Tutorial
Ball whistle, step by step
A real, printable ball whistle, designed from scratch on a phone held upright: sketch, extrusion, cavity, ring, ball, then slicing and G-code. Each step shows what to tap, circled in orange. Allow about twenty minutes.
All the steps are listed below.
Step 1 / 37
Open TouchFab3D
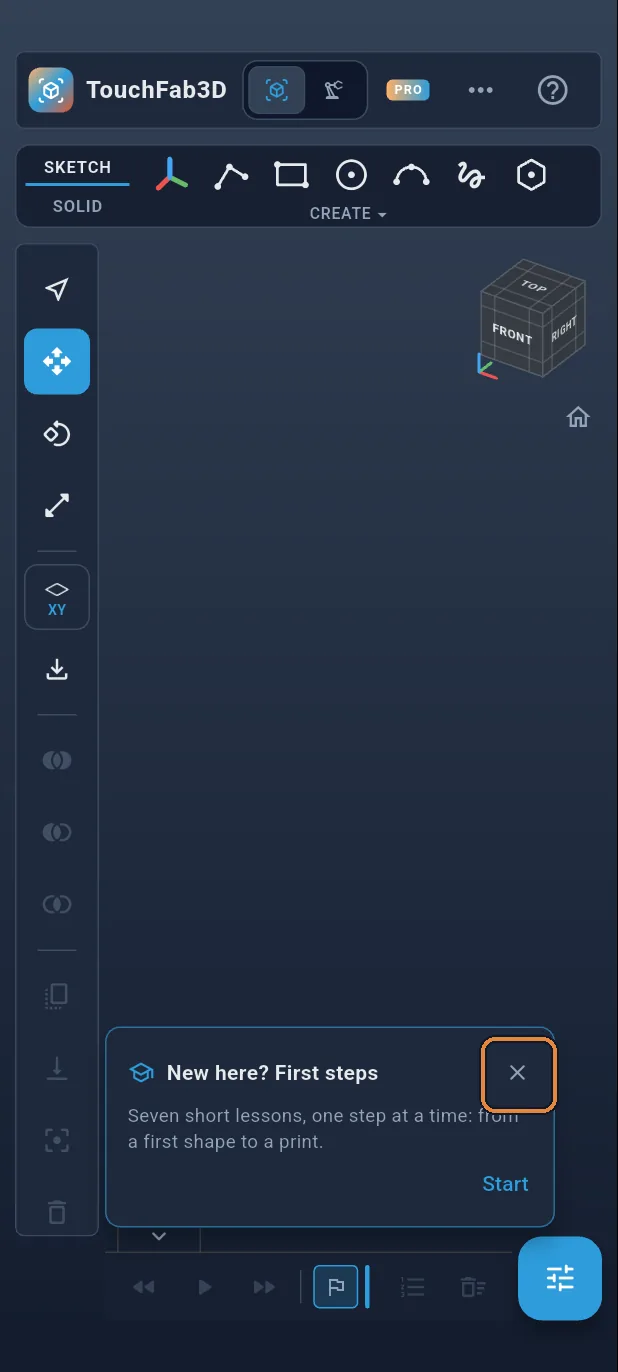
Open the app. A blank page appears with the “New here? First steps” card: close it with the cross.
Step 2 / 37
A sketch on the ground
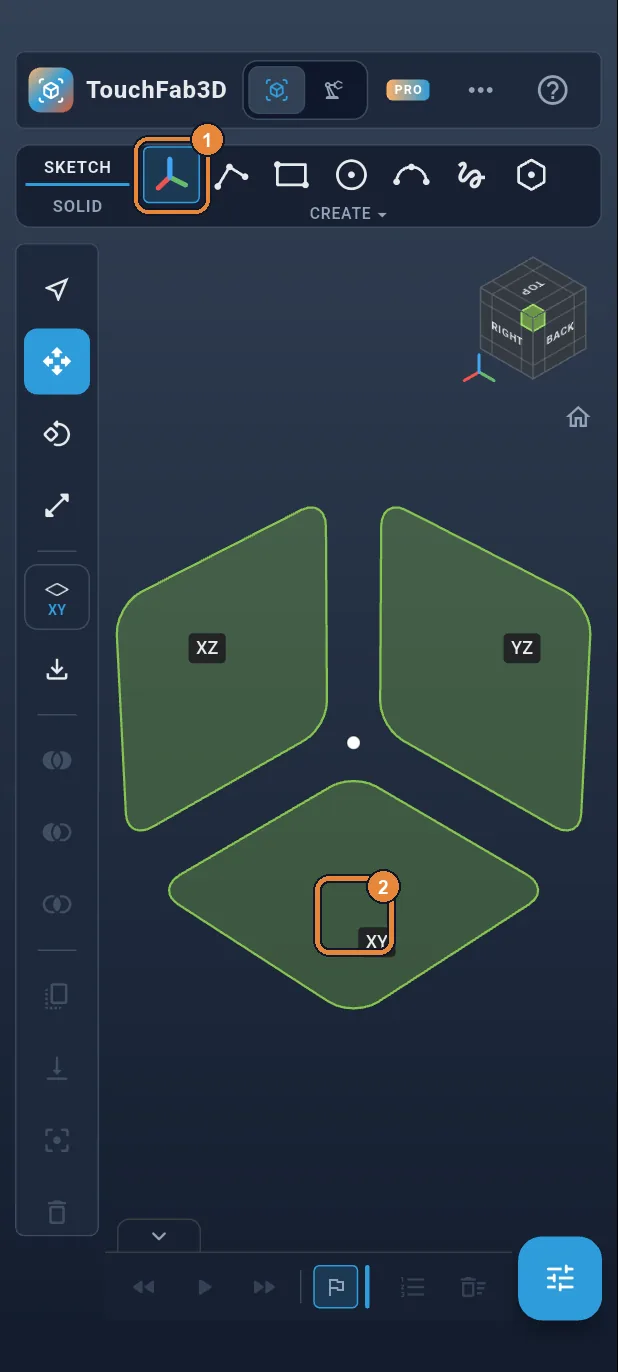
In the SKETCH tab, tap Plane ①, the first icon in the ribbon. The three origin planes appear: tap the XY square ②, the ground plane. The view flattens out, seen from above.
Step 3 / 37
The mouthpiece: a rectangle
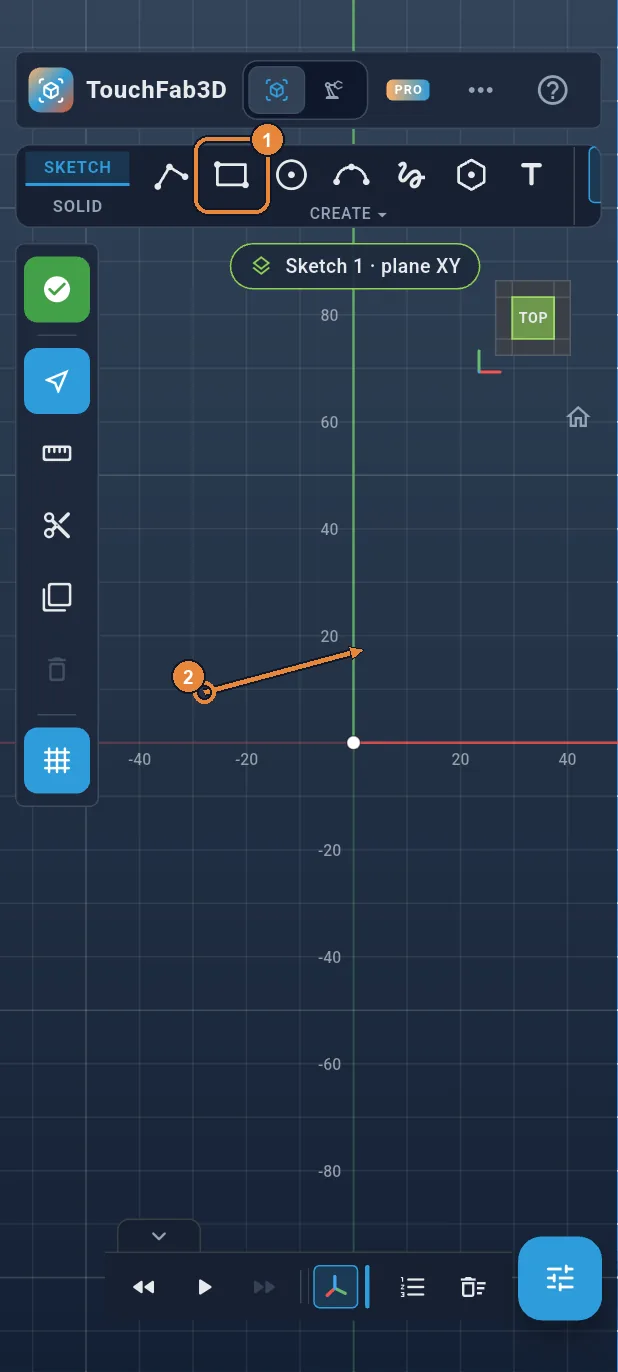
Tap Rectangle ①. Put your finger to the left of the origin (where the red and green axes cross) and drag diagonally ②: an elongated rectangle follows your finger. No need to be precise, you type the dimensions next.
Step 4 / 37
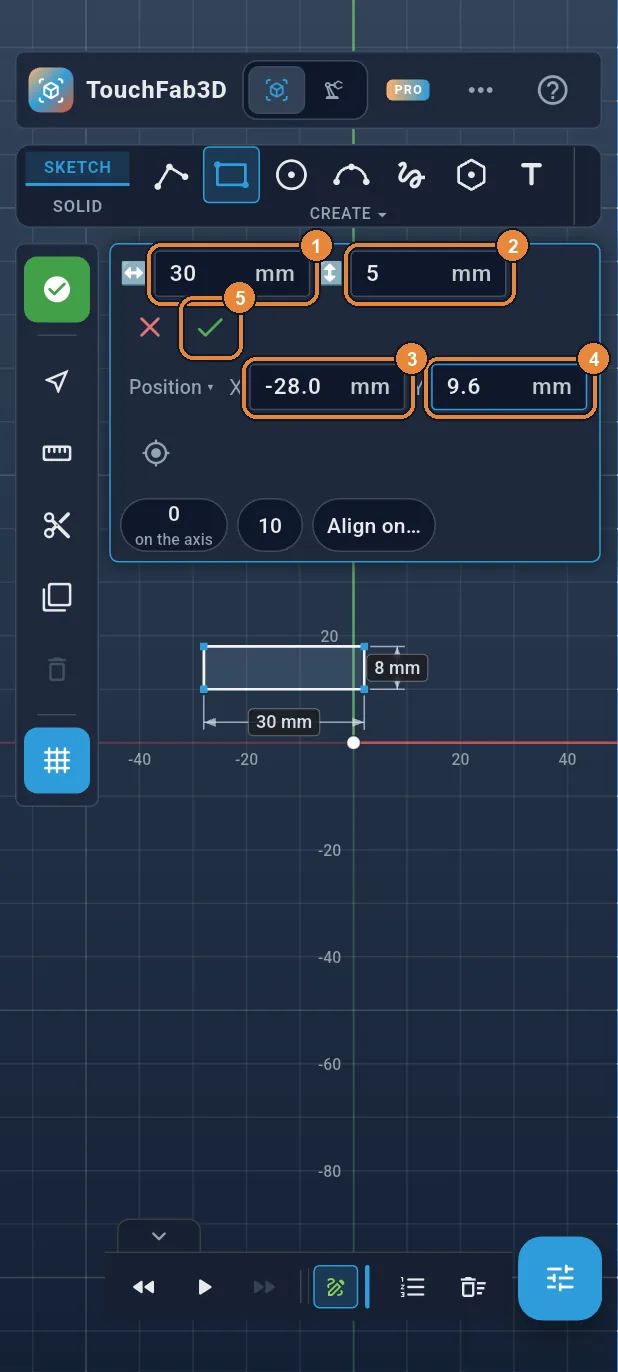
Its dimensions: 30 × 5 mm, at (−28, 9.6)
A dimension box opens at the top. Type 30 in the width ① and 5 in the height ②. Tap the Position line: type −28 in X ③ and 9.6 in Y ④ (the rectangle's bottom-left corner), then ✓ ⑤.
Step 5 / 37
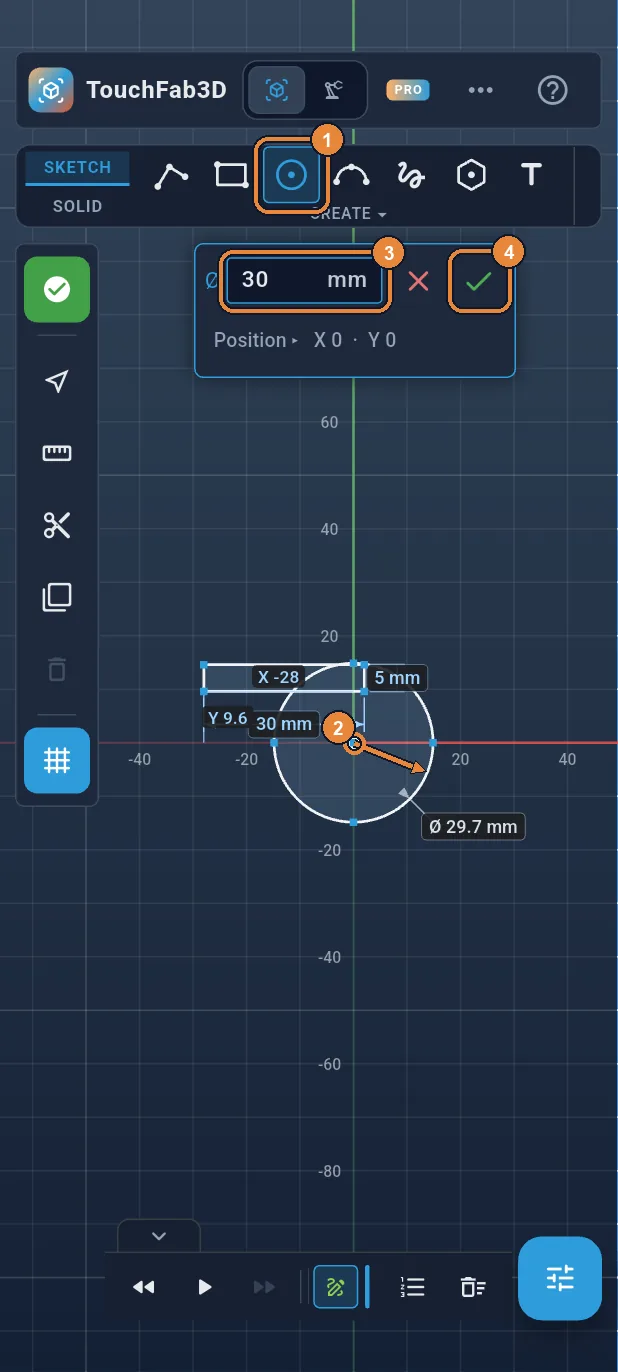
The body: a Ø 30 circle
Tap Circle ①, put your finger on the origin and drag outwards ②: the center snaps to the origin. Type 30 in Ø ③, then ✓ ④. The outline of the whistle is drawn.
Step 6 / 37
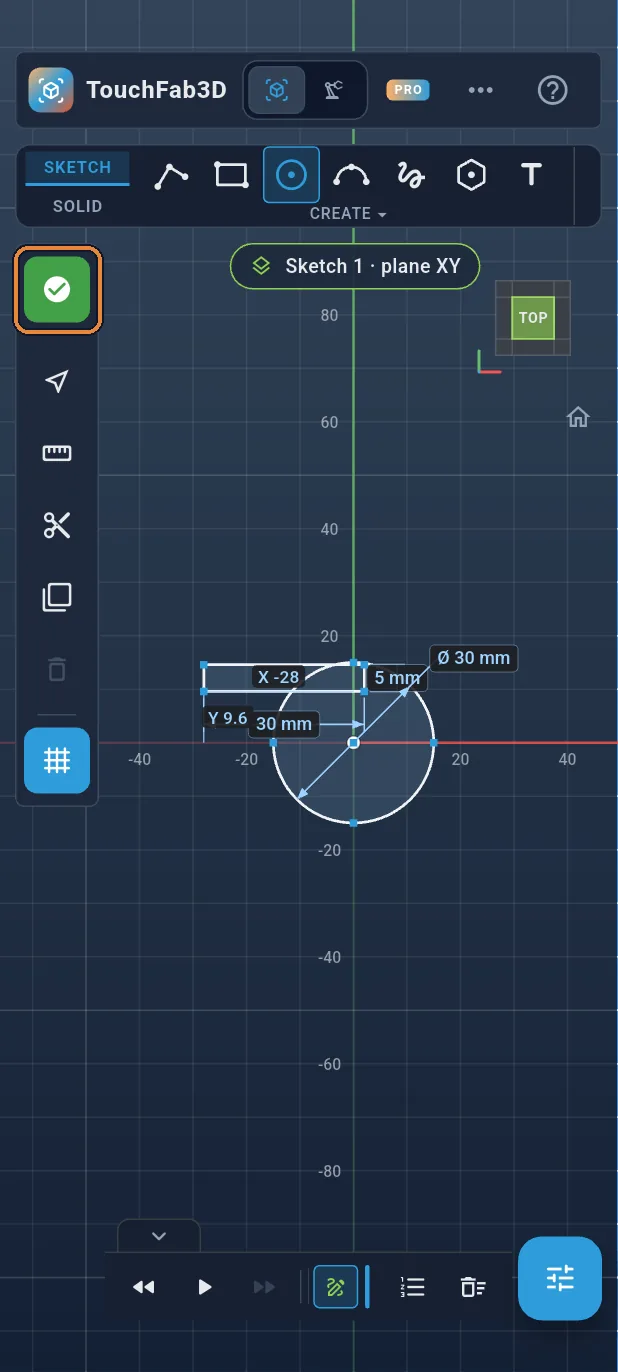
Finish the sketch
Tap the green ✓ at the top of the left bar: the sketch is finished and the ribbon switches to the SOLID tab.
Step 7 / 37
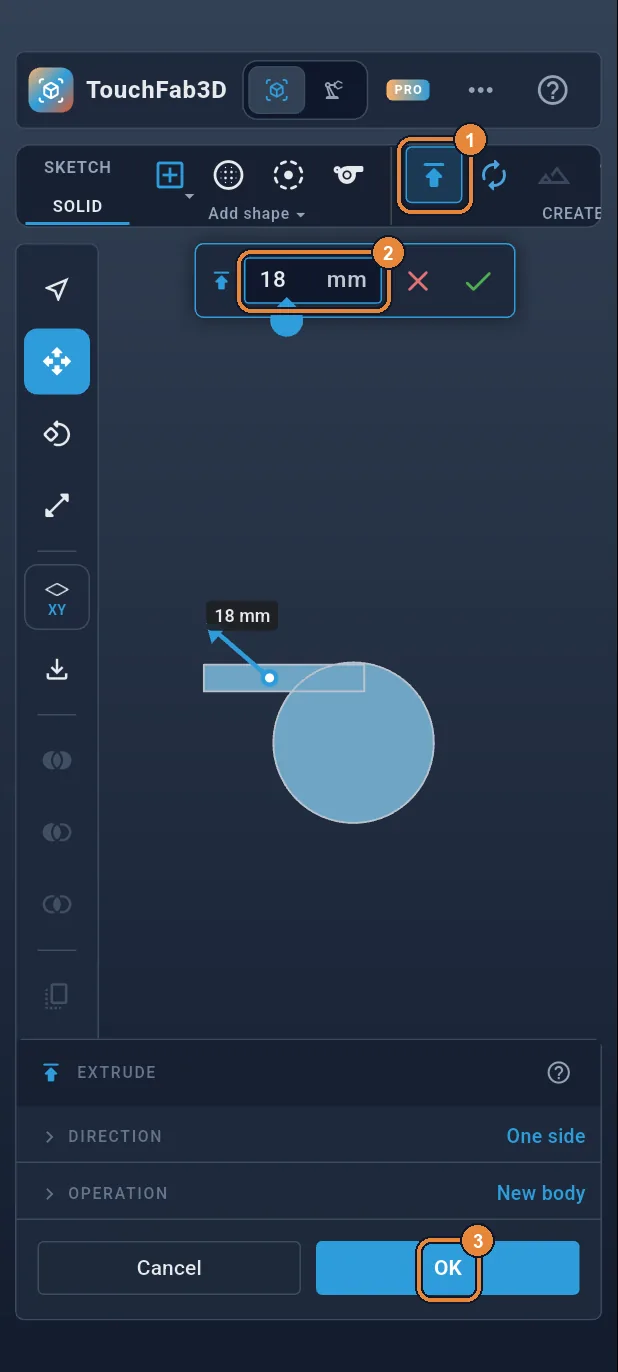
Extrude by 18 mm
Tap Extrude ①. The mouthpiece and the body are selected automatically. Type 18 in the distance box ②, then OK ③: the whistle body rises in one piece.
Step 8 / 37
Raise the work plane
The cavity will be cut above a 1.6 mm floor. Tap the plane button (XY) in the left bar ①, then Offset (mm) ②.
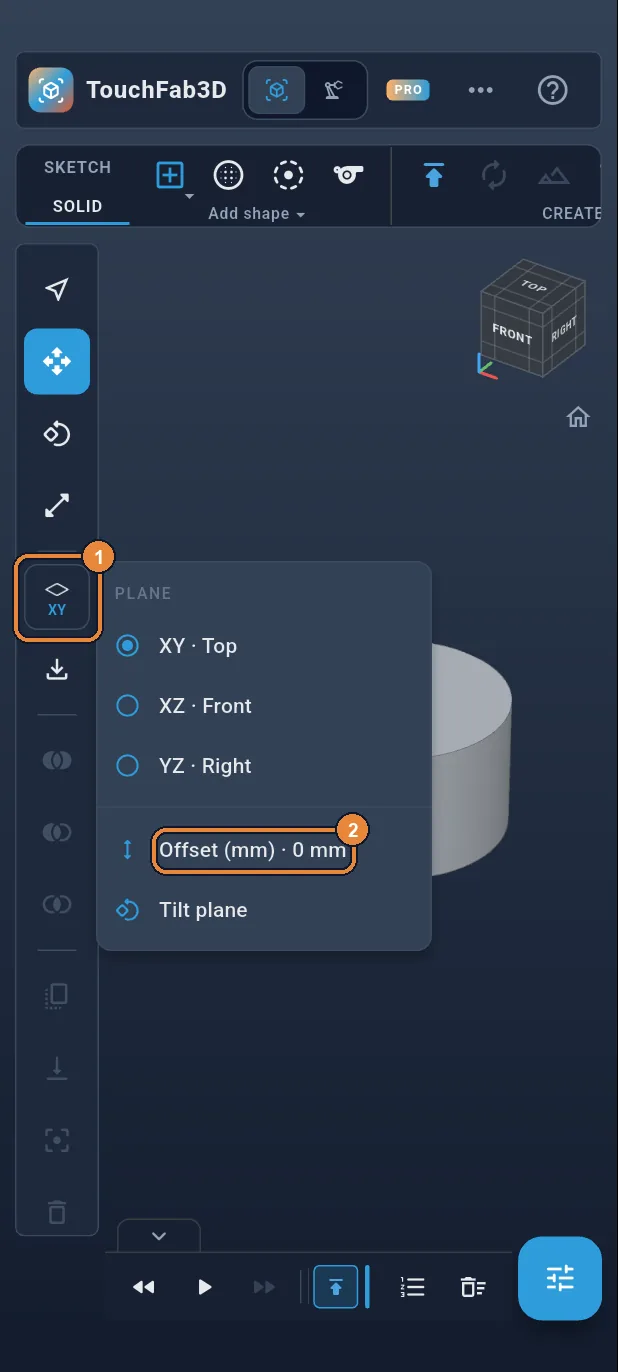
Step 9 / 37
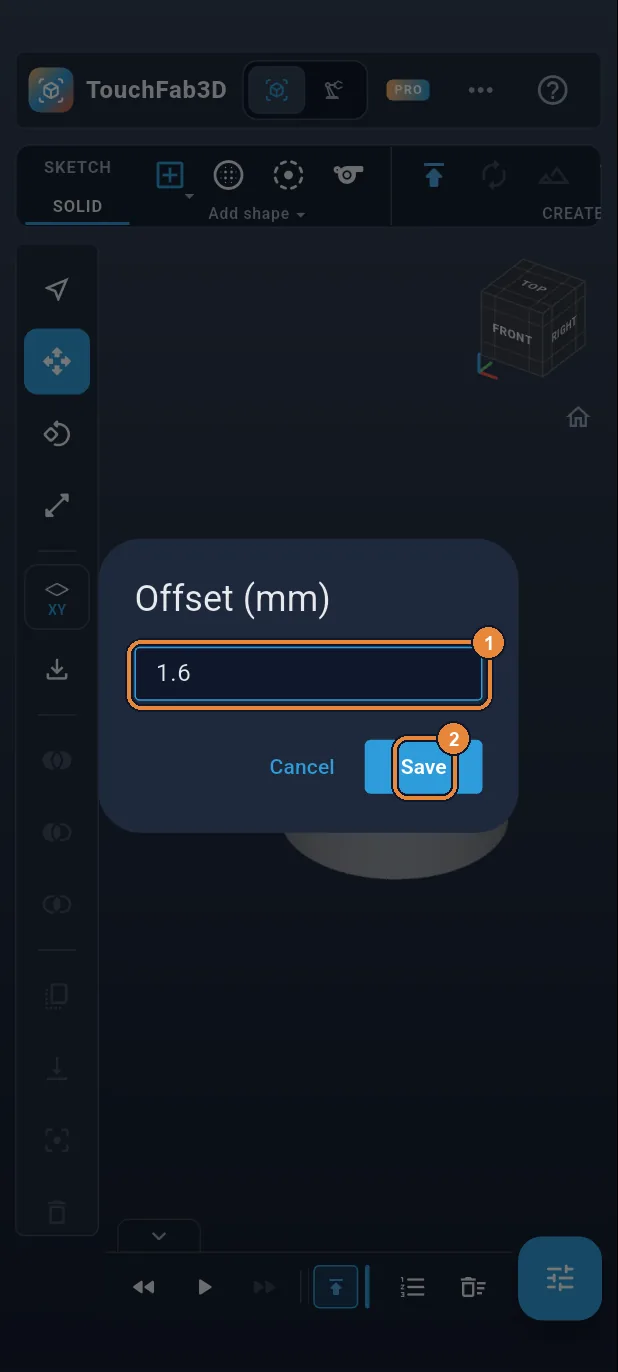
An offset of 1.6 mm
Type 1.6 ① then Save ②. The XY plane now sits 1.6 mm above the ground: that will be the thickness of the floor.
Step 10 / 37
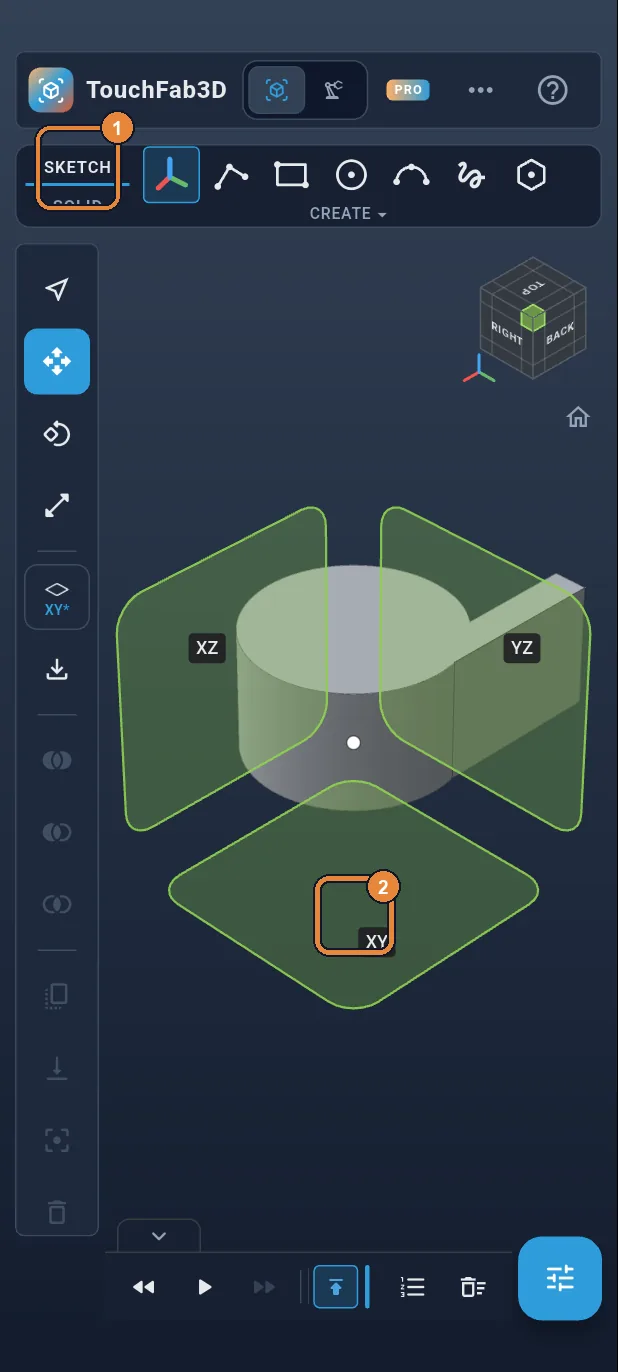
Second sketch
Tap the SKETCH tab ①: the planes appear, with XY above the floor. Tap the XY square ②.
Step 11 / 37
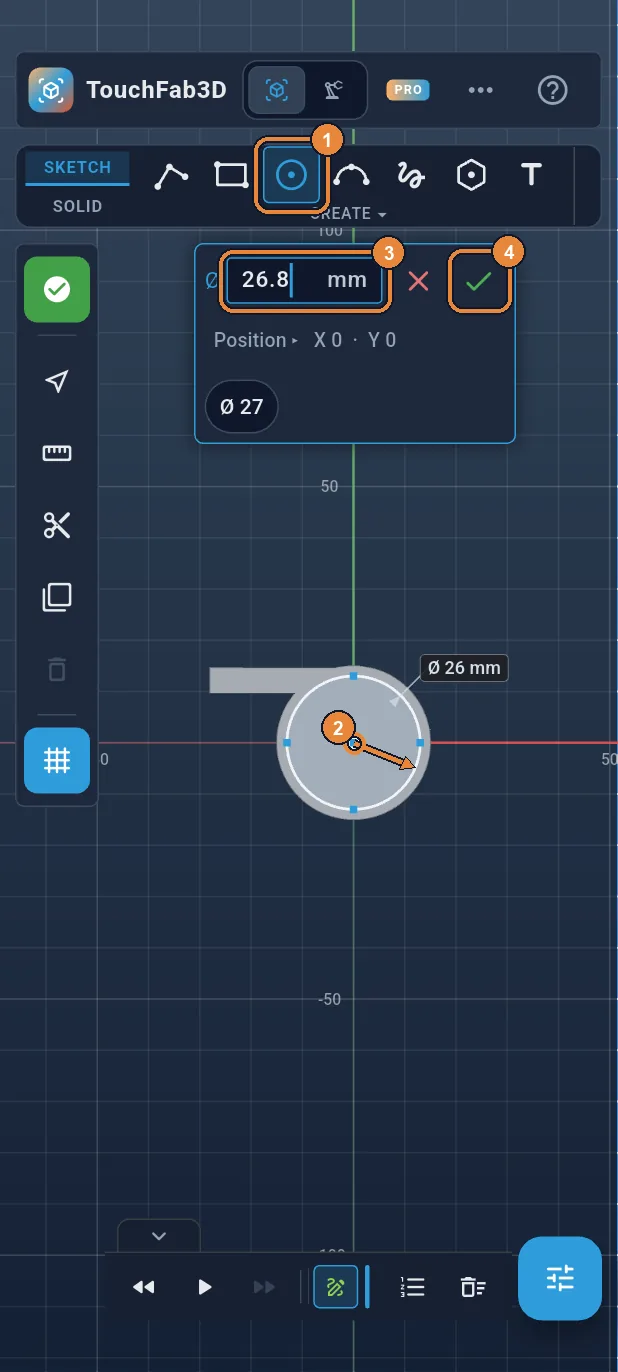
The cavity: a Ø 26.8 circle
Tap Circle ①, drag from the origin ②, type 26.8 in Ø ③ then ✓ ④. That leaves a 1.6 mm wall all around.
Step 12 / 37
The windway: a thin rectangle
Tap Rectangle ① and draw a rectangle along the mouthpiece ②, from its tip into the body. This is the windway the air flows through.
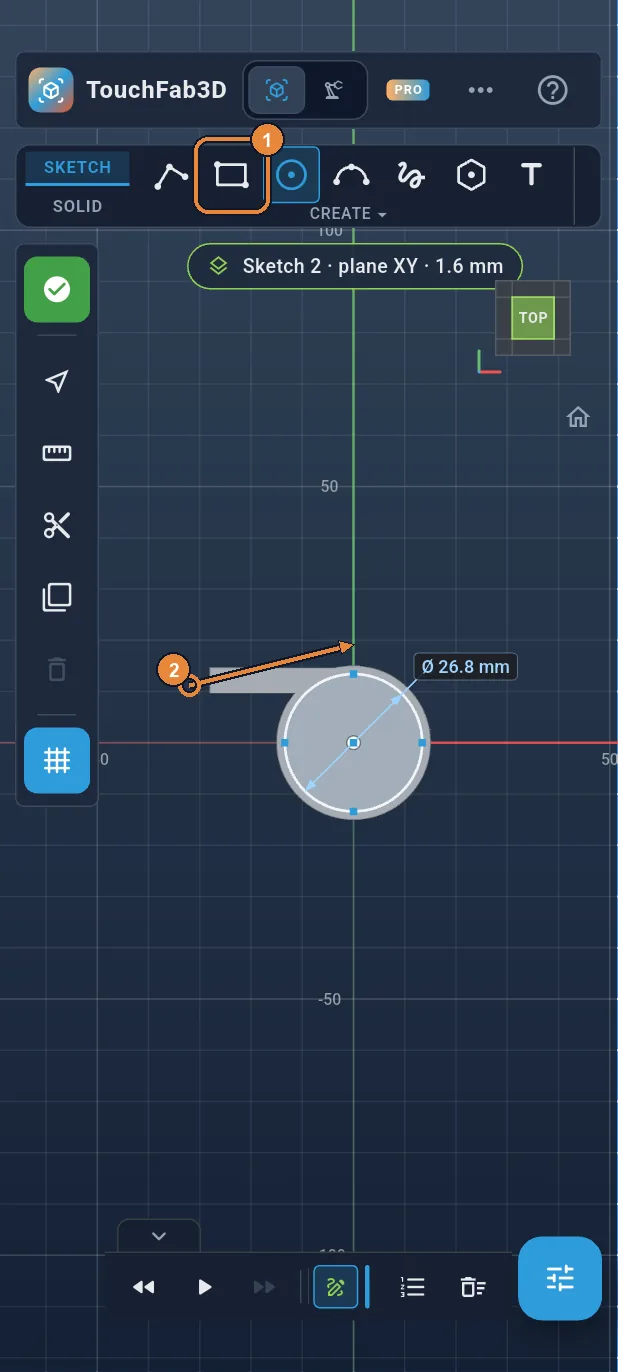
Step 13 / 37
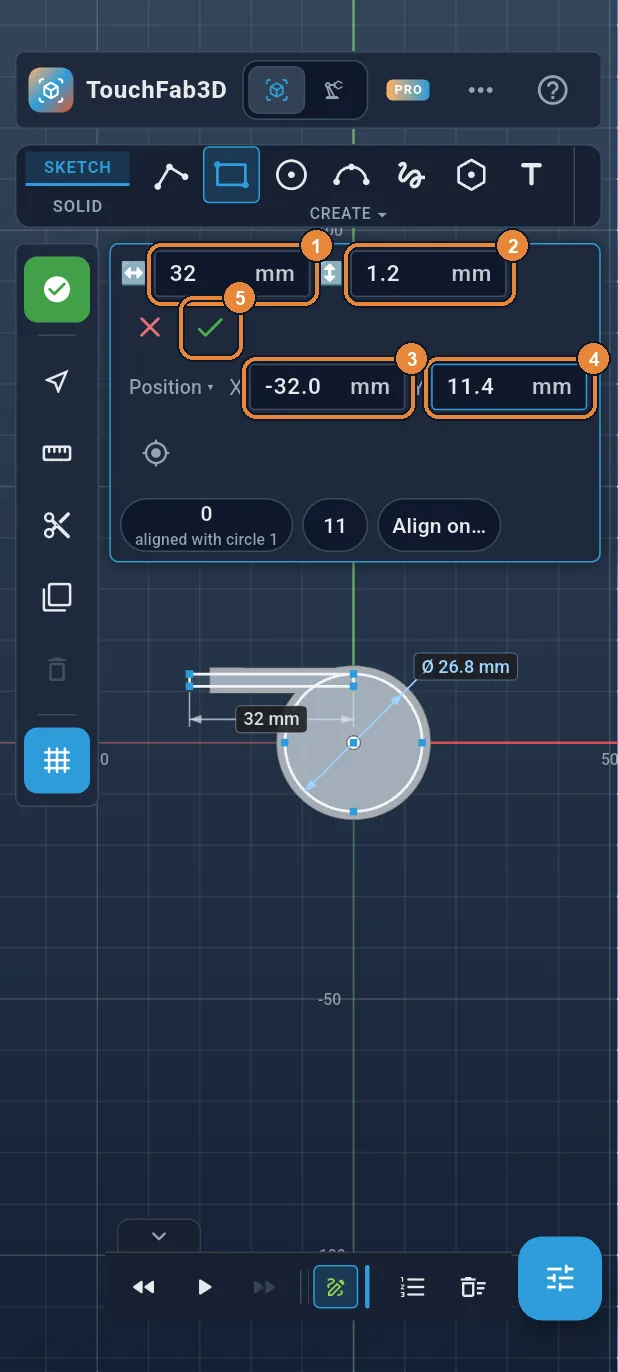
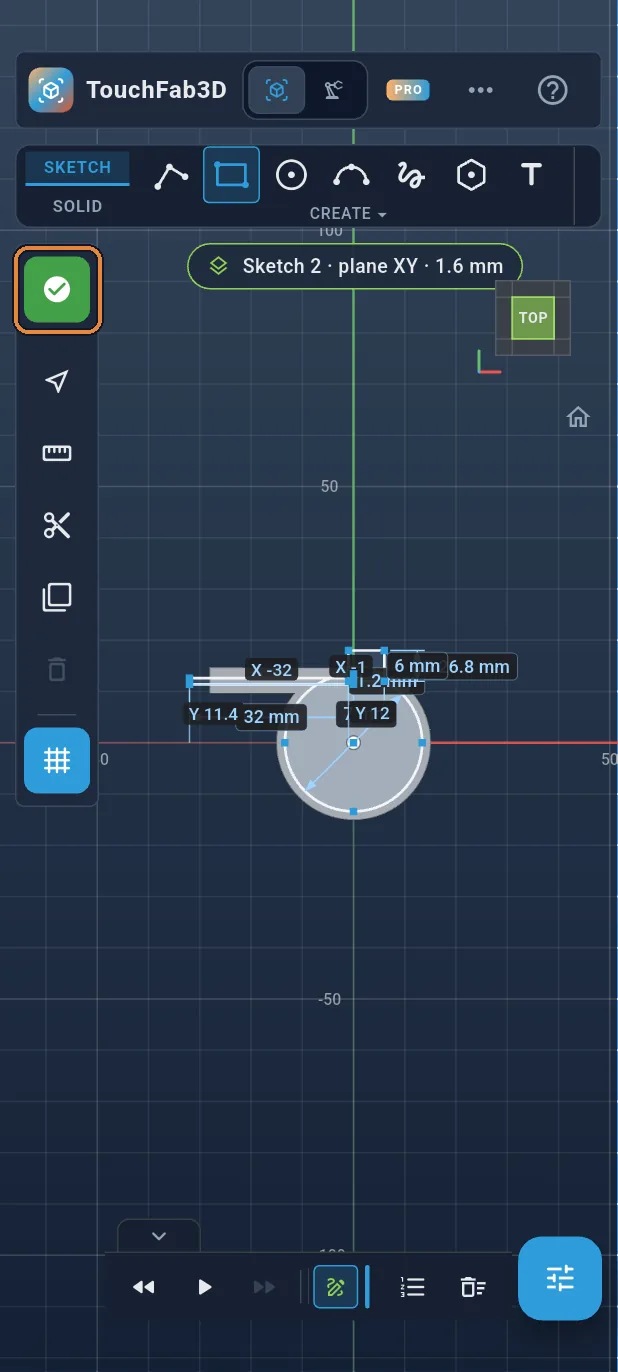
Windway: 32 × 1.2 mm, at (−32, 11.4)
Type 32 in the width ① and 1.2 in the height ②. Tap Position, type −32 in X ③ and 11.4 in Y ④, then ✓ ⑤. The windway sticks out slightly past the mouthpiece: it opens at the tip.
Step 14 / 37
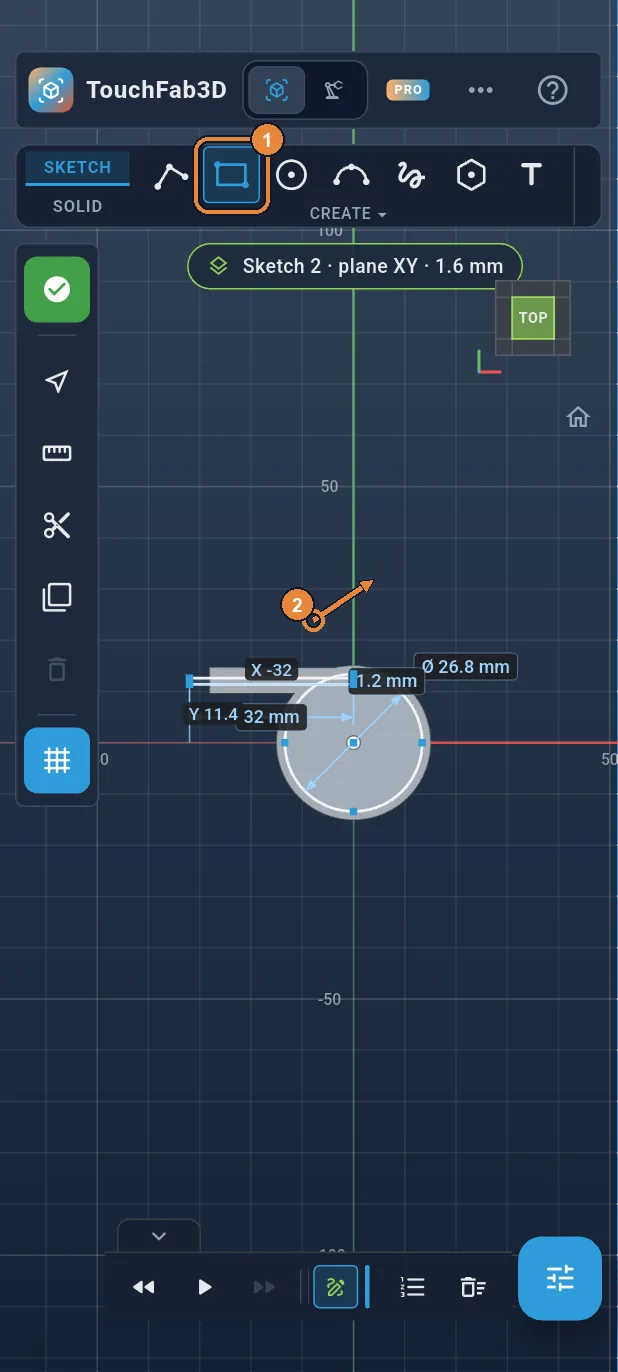
The window: another rectangle
Rectangle is still selected ①. Draw a small rectangle in an empty area above the whistle ②: a finger placed on a line that is already drawn would pick that line instead of drawing.
Step 15 / 37
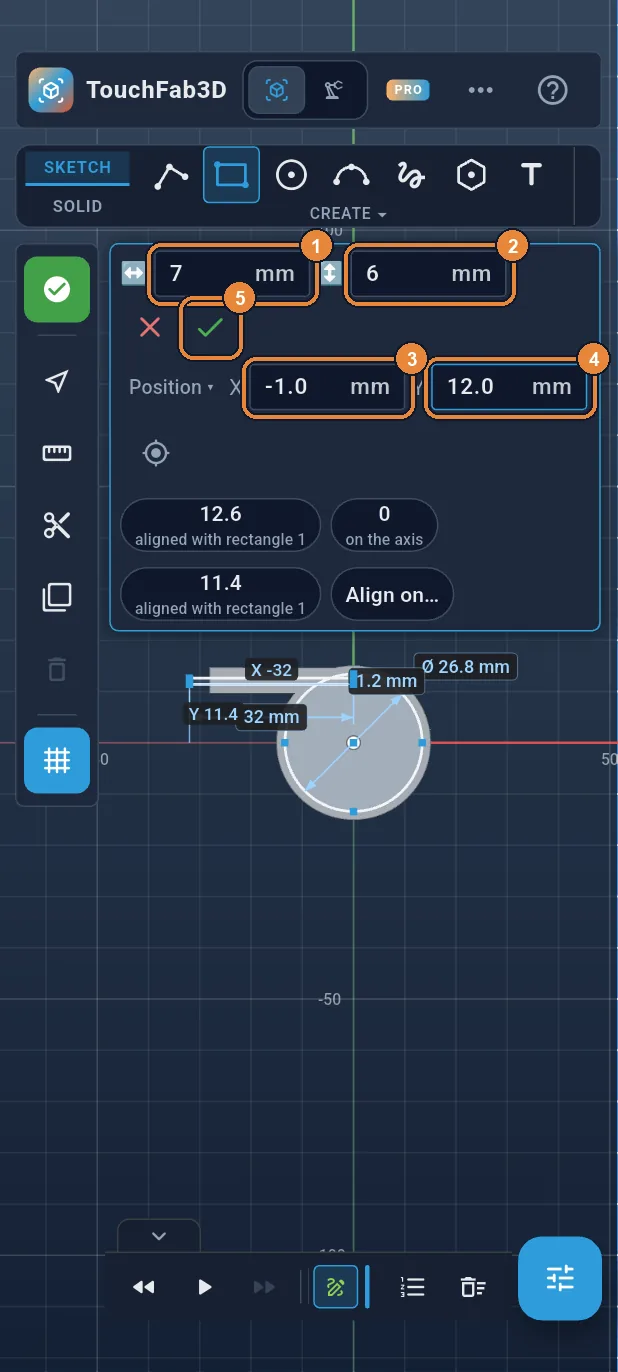
Window: 7 × 6 mm, at (−1, 12)
Type 7 in the width ① and 6 in the height ②. Tap Position, type −1 in X ③ and 12 in Y ④, then ✓ ⑤. The rectangle lands at the end of the windway and opens the wall: this is where the air escapes and the whistle sings.
Step 16 / 37
Finish the sketch
Tap the green ✓ in the left bar.
Step 17 / 37
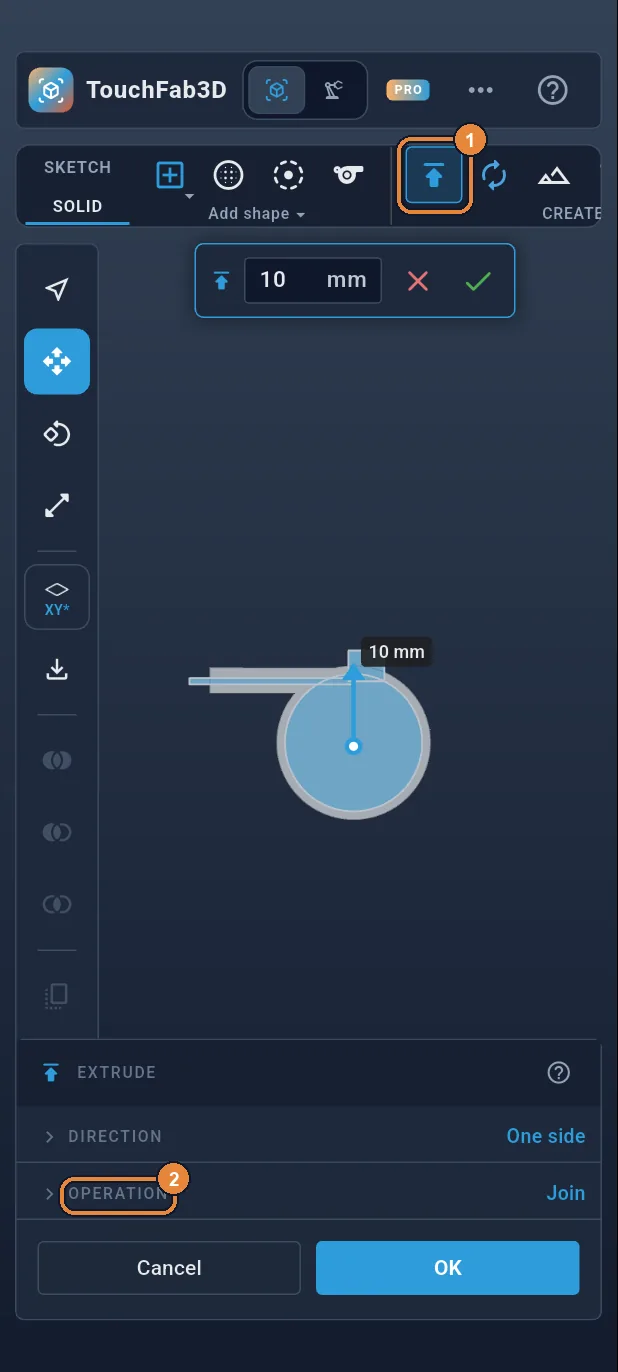
Extrude… to hollow out
Tap Extrude ①. In the bottom panel, tap OPERATION ② to see the choices.
Step 18 / 37
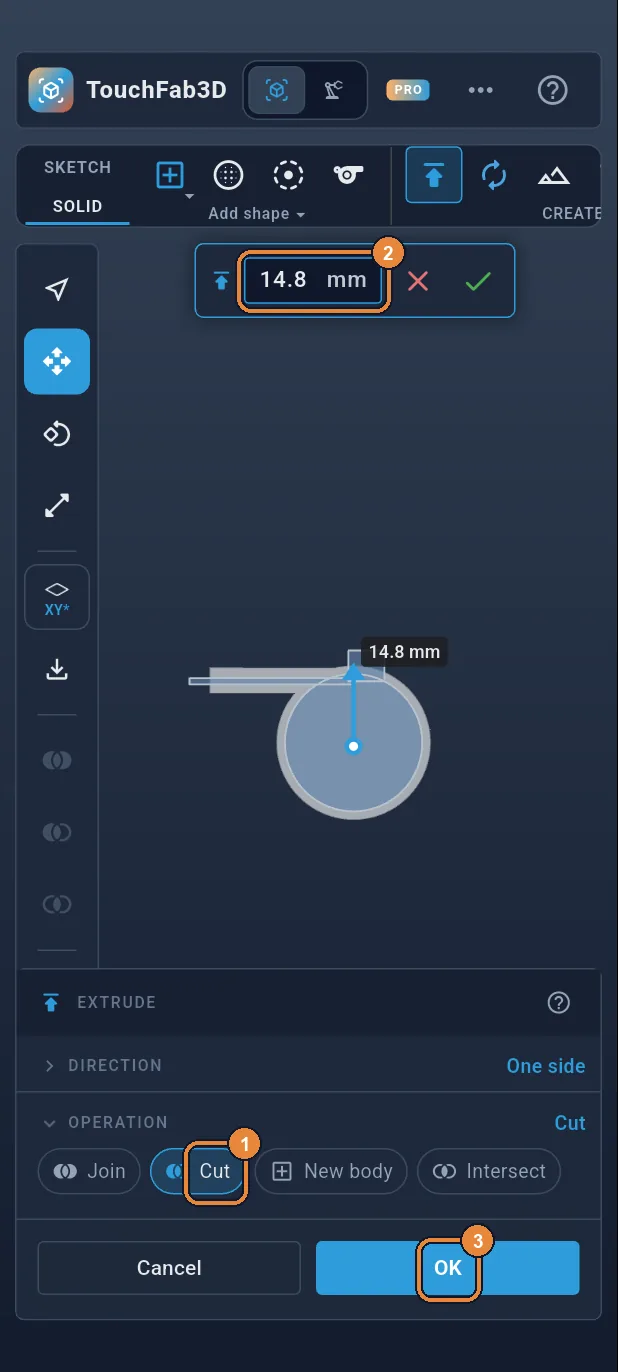
Cut 14.8 mm deep
Tap Cut ①, type 14.8 in the distance ② then OK ③. The cavity, the windway and the window are hollowed out, leaving a 1.6 mm ceiling.
Step 19 / 37
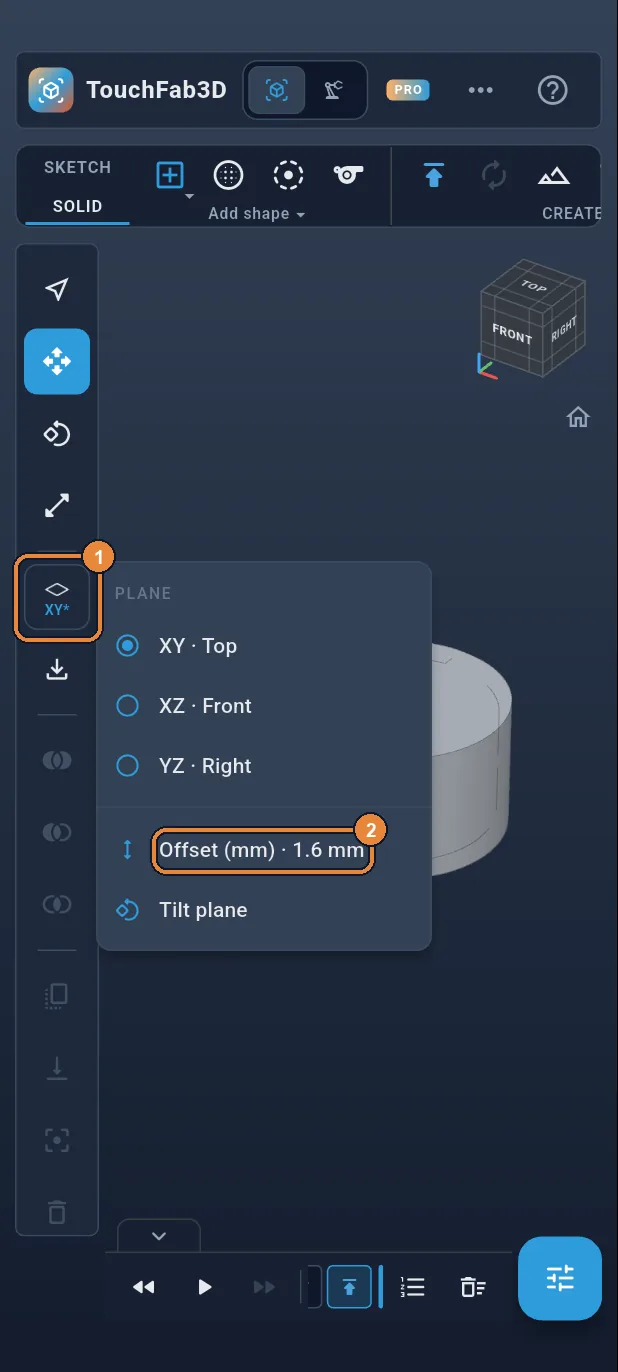
Lower the plane again
The attachment ring sits on the ground. Tap the plane button ① then Offset (mm) ②.
Step 20 / 37
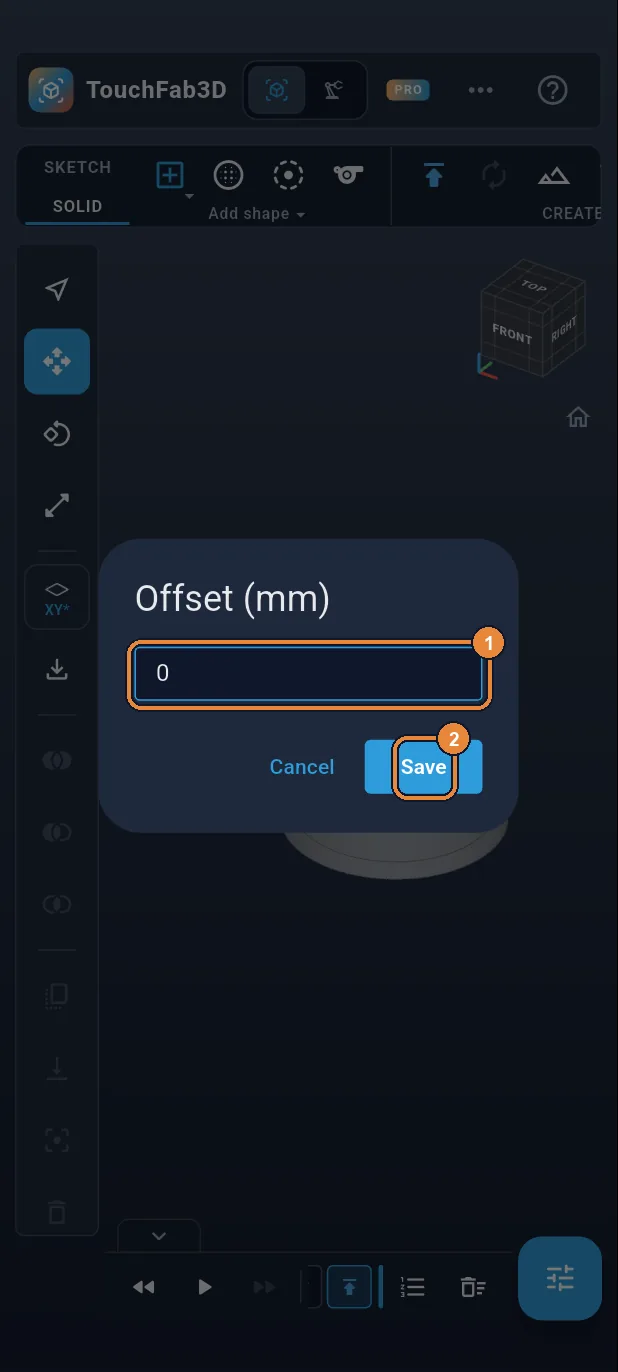
An offset of 0
Type 0 ① then Save ②.
Step 21 / 37
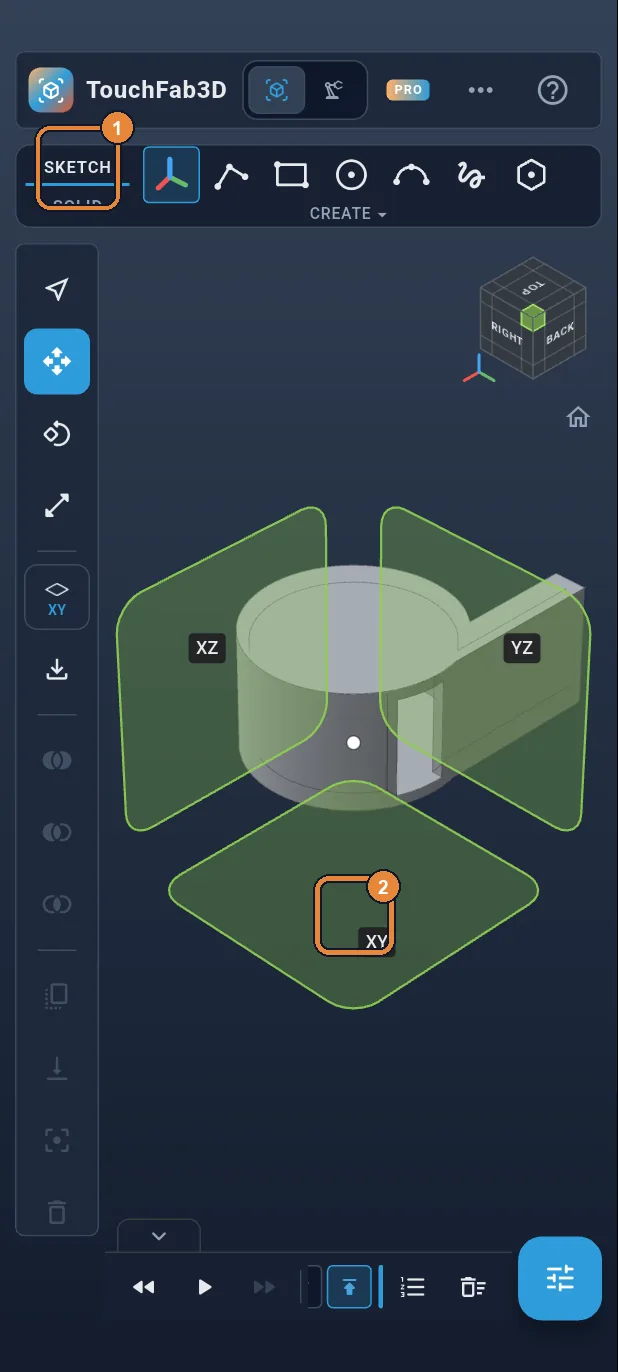
Third sketch
Tap the SKETCH tab ①, then the XY square ②.
Step 22 / 37
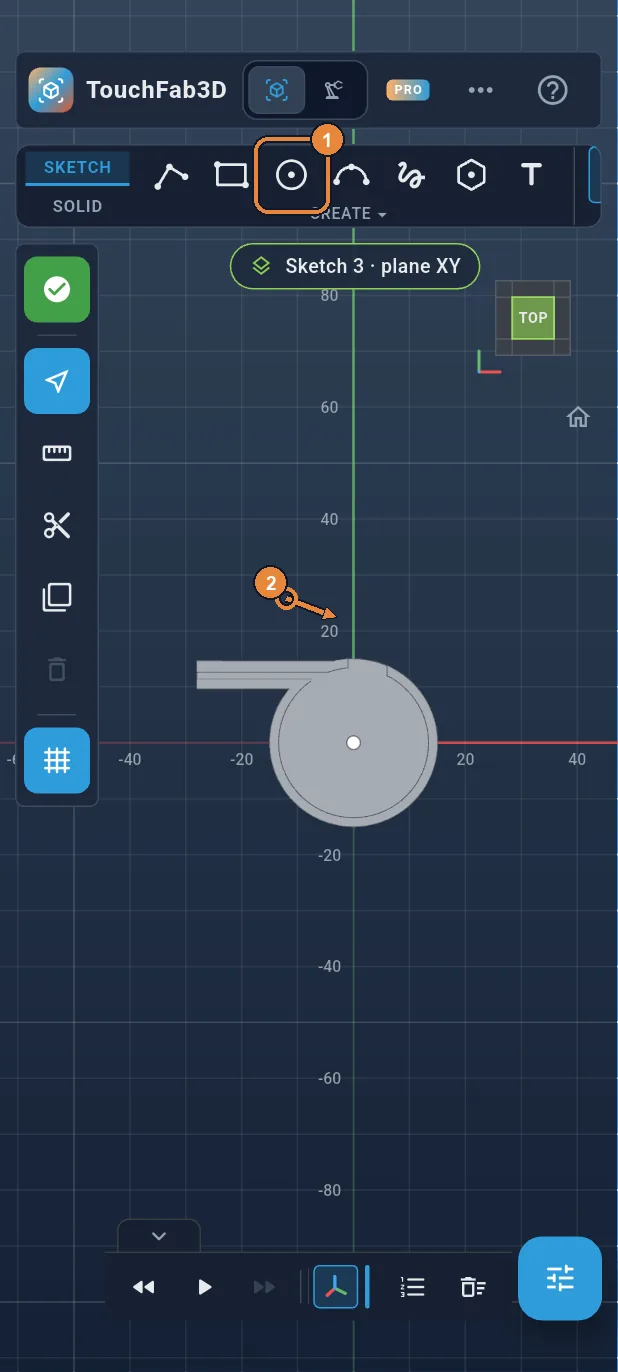
The ring: a circle
Tap Circle ① and draw a circle in an empty area above the whistle ②: you type its exact position next.
Step 23 / 37
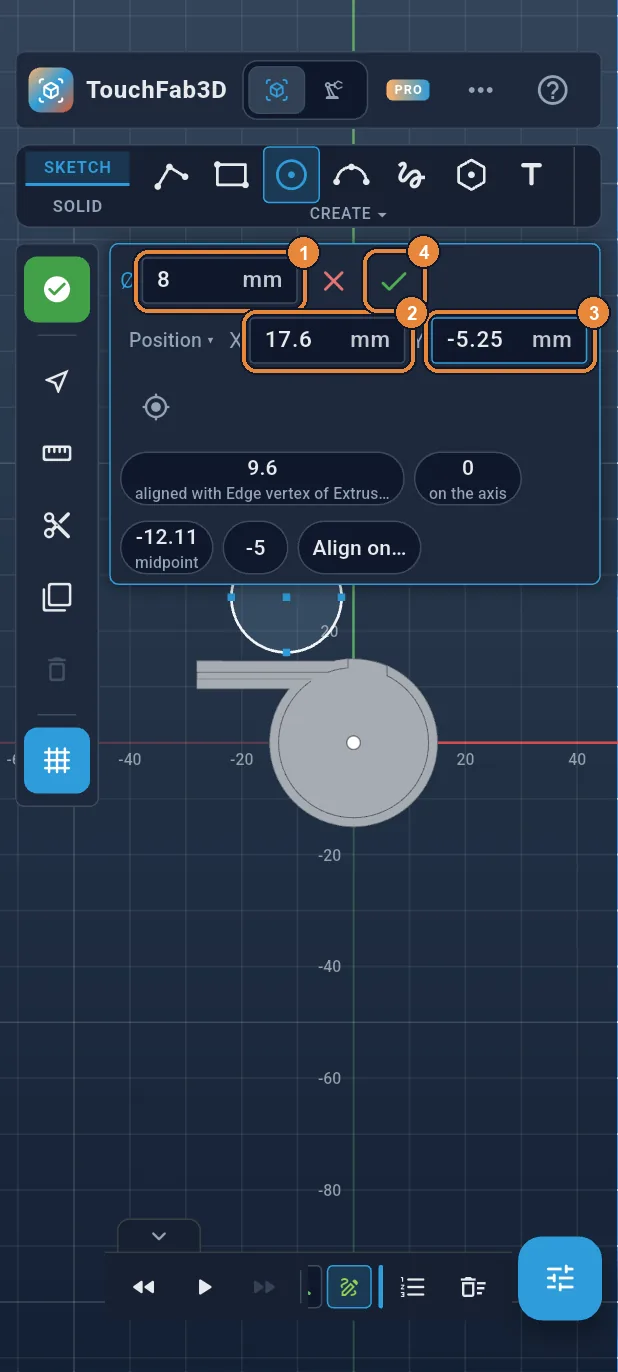
Ring: Ø 8 at (17.6, −5.25)
Type 8 in Ø ①. Tap Position, type 17.6 in X ② and −5.25 in Y ③, then ✓ ④.
Step 24 / 37
The ring's hole
Circle is still selected ①. Draw a second circle in an empty area ②.
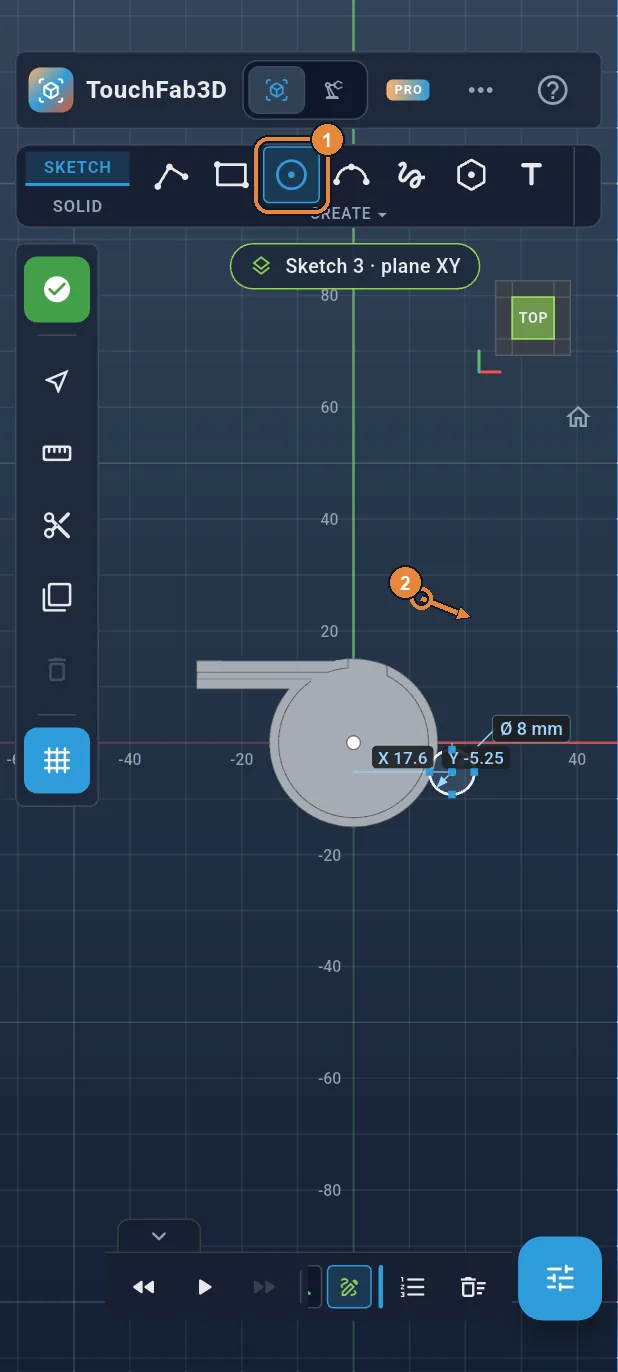
Step 25 / 37
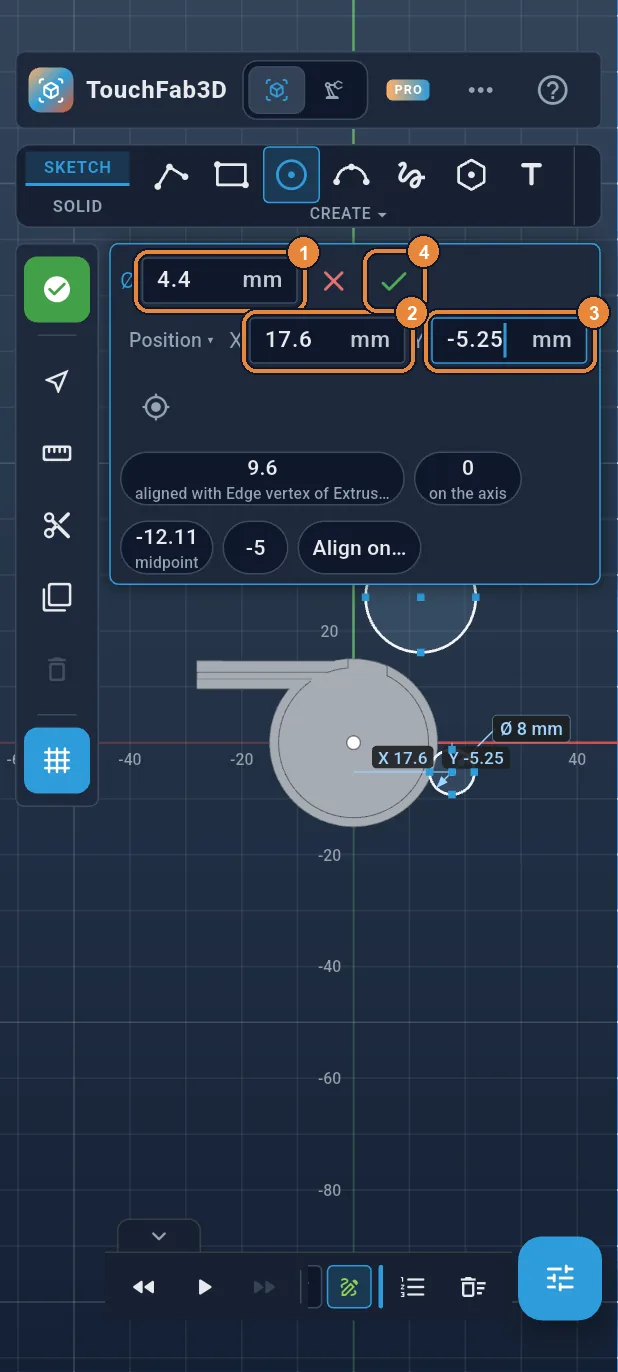
Hole: Ø 4.4, same center
Type 4.4 in Ø ①. Tap Position, type 17.6 in X ② and −5.25 in Y ③, then ✓ ④: the circle moves to the center of the ring.
Step 26 / 37
Finish the sketch
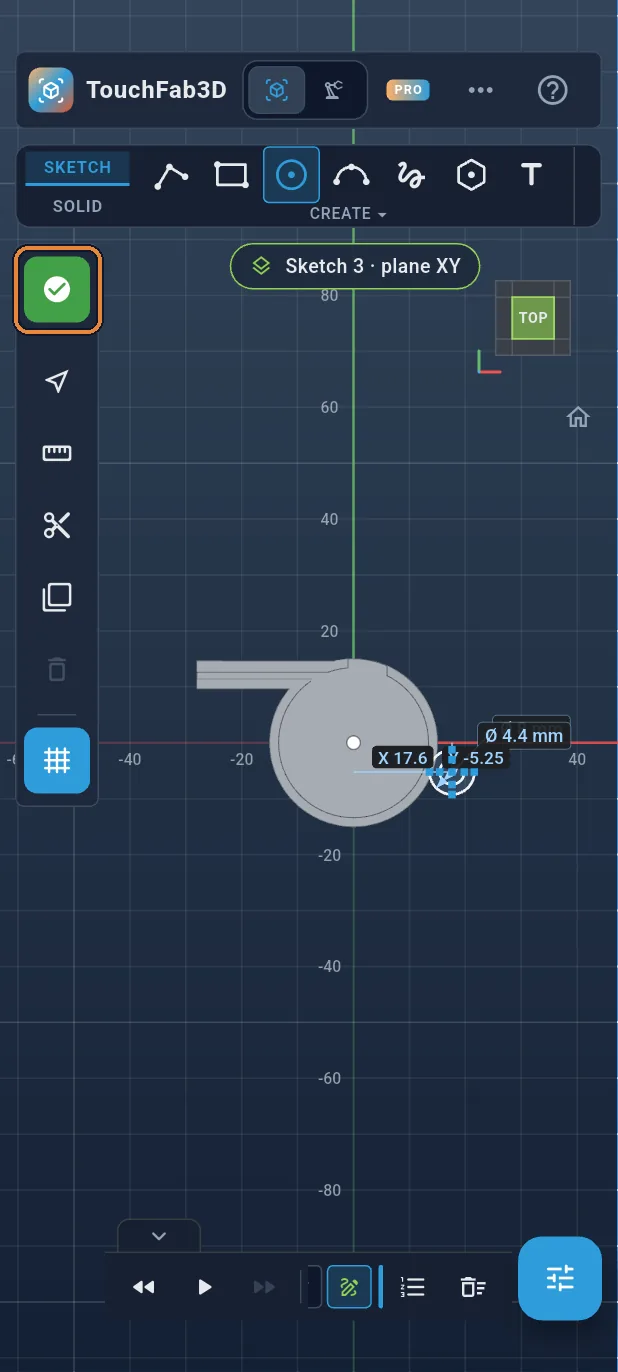
Tap the green ✓ in the left bar.
Step 27 / 37
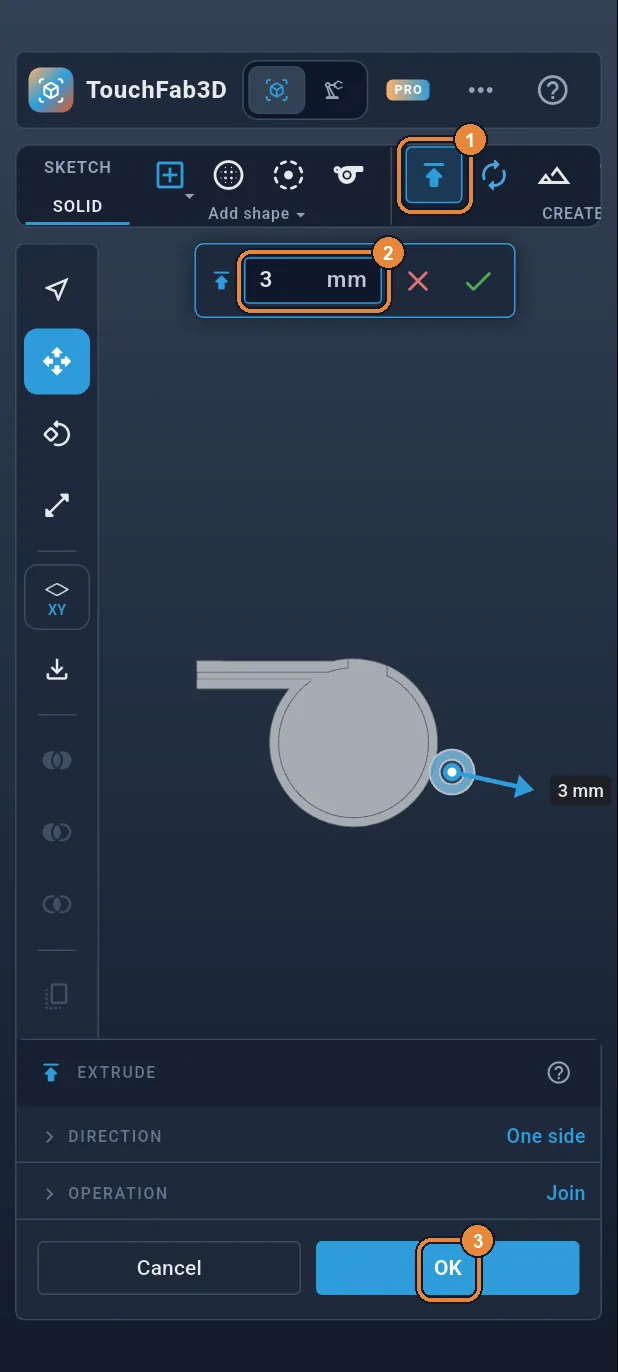
Extrude the ring by 3 mm
Tap Extrude ①, type 3 ② then OK ③. Only the ring is selected automatically (the hole's disc stays empty), and it fuses with the whistle.
Step 28 / 37
The ball: a sphere
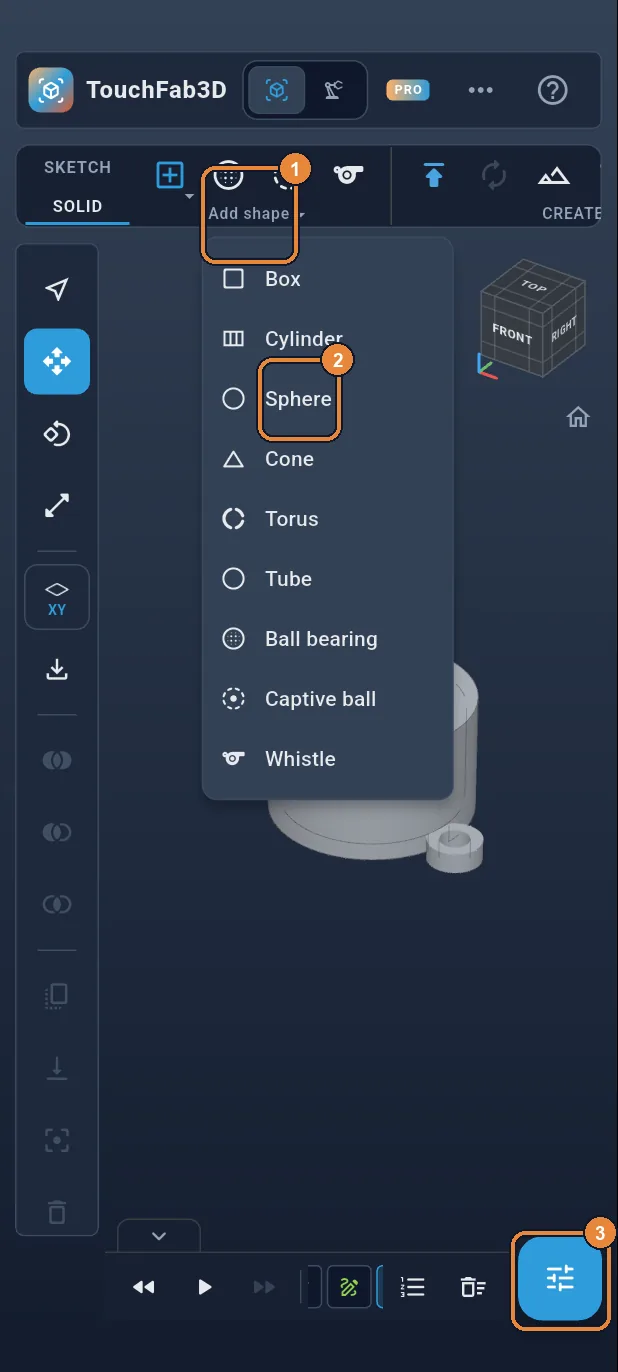
Tap “Add shape ▾” in the ribbon ①, then Sphere ②. The sphere is added and selected: tap the panels button at the bottom right ③ to open its properties.
Step 29 / 37
Ø 8, sitting in the body
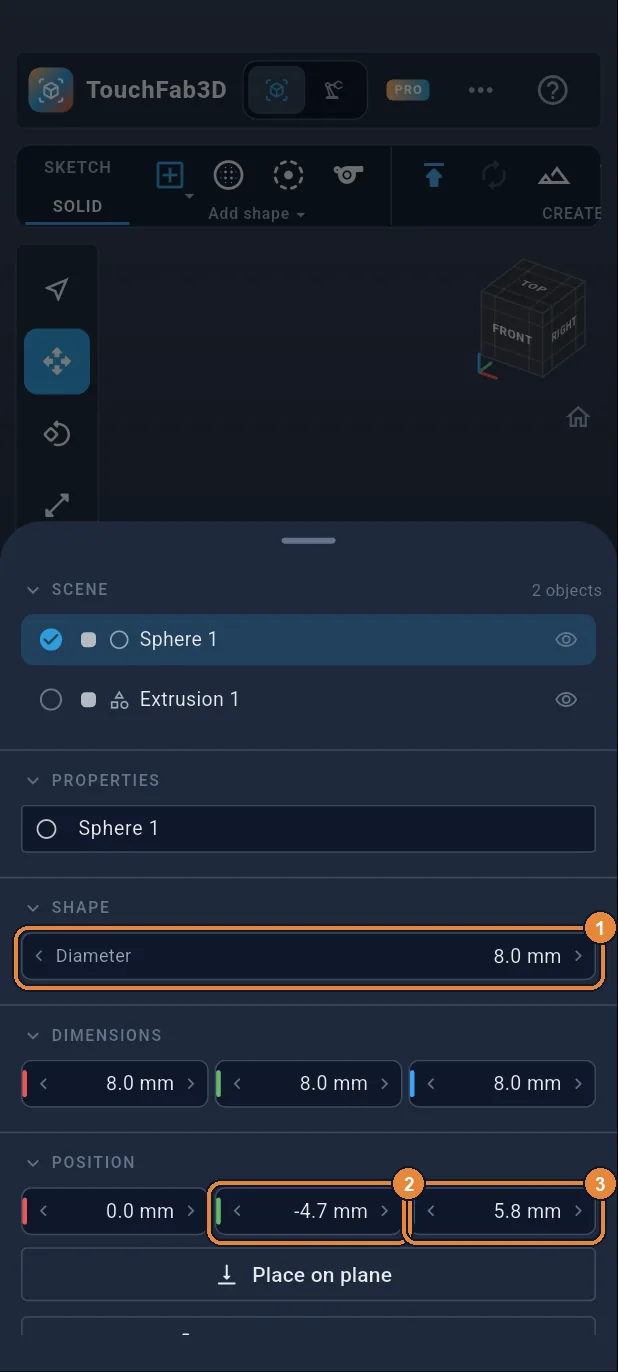
Tap Diameter and type 8 ①. Under POSITION, type −4.7 for Y ② and 5.8 for Z ③. The ball floats 0.2 mm above the floor: printed inside the body, it stays trapped there. Swipe the sheet down to close it.
Step 30 / 37
Switch to Manufacture
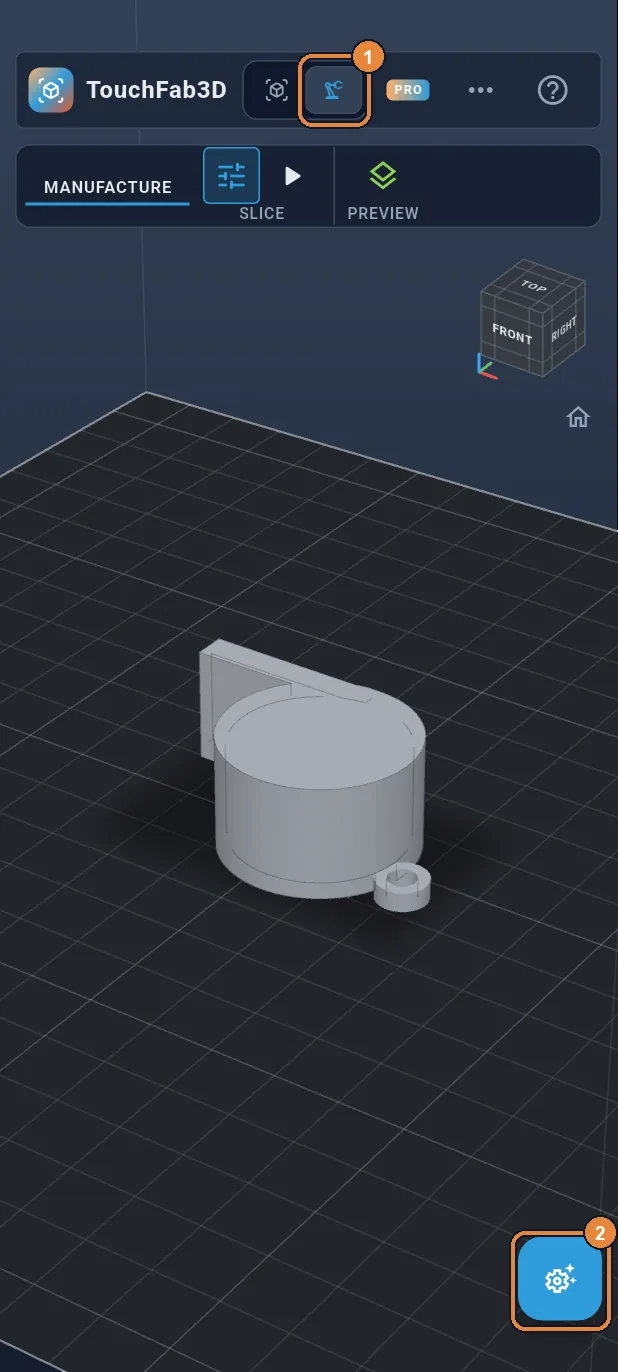
The whistle is finished. Tap Manufacture at the top ①, then the panels button ②.
Step 31 / 37
Choose your printer
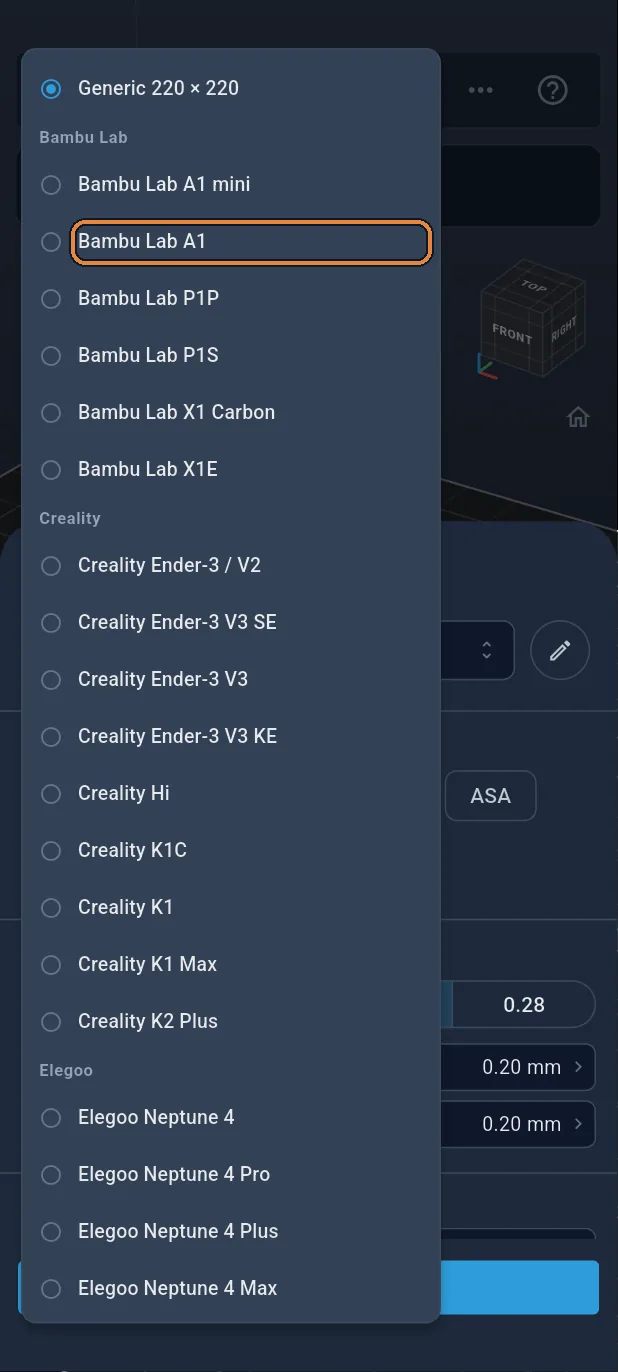
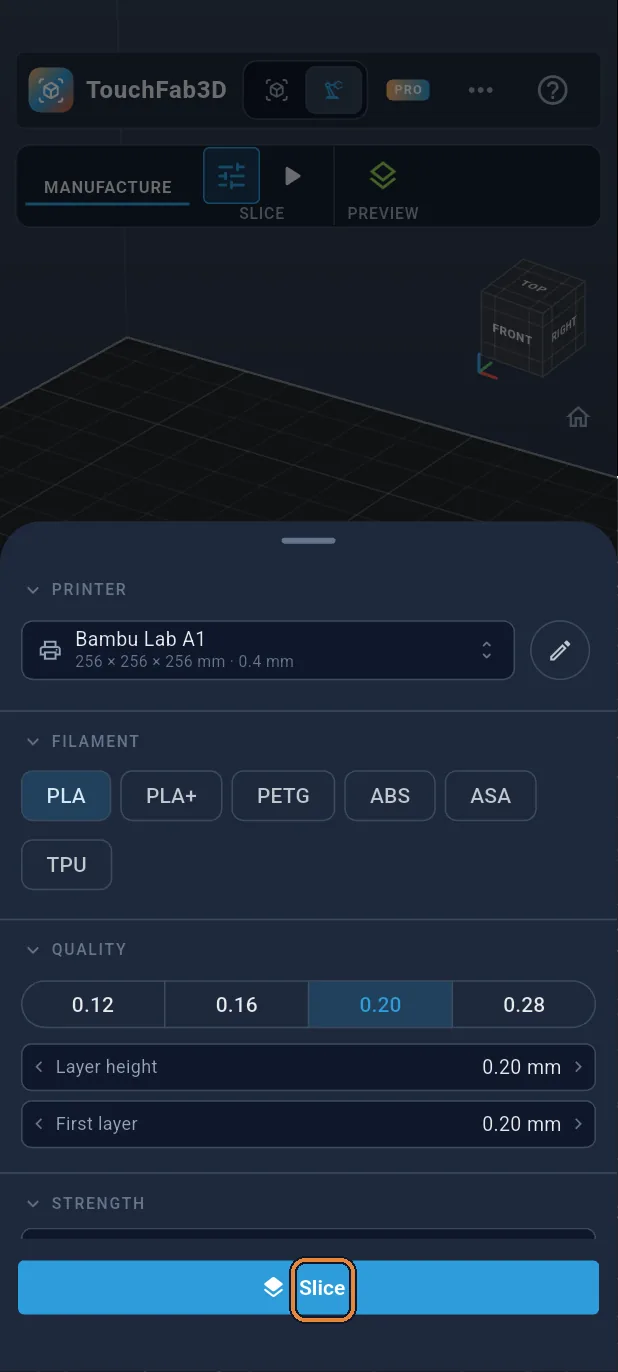
Tap the printer (Generic 220 × 220) in the sheet, then yours in the list, here Bambu Lab A1.
Step 32 / 37
Slice
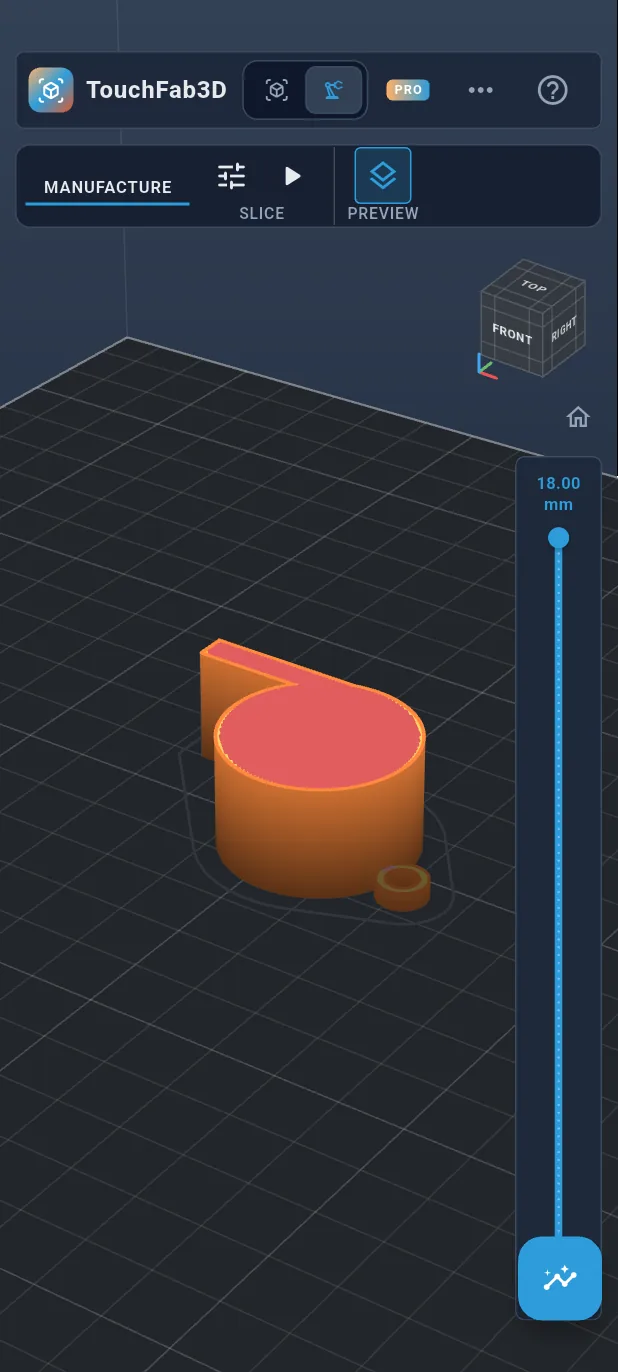
Tap Slice: the whistle is cut into 0.2 mm layers, then the preview appears.
Step 33 / 37
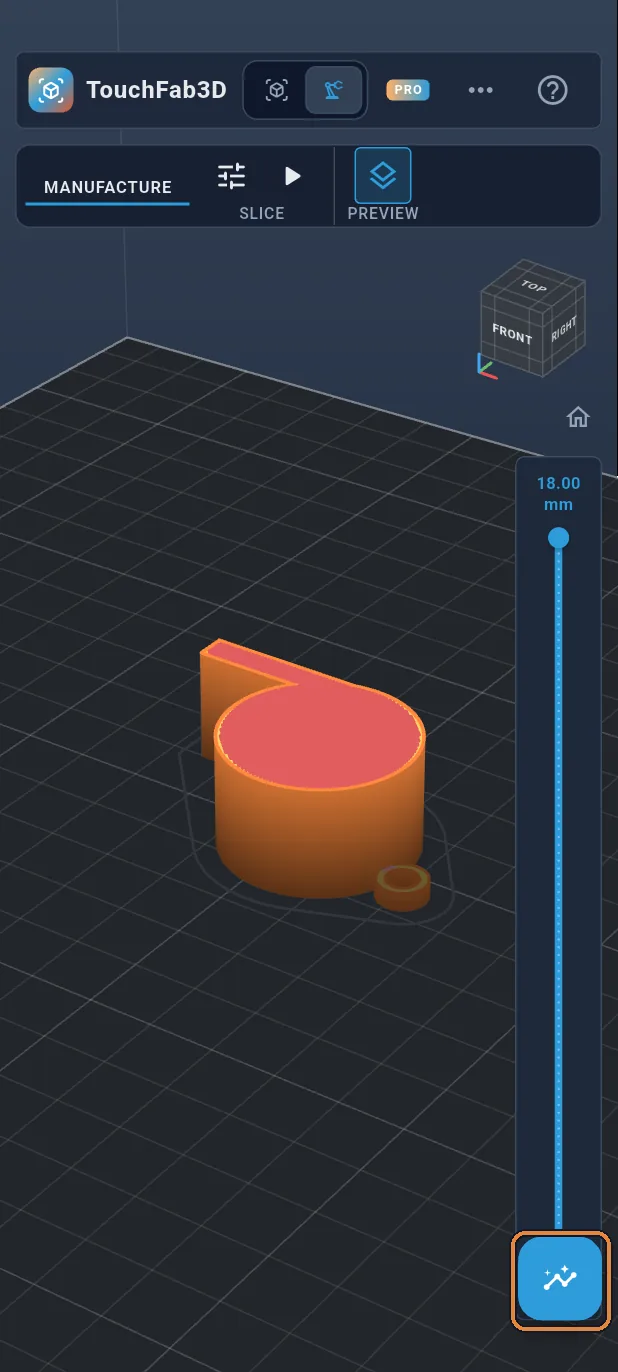
The layer preview
Drag the slider on the right to watch the layers build up, ball included. Then tap the panels button.
Step 34 / 37
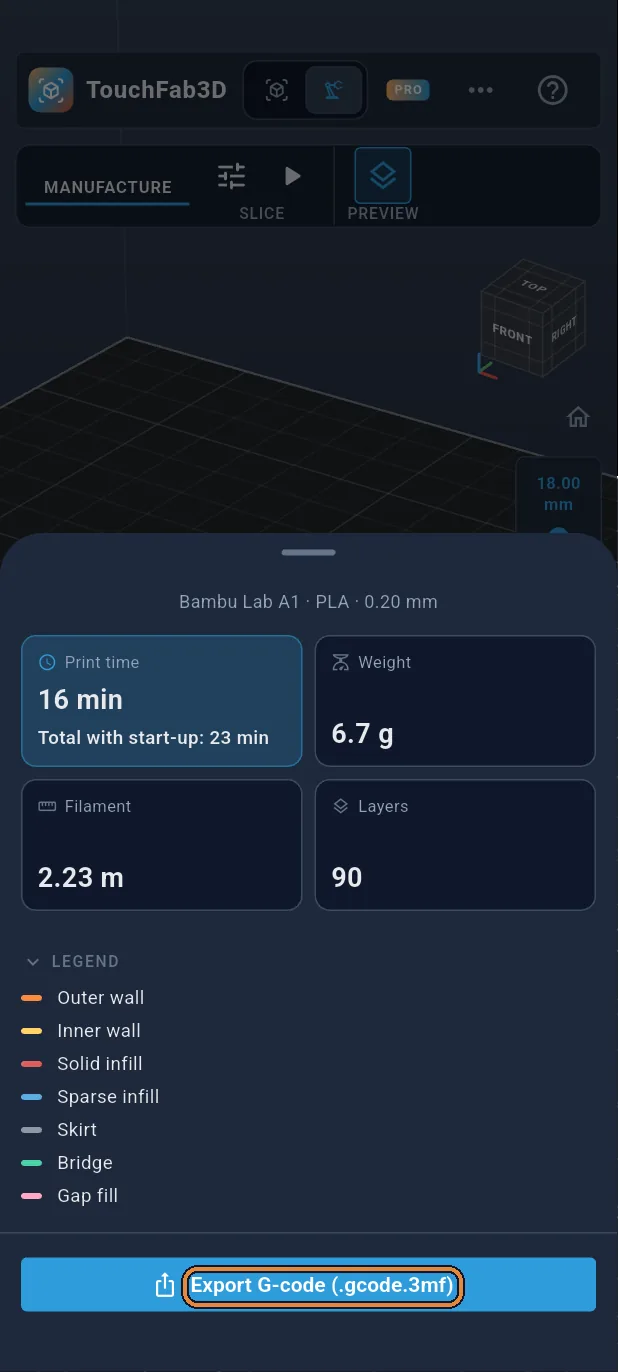
Export the G-code
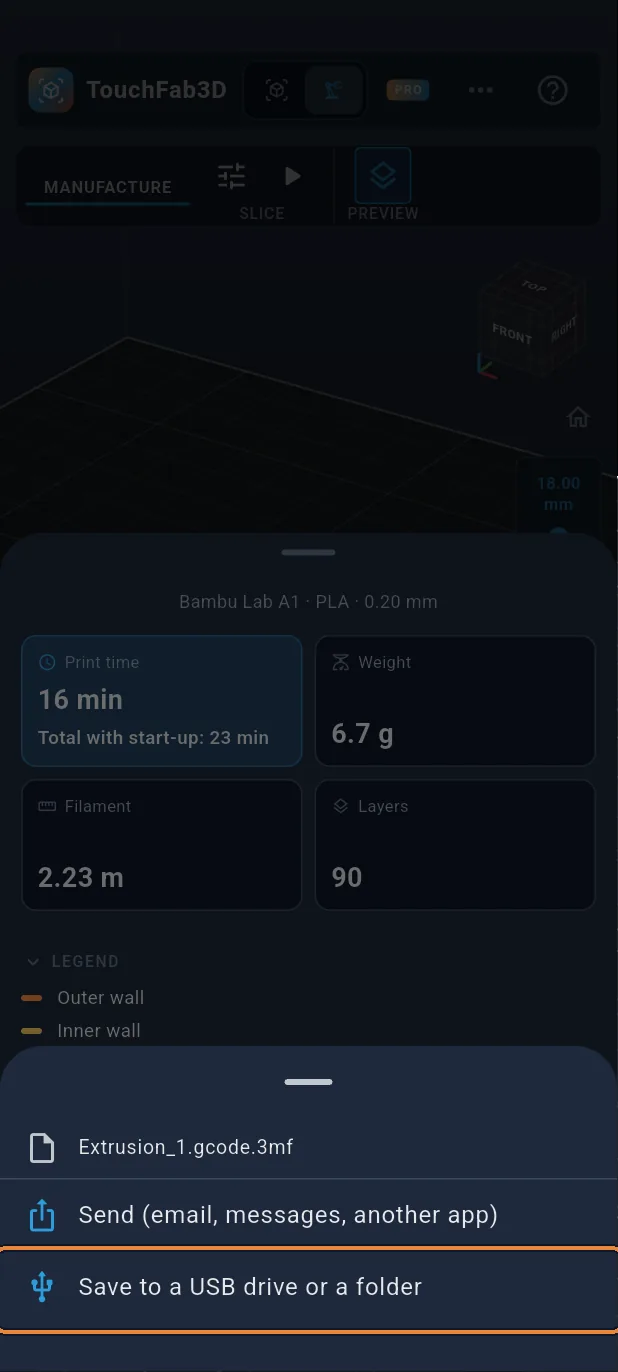
The sheet gives the print time, the weight and the filament length. Tap Export G-code (.gcode.3mf for a Bambu Lab).
Step 35 / 37
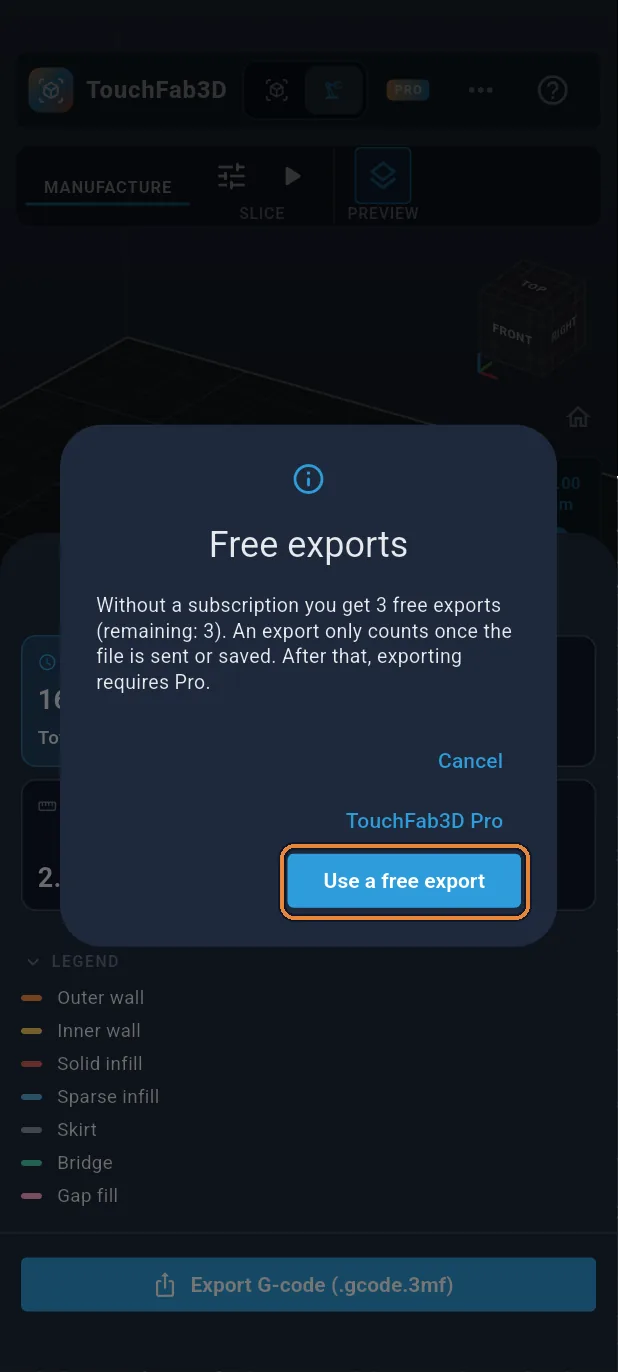
Free export
Without a subscription, three exports are free: tap Use a free export.
Step 36 / 37
Save the file
Tap “Save to a USB drive or a folder” and choose where to keep it, or Send to pass it to another app. All that's left is to start the print.
Step 37 / 37
Well done!
Your ball whistle is ready to print: about 16 minutes and 7 g of PLA. Once it is printed, blow into the mouthpiece: the air runs down the windway, splits on the edge of the window, and the ball makes the sound trill.