Tutorial
Twisted vase, step by step
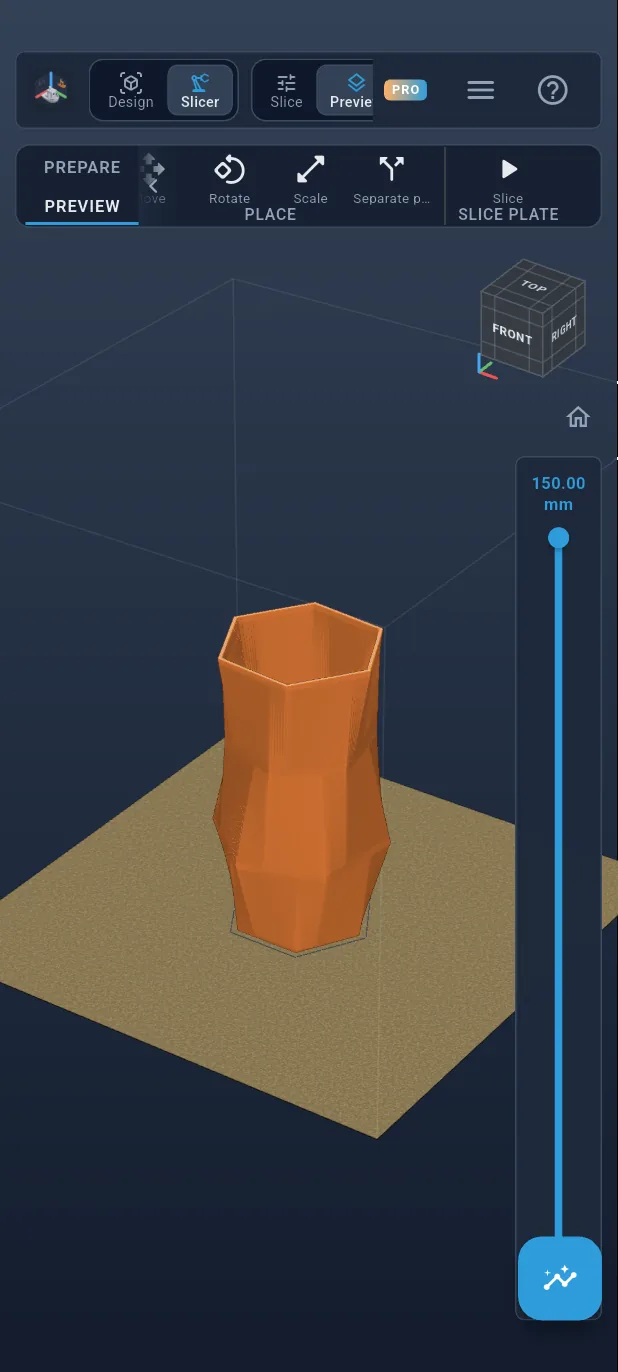
A 15 cm vase that twists as it rises, designed from scratch on a phone held upright. Four hexagons at four heights, each turned a little: the app stretches the shape from one to the next. Then you hollow it out, and slice it. Each step shows what to tap, circled in orange. Allow about half an hour.
What you will learn
- Draw on planes offset in height.
- Draw a regular polygon and set its size and rotation.
- Loft: stretch a part between several sections.
- Reuse a sketch with an offset, to make the wall.
- Subtract one body from another.
All the steps are listed below.
Step 1 / 51
Open TouchFab3D
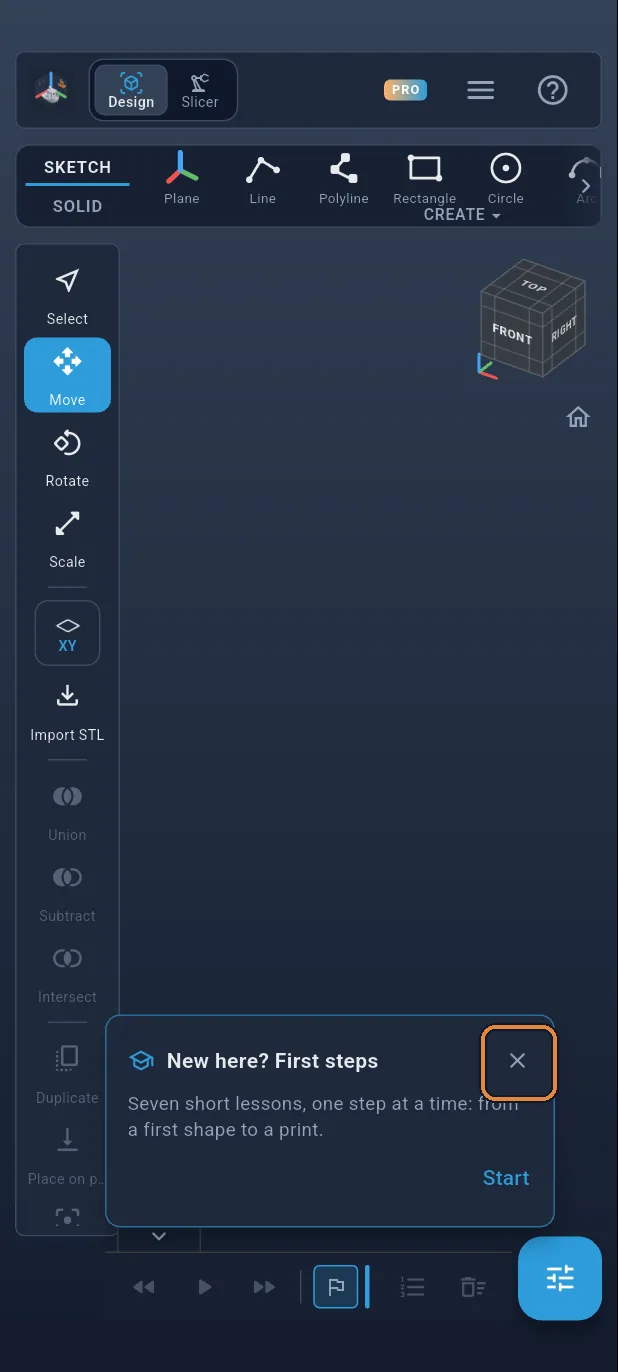
Open the app. The “New here? First steps” card appears: close it with the cross.
Step 2 / 51
A sketch on the ground
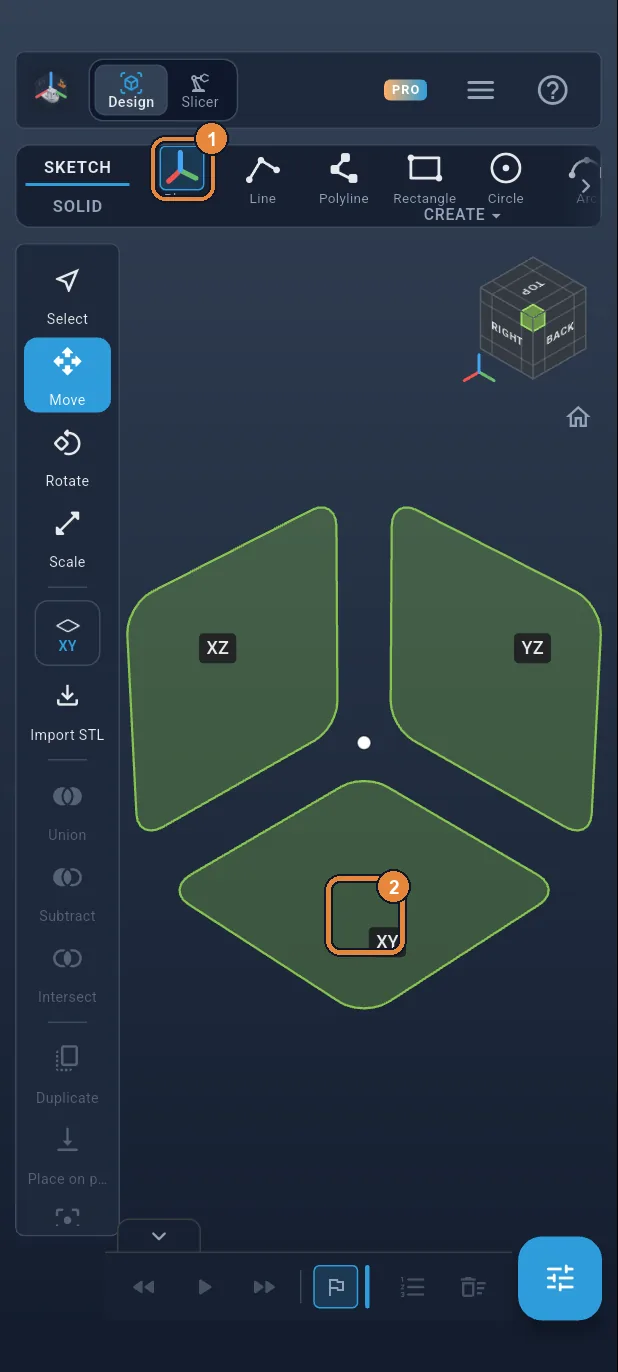
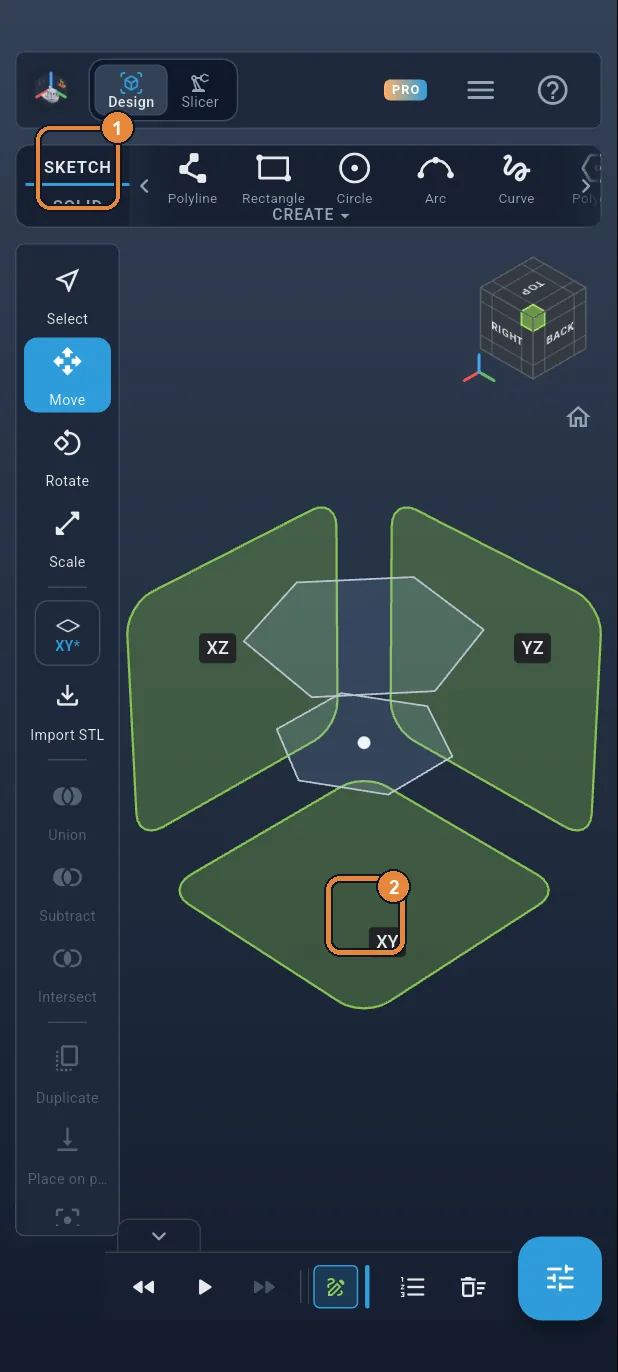
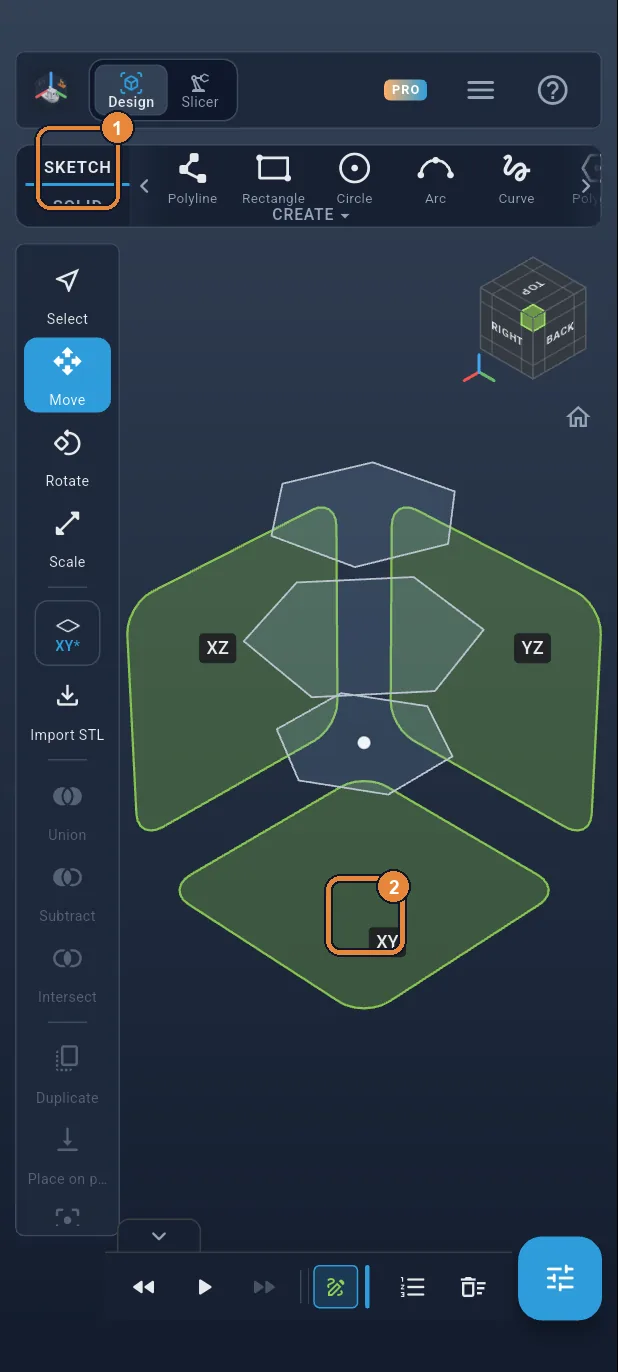
In the SKETCH tab, tap Plane ①. The three origin planes appear: tap the XY square ②, the ground plane. The view switches to a top view.
Step 3 / 51
The base: a hexagon
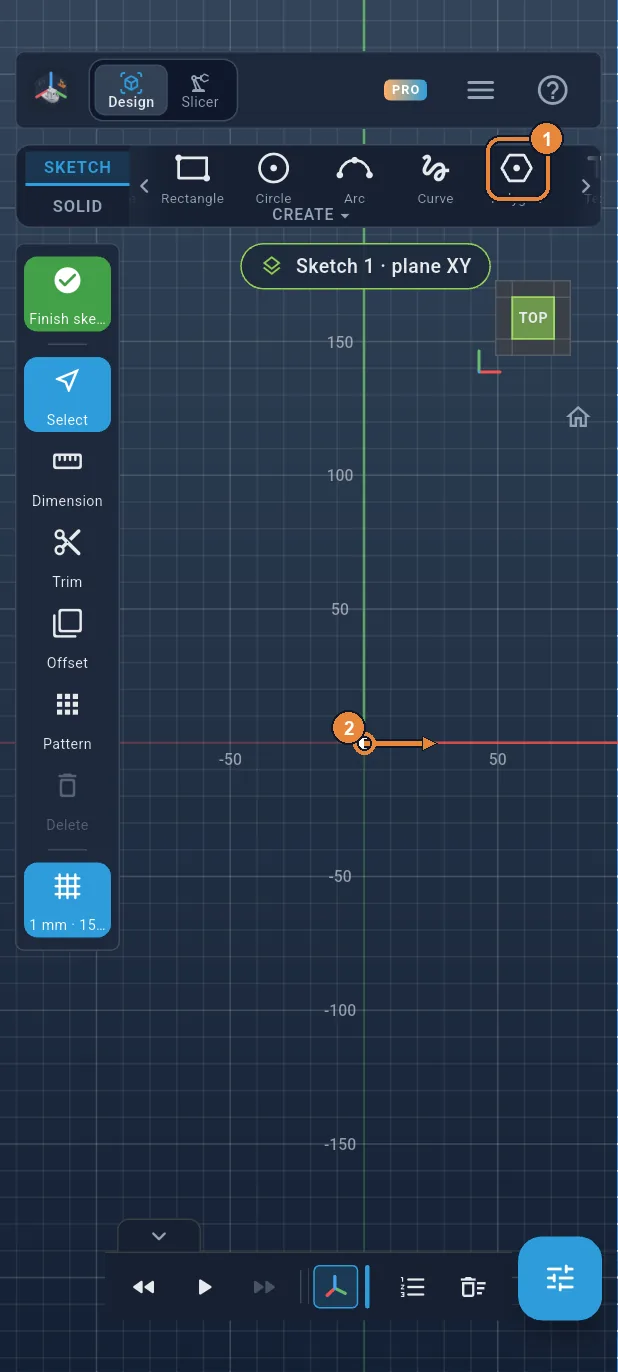
Tap Polygon ①: it has six sides by default. Put your finger on the origin, where the red and green axes cross, and drag outwards ②. The center snaps to the origin.
Step 4 / 51
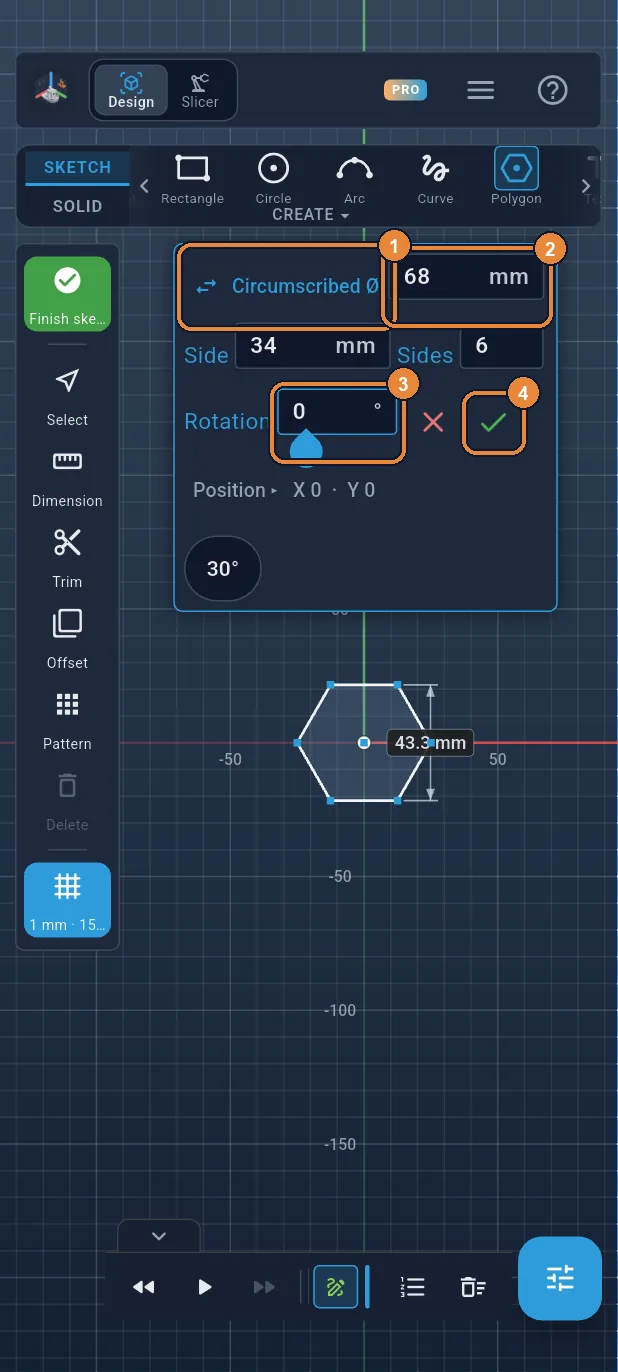
Ø 68 mm, rotation 0
Tap “Across flats” ①: the box switches to Circumscribed Ø, the circle through the corners. Type 68 ②, then 0 in Rotation ③, and ✓ ④.
Step 5 / 51
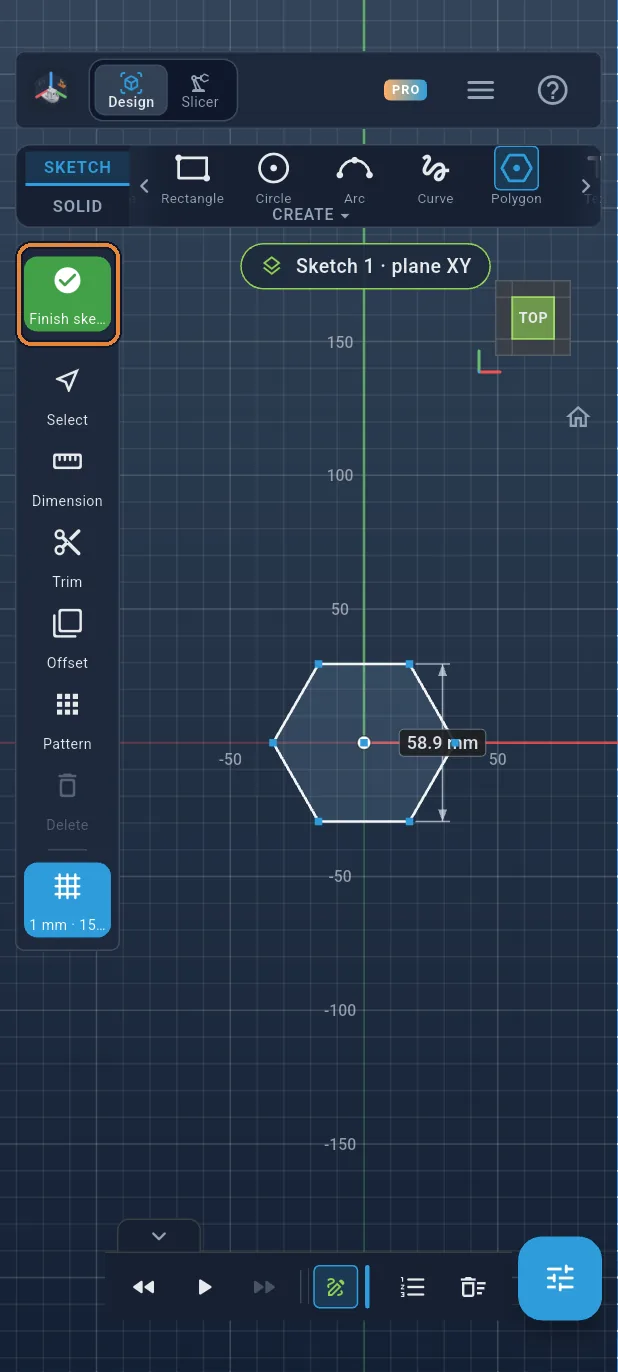
Finish the sketch
Tap the green ✓ at the top of the left bar. The base of the vase is in place.
Step 6 / 51
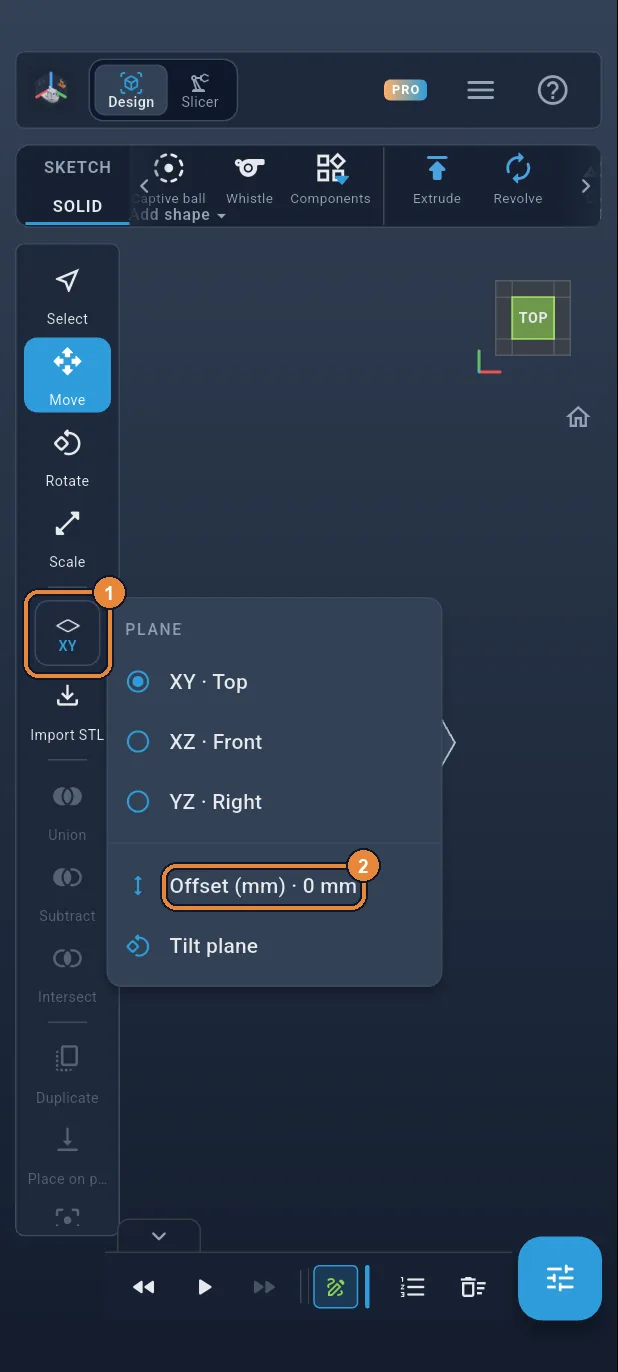
Raise the work plane
Each section of the vase sits at its own height. To draw higher up, you offset the XY plane. Tap the plane button (XY) in the left bar ①, then Offset (mm) ②.
Step 7 / 51
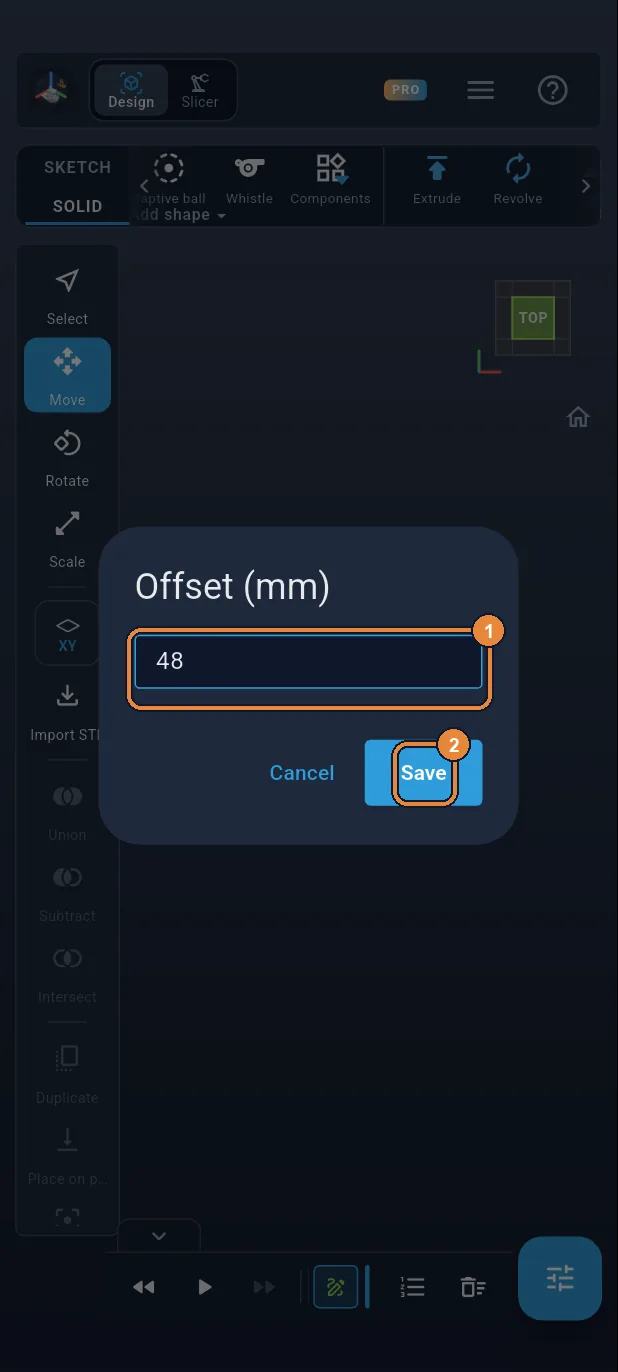
Plane at 48 mm
Type 48 ① then Save ②. The XY plane now sits 48 mm above the ground: that is where the vase will be widest.
Step 8 / 51
Second sketch
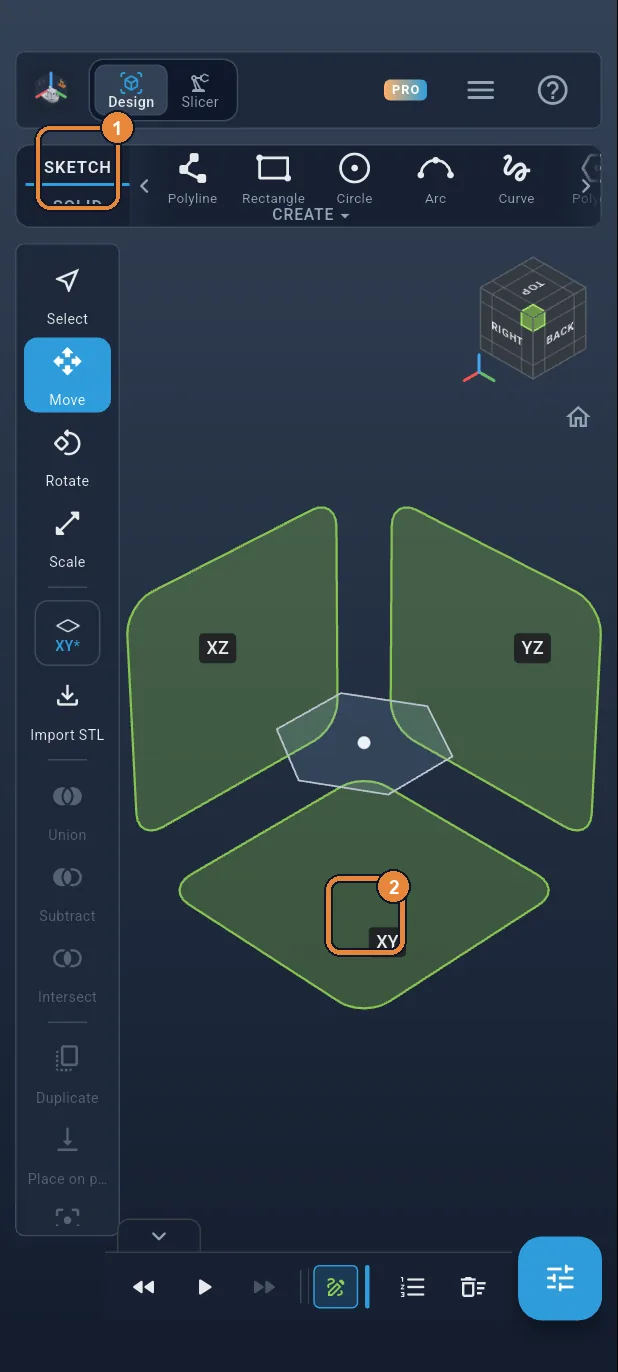
Tap the SKETCH tab ①: the planes appear. Tap the XY square ②: the sketch is placed on the offset plane.
Step 9 / 51
Hexagon Ø 88, turned by 20°
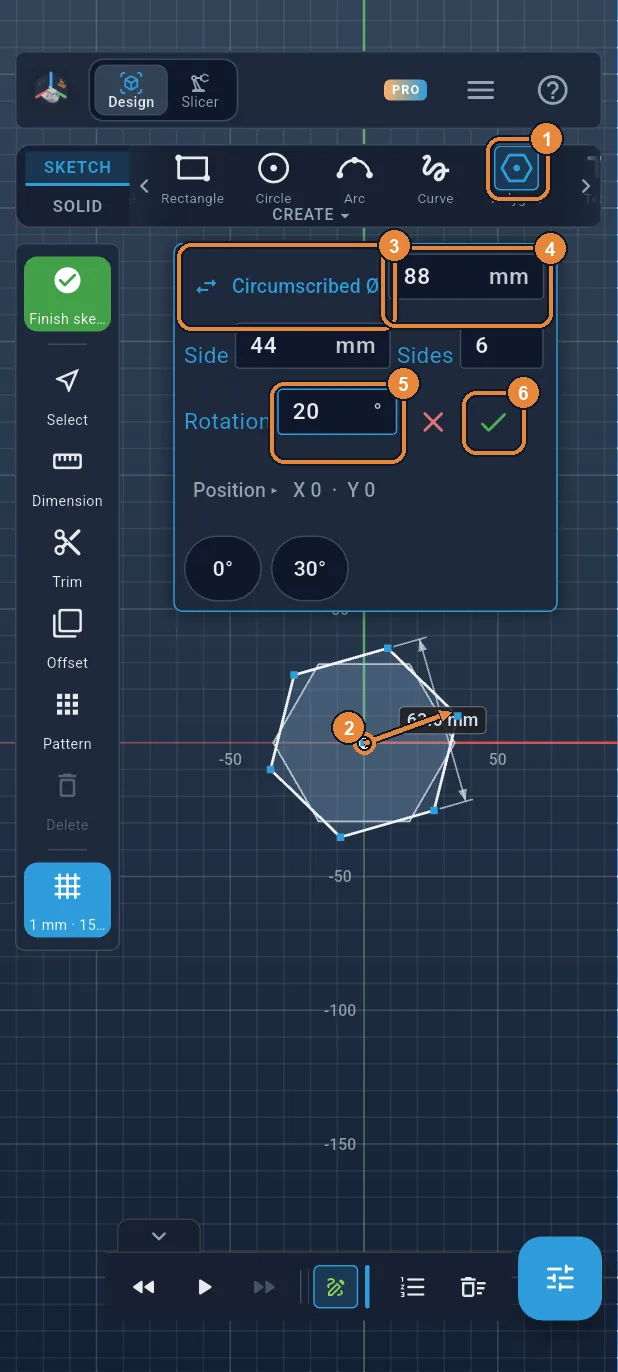
Tap Polygon ① and drag from the origin ②. Switch to Circumscribed Ø ③, type 88 ④ and 20 in Rotation ⑤, then ✓ ⑥. Bigger and turned: this is where the twist begins.
Step 10 / 51
Finish the sketch
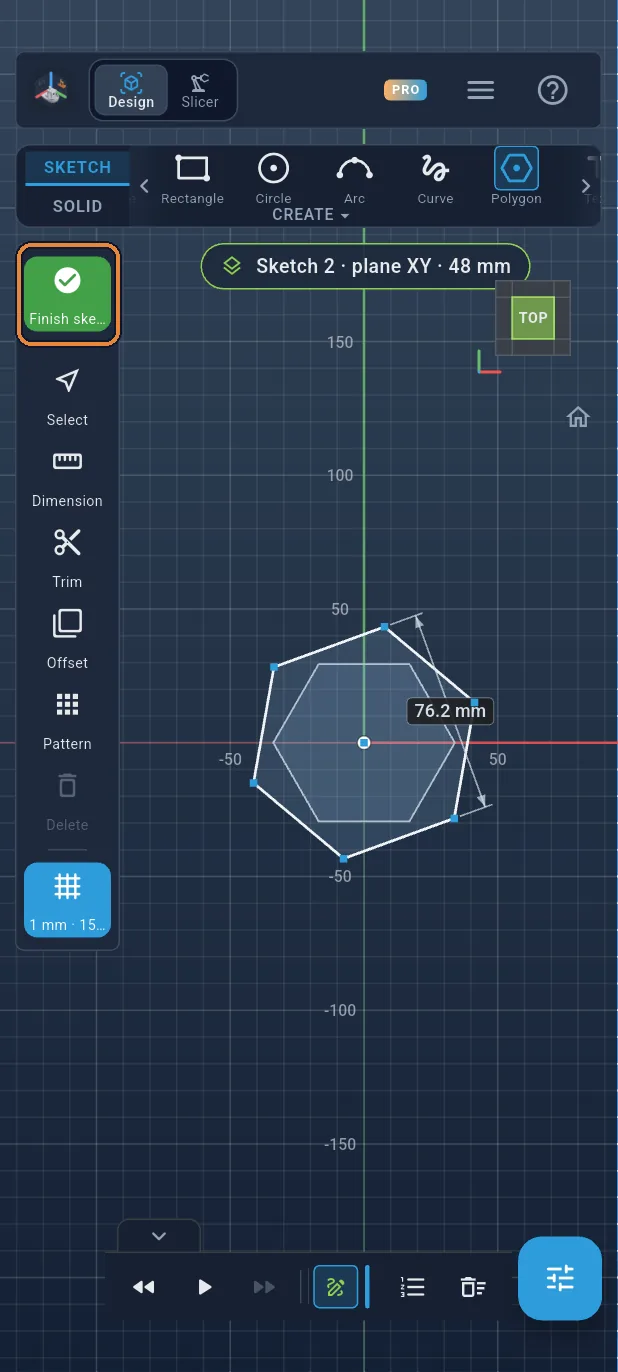
Tap the green ✓ in the left bar.
Step 11 / 51
Plane at 100 mm
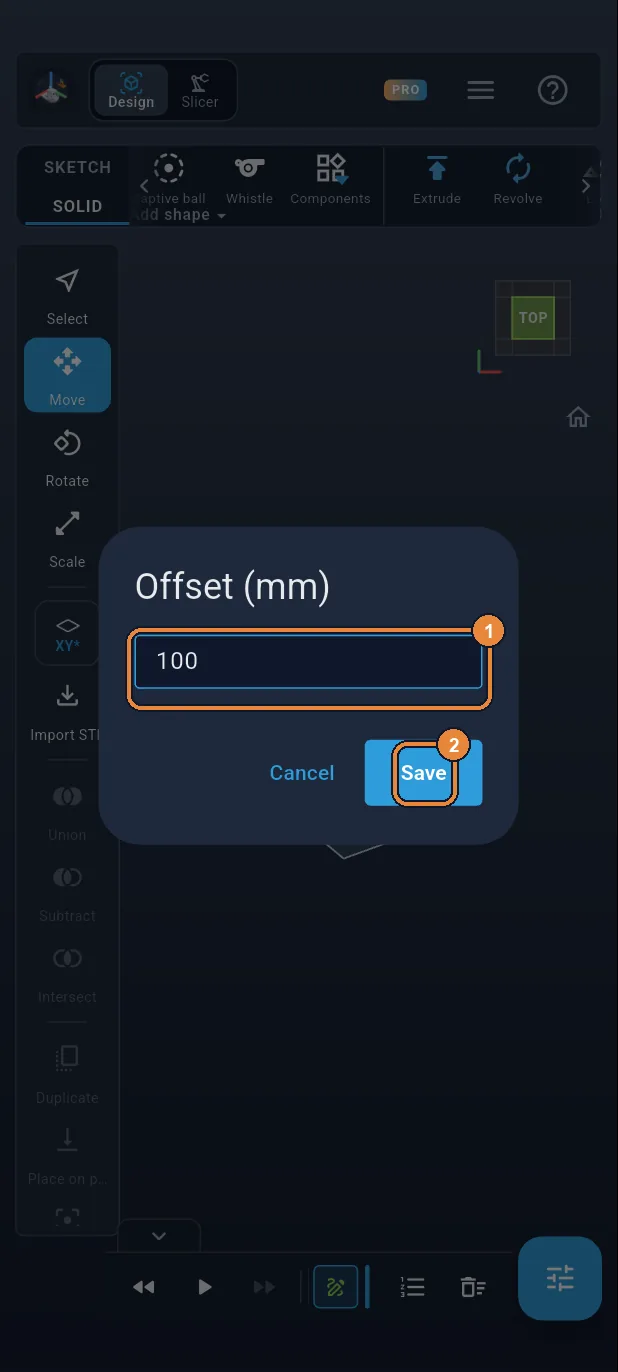
Same gesture as before: the plane button in the left bar, then Offset (mm). Type 100 ① then Save ②.
Step 12 / 51
Sketch no. 3
Tap the SKETCH tab ①, then the XY square ②.
Step 13 / 51
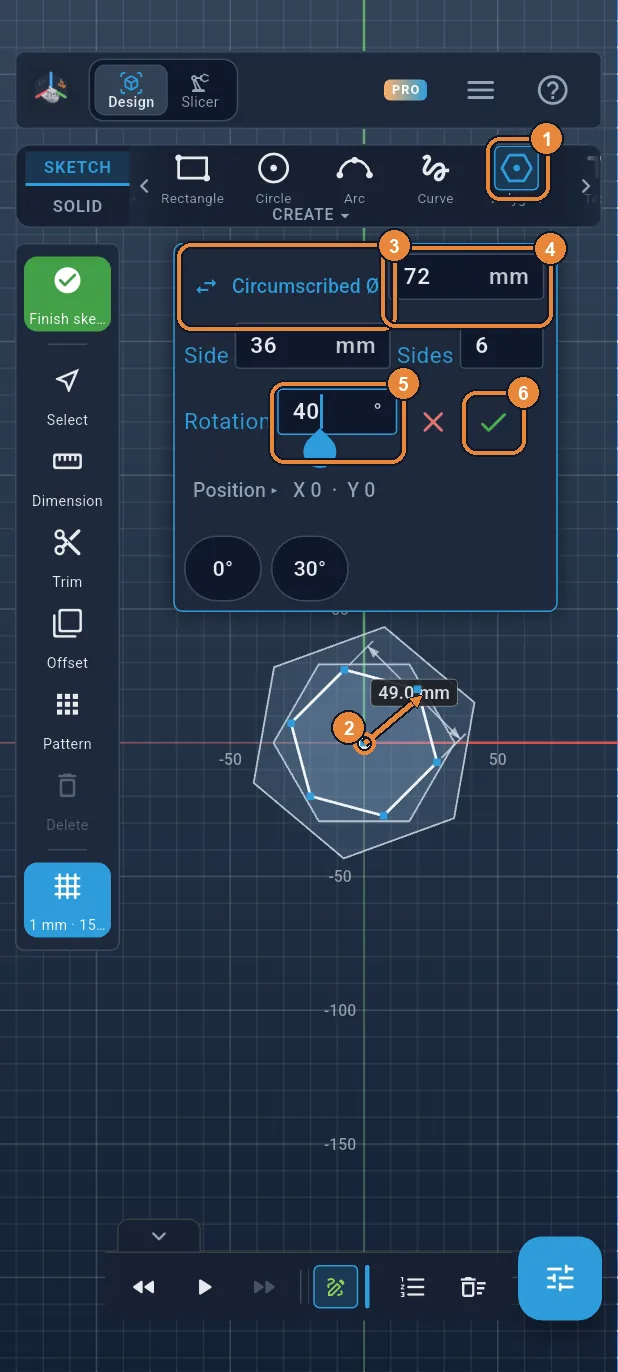
Hexagon Ø 72, turned by 40°
Tap Polygon ① and drag from the origin ②. Switch to Circumscribed Ø ③, type 72 ④ and 40 in Rotation ⑤, then ✓ ⑥.
Step 14 / 51
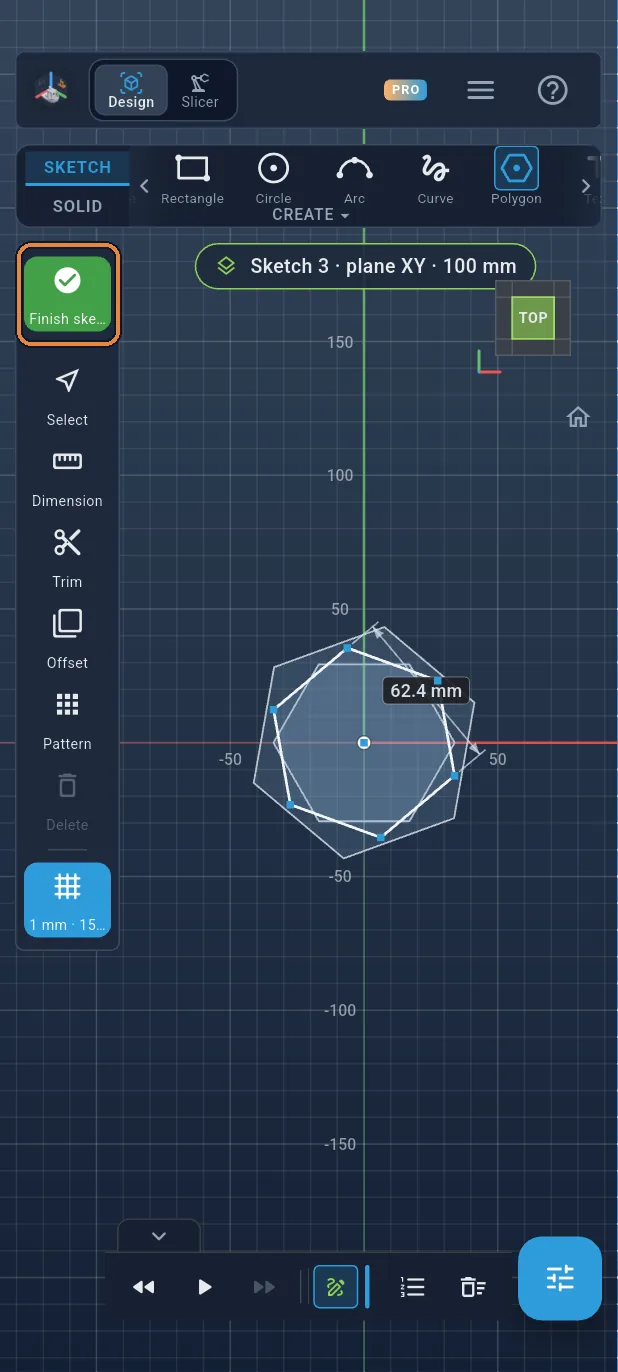
Finish the sketch
Tap the green ✓ in the left bar.
Step 15 / 51
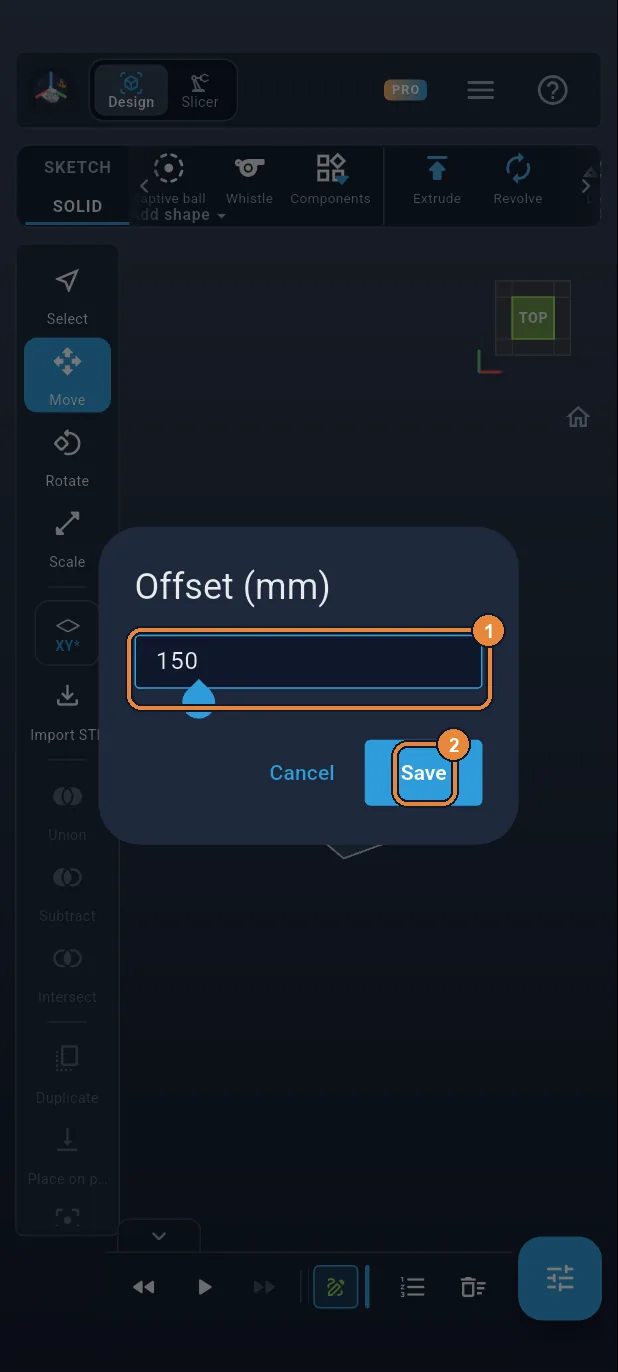
Plane at 150 mm
Same gesture as before: the plane button in the left bar, then Offset (mm). Type 150 ① then Save ②.
Step 16 / 51
Sketch no. 4
Tap the SKETCH tab ①, then the XY square ②.
Step 17 / 51
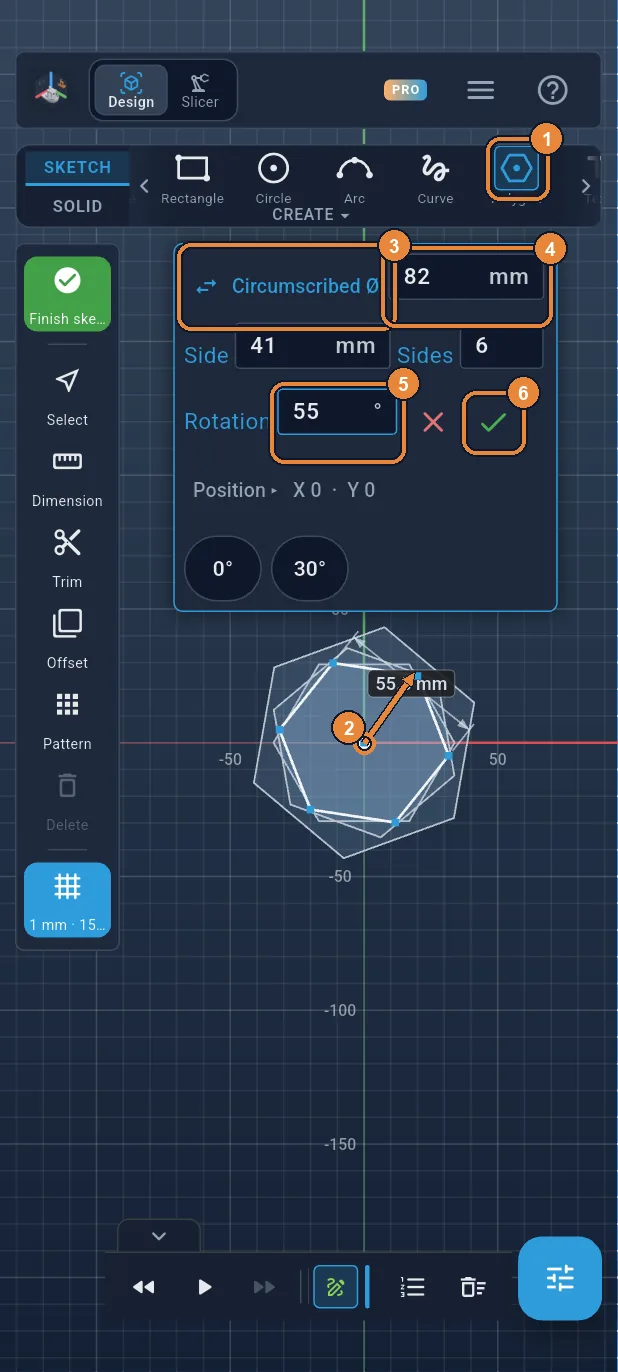
Hexagon Ø 82, turned by 55°
Tap Polygon ① and drag from the origin ②. Switch to Circumscribed Ø ③, type 82 ④ and 55 in Rotation ⑤, then ✓ ⑥. The neck of the vase is drawn.
Step 18 / 51
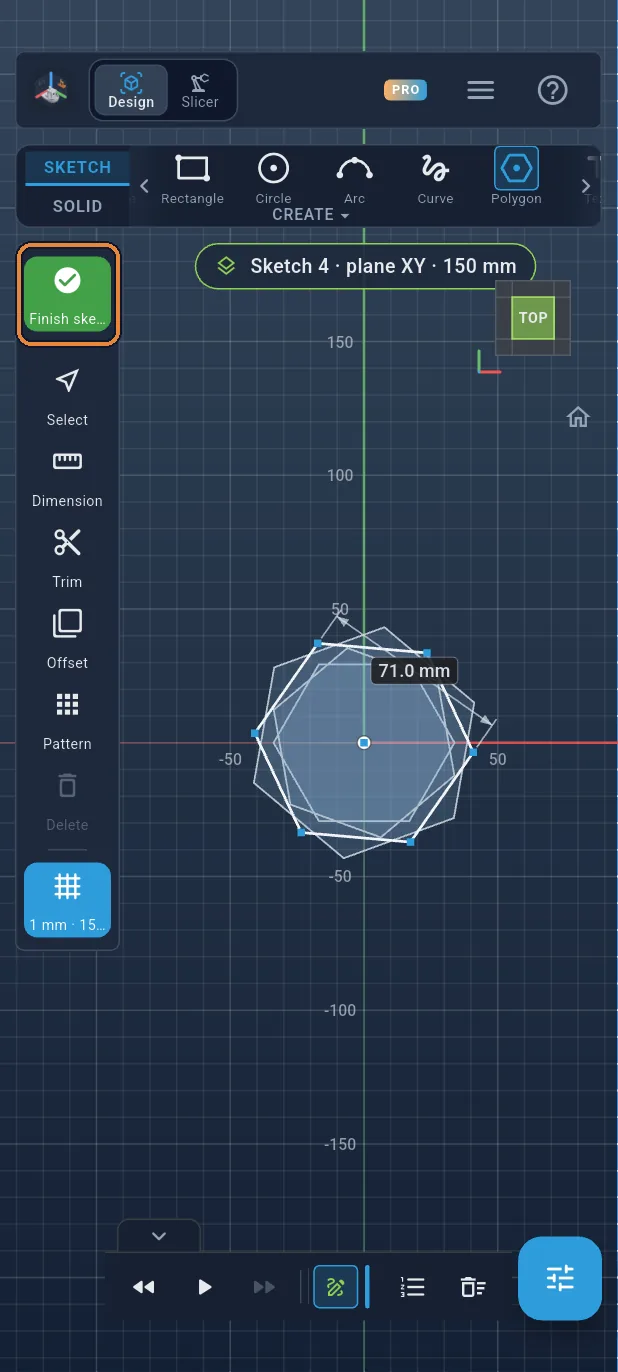
Finish the sketch
Tap the green ✓ in the left bar.
Step 19 / 51
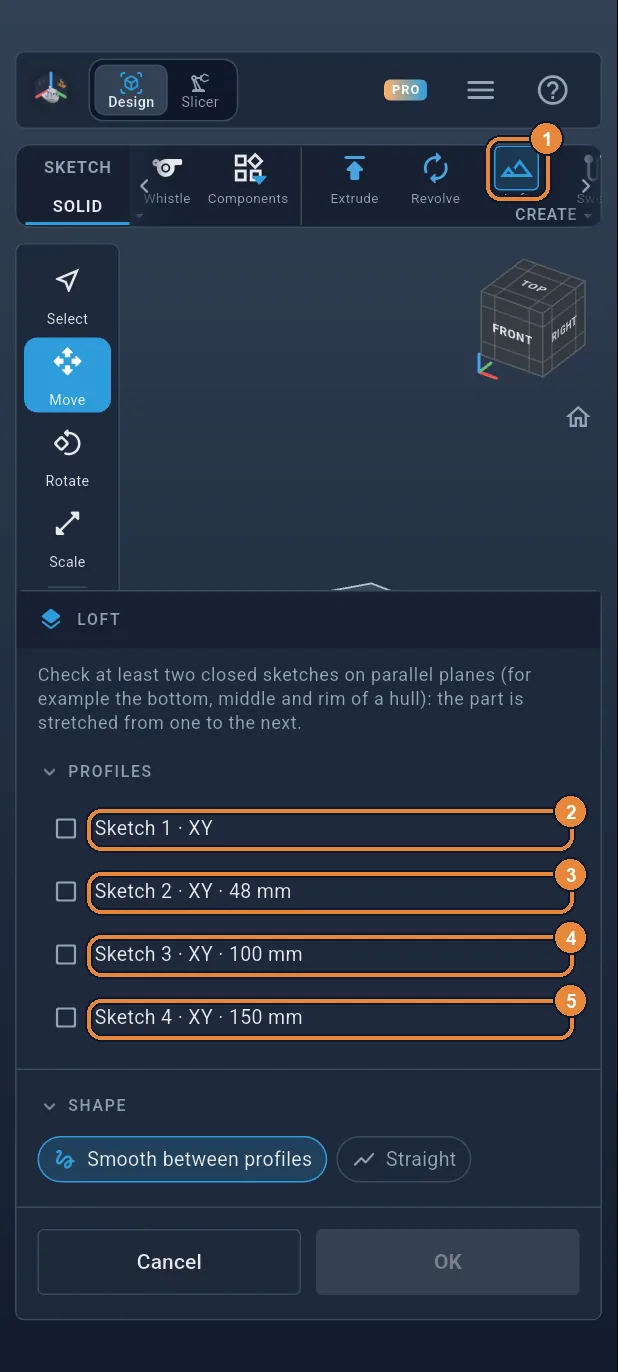
Loft the four sections
In the SOLID tab, tap Loft ①. Tick the four sketches, from bottom to top ②③④⑤: the part stretches from one to the next, live.
Step 20 / 51
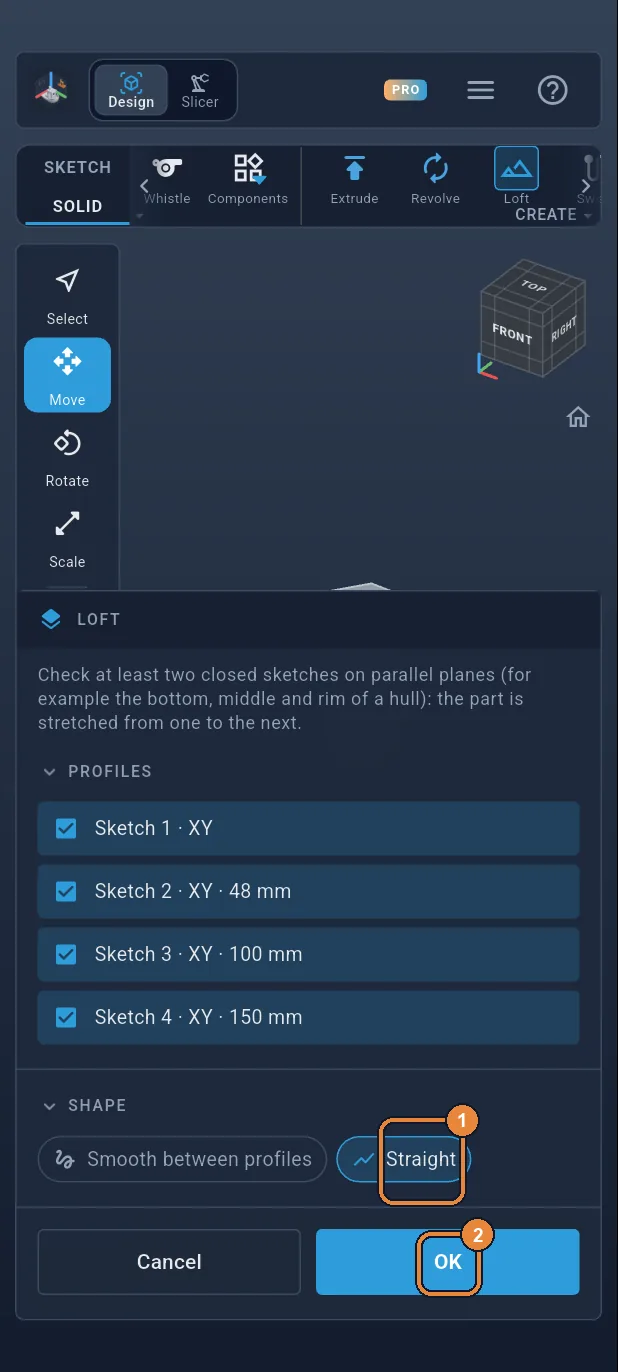
Straight, then OK
Tap Straight ①: the faces stay flat and the edges of the hexagon spiral from one end to the other. Then OK ②. The vase is there, but it is solid.
Step 21 / 51
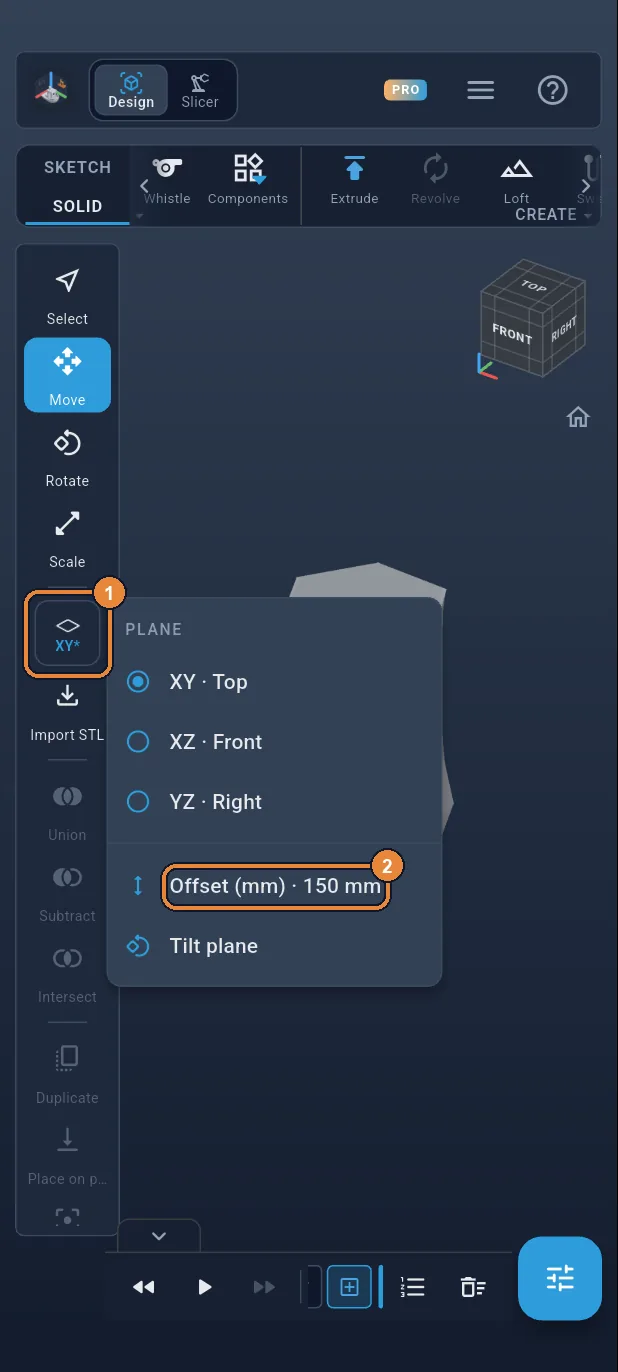
The bottom: 2 mm
To hollow it out, you draw a second shape, 2 mm smaller everywhere, which you will remove. It starts 2 mm above the ground: that will be the bottom. Tap the plane button ① then Offset (mm) ②.
Step 22 / 51
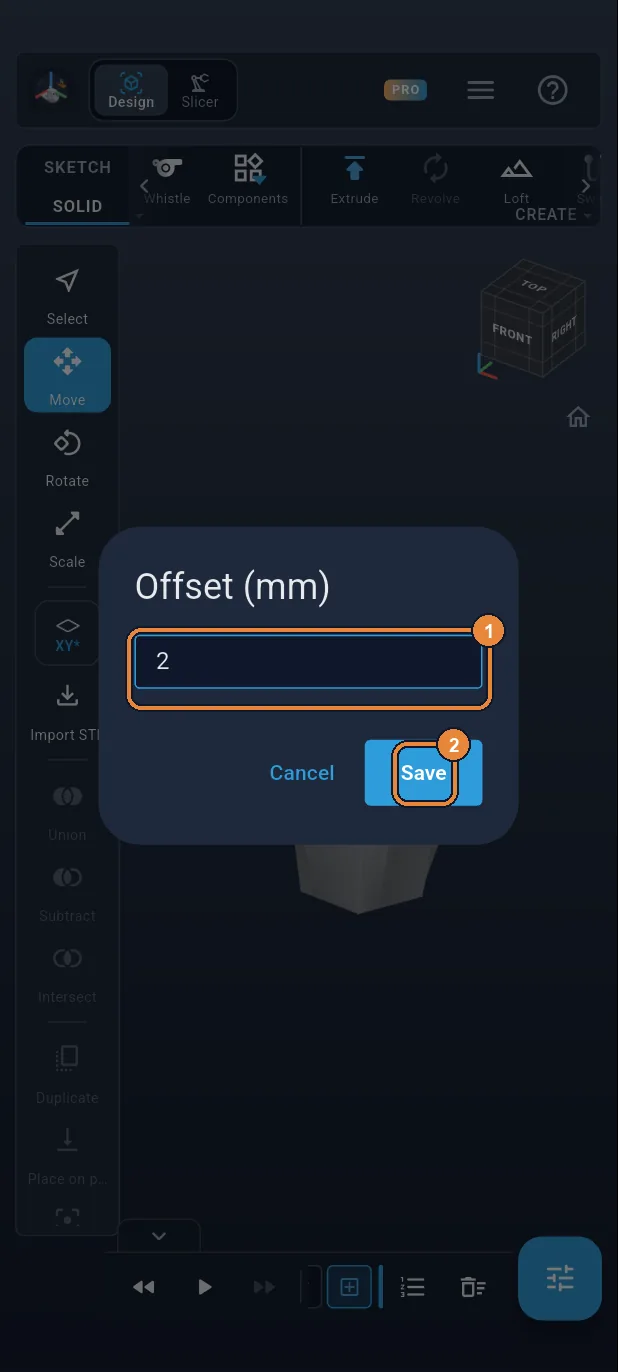
Plane at 2 mm
Type 2 ① then Save ②.
Step 23 / 51
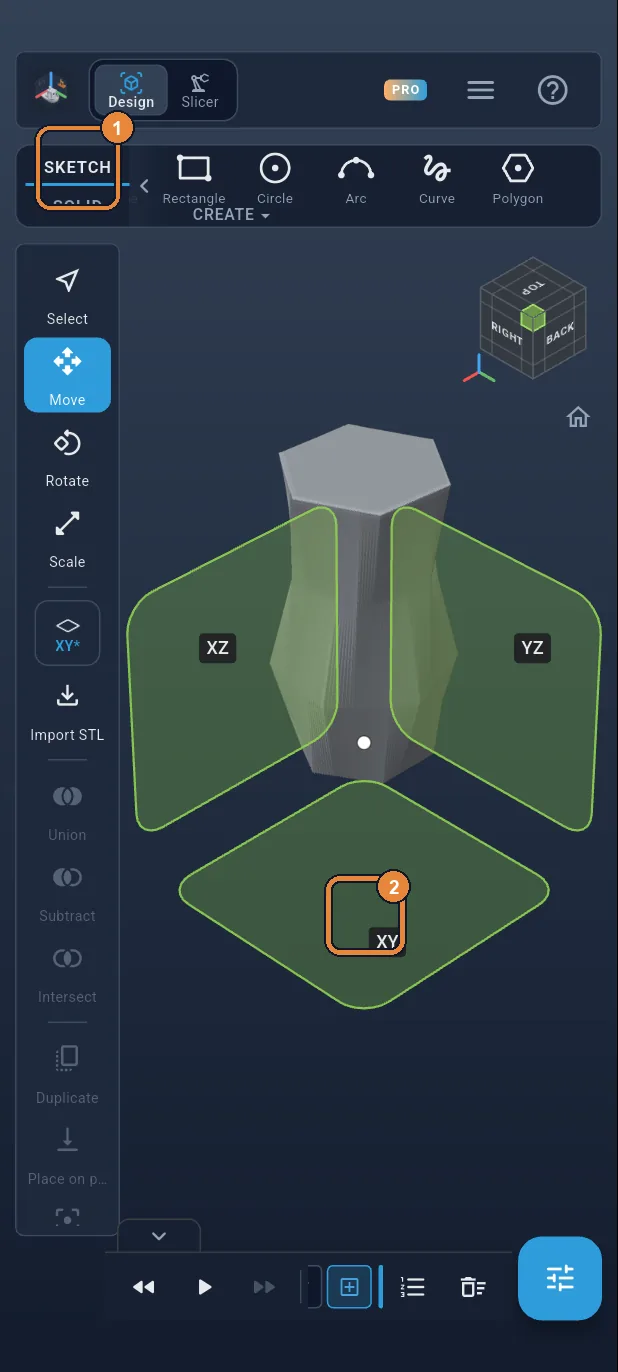
Sketch of the cavity
Tap the SKETCH tab ①, then the XY square ②.
Step 24 / 51
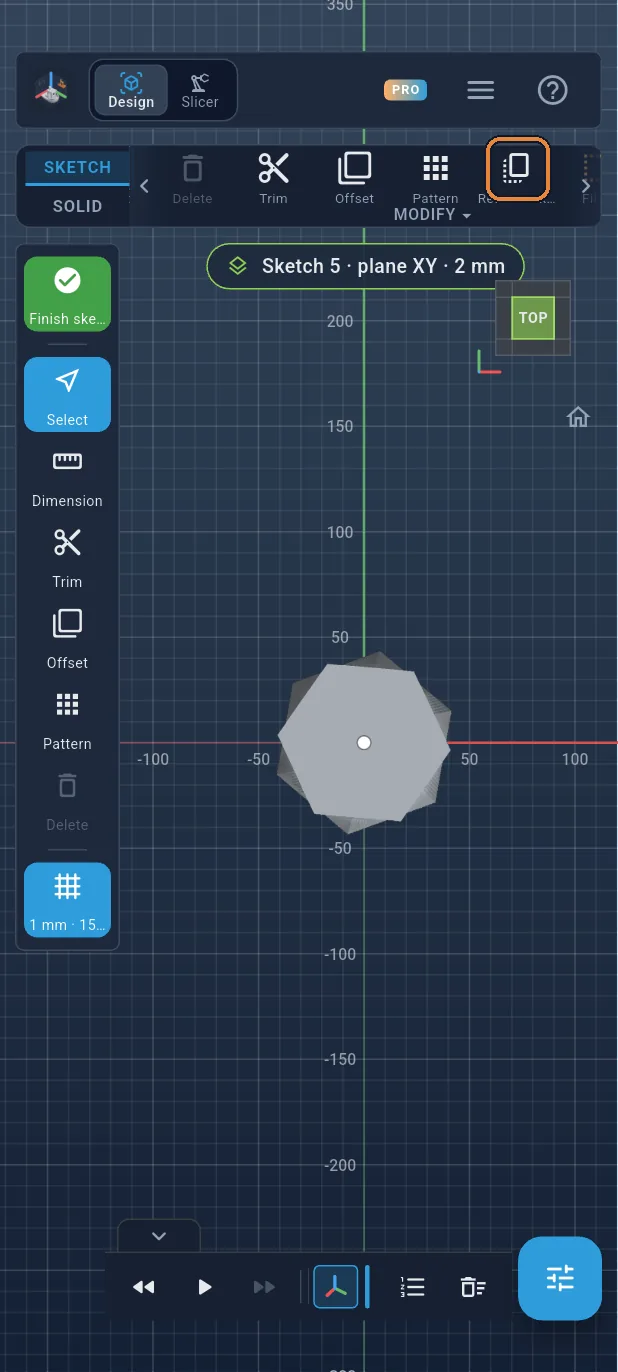
Reuse a sketch
No need to draw the hexagon again: tap Reuse a sketch, in the ribbon. It copies the lines of another sketch onto this plane.
Step 25 / 51
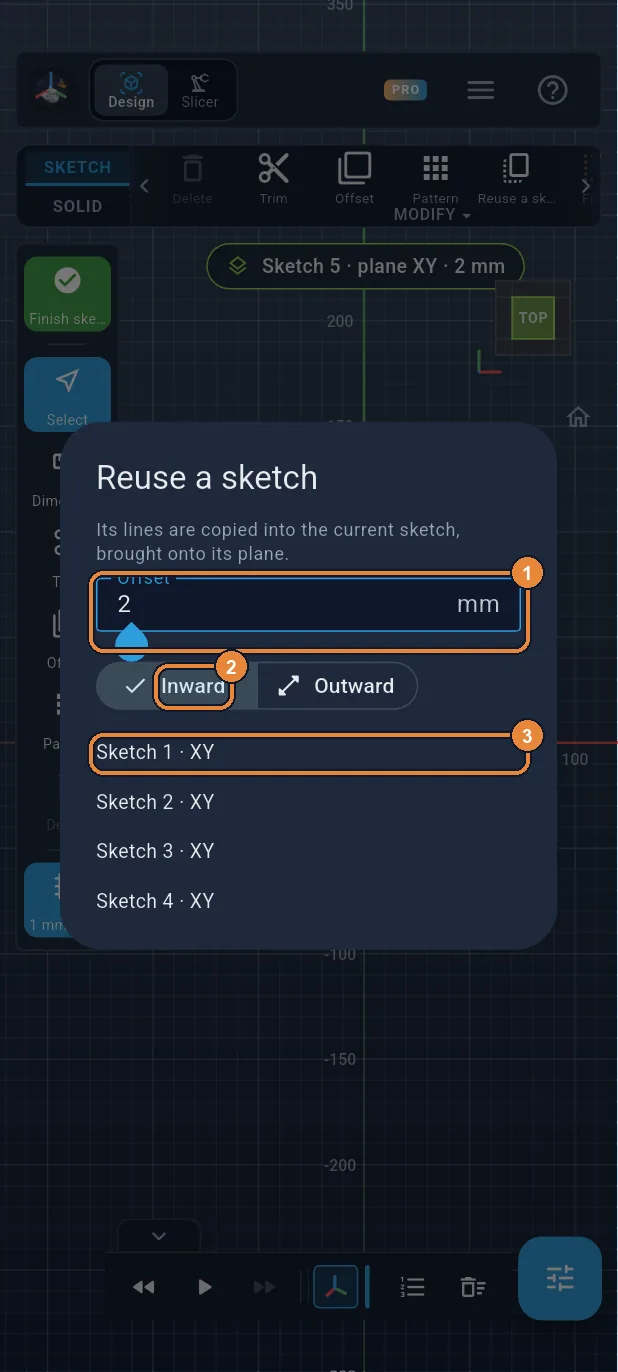
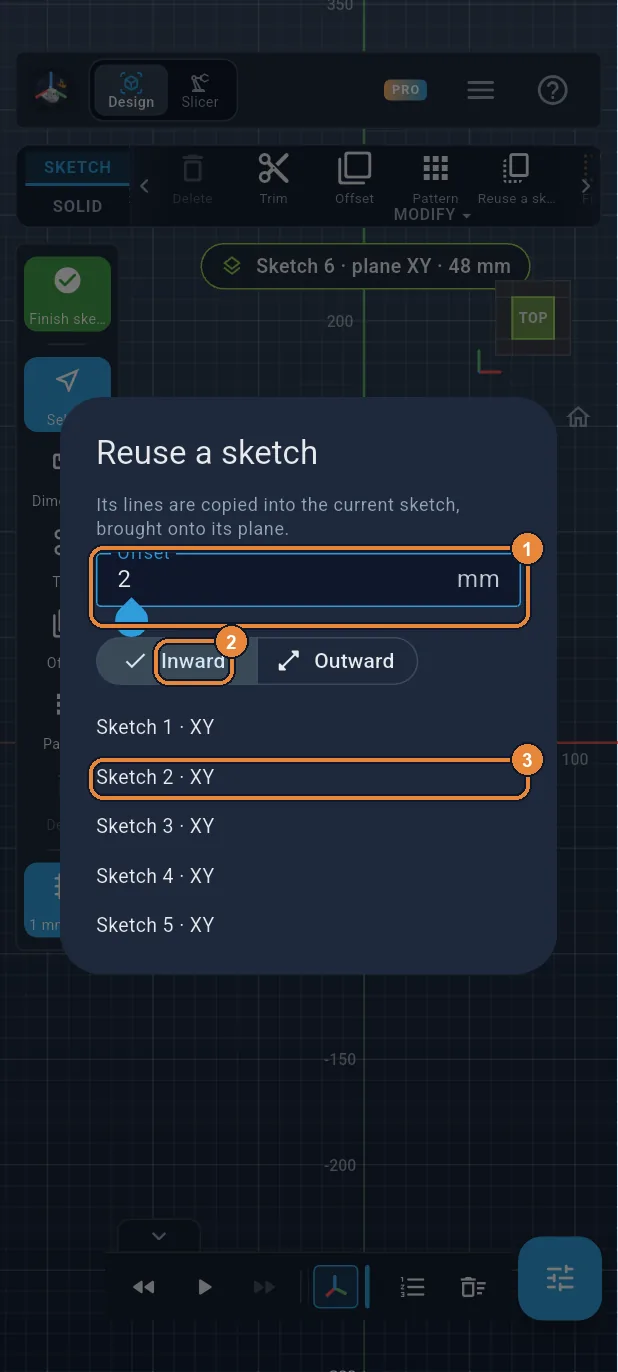
2 mm inward
Type 2 in Offset ①, leave Inward ② selected, then tap Sketch 1 ③, the base one. The hexagon comes back, 2 mm smaller: that is the thickness of the wall.
Step 26 / 51
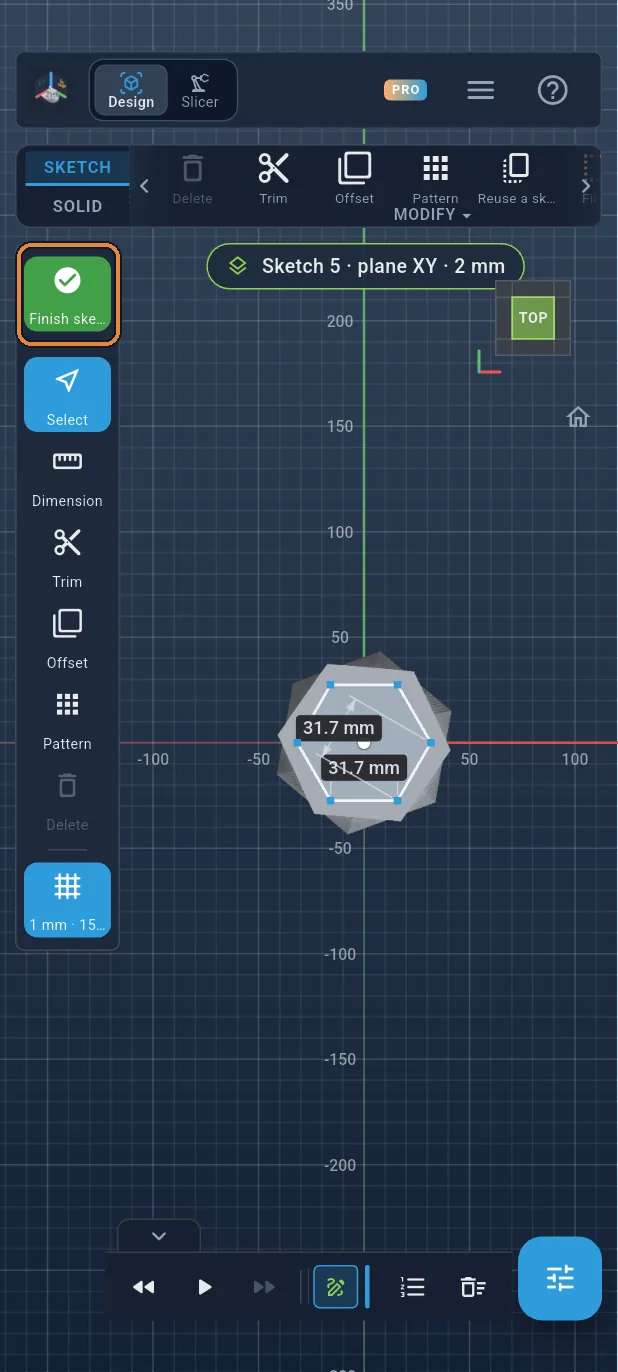
Finish the sketch
Tap the green ✓ in the left bar.
Step 27 / 51
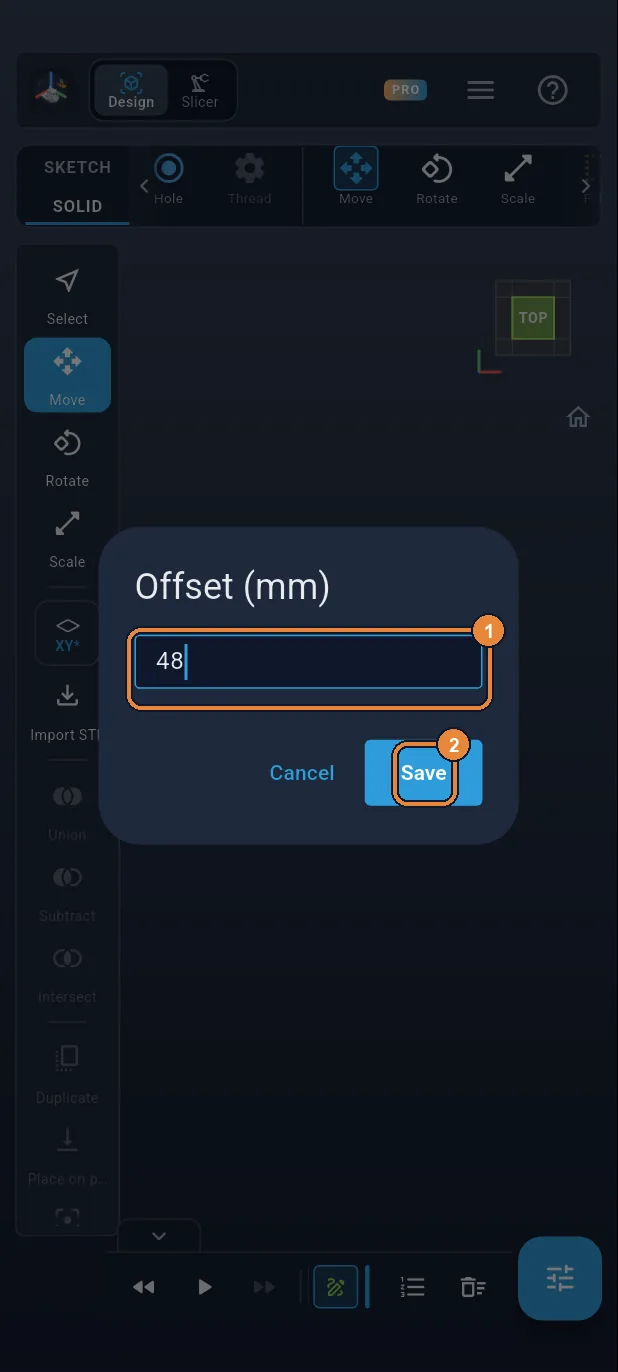
Plane at 48 mm
Plane button, Offset (mm): type 48 ① then Save ②.
Step 28 / 51
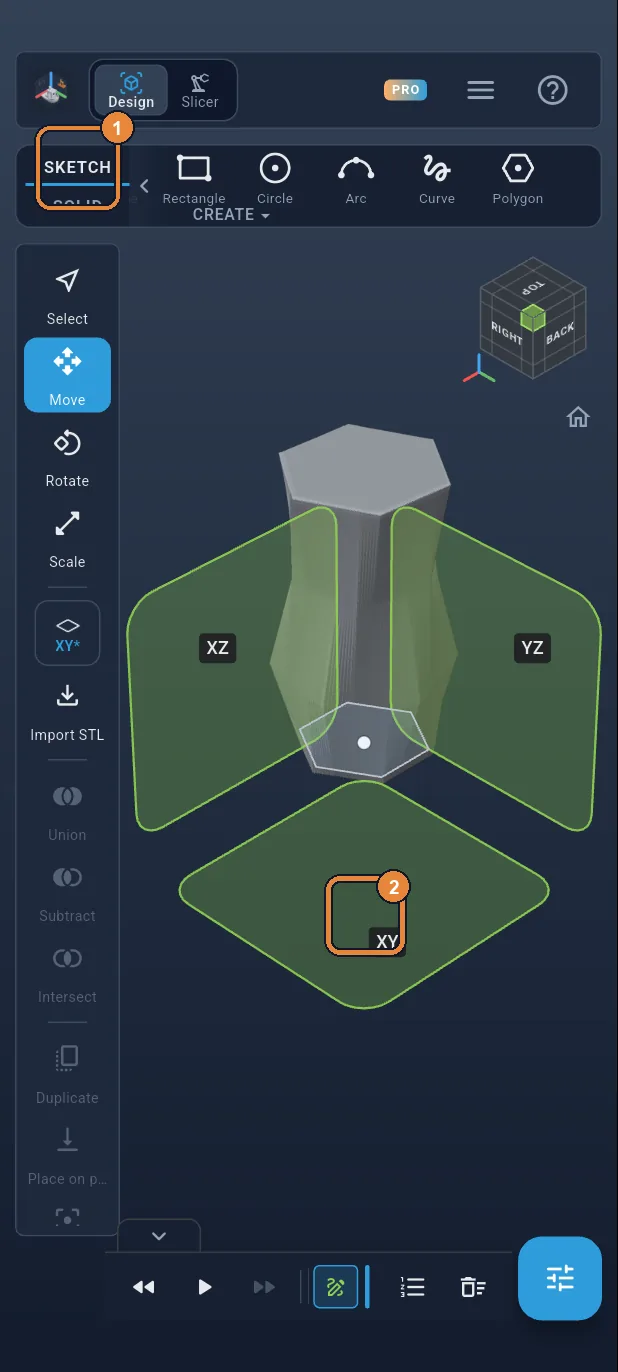
New sketch
SKETCH tab ①, then the XY square ②.
Step 29 / 51
Reuse Sketch 2
Tap Reuse a sketch in the ribbon. Type 2 ①, leave Inward ② and tap Sketch 2 ③.
Step 30 / 51
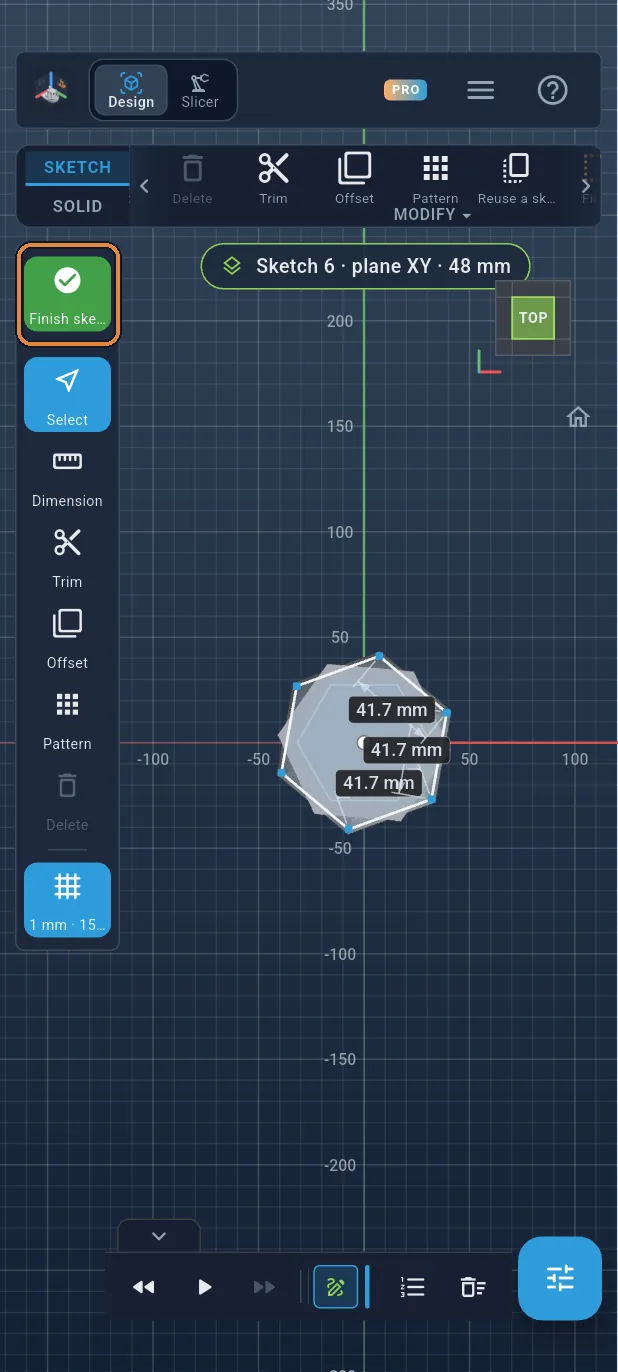
Finish the sketch
Tap the green ✓.
Step 31 / 51
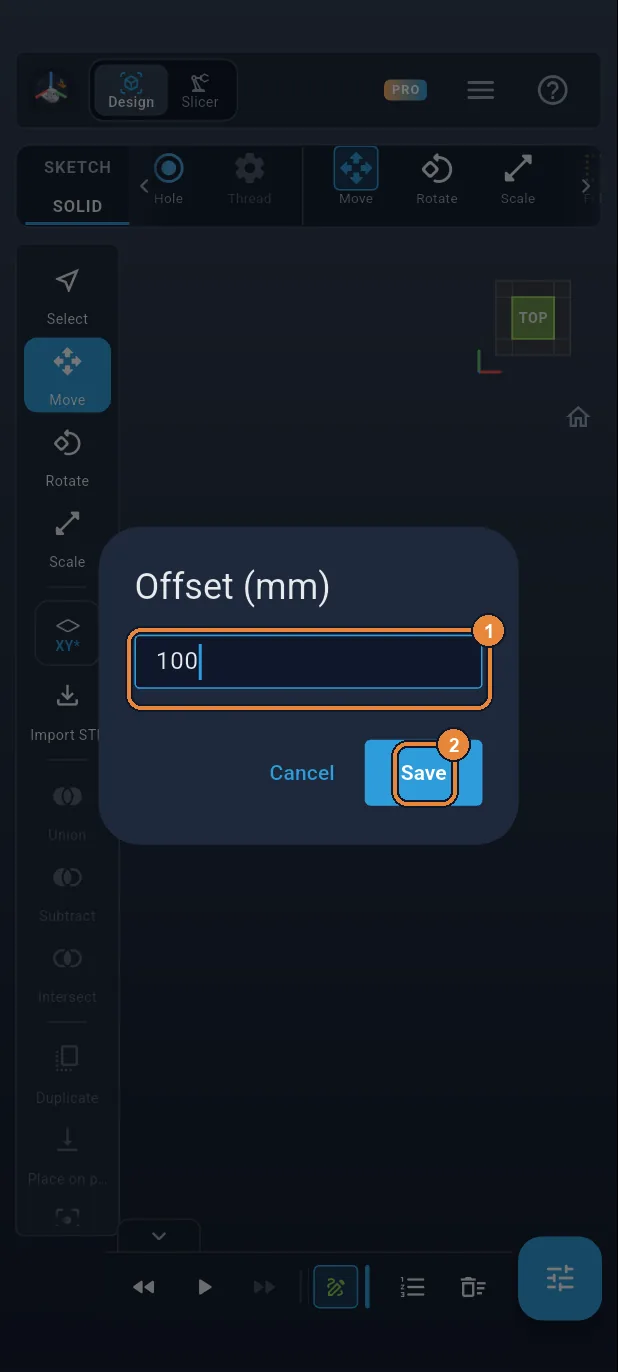
Plane at 100 mm
Plane button, Offset (mm): type 100 ① then Save ②.
Step 32 / 51
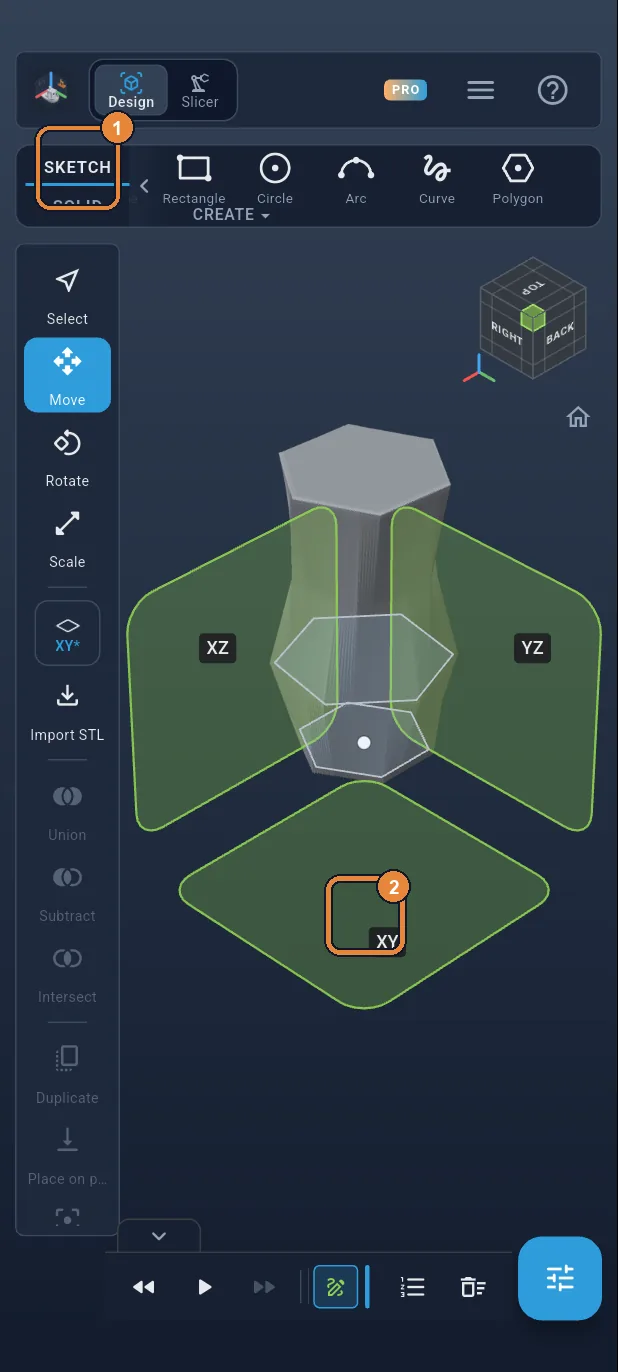
New sketch
SKETCH tab ①, then the XY square ②.
Step 33 / 51
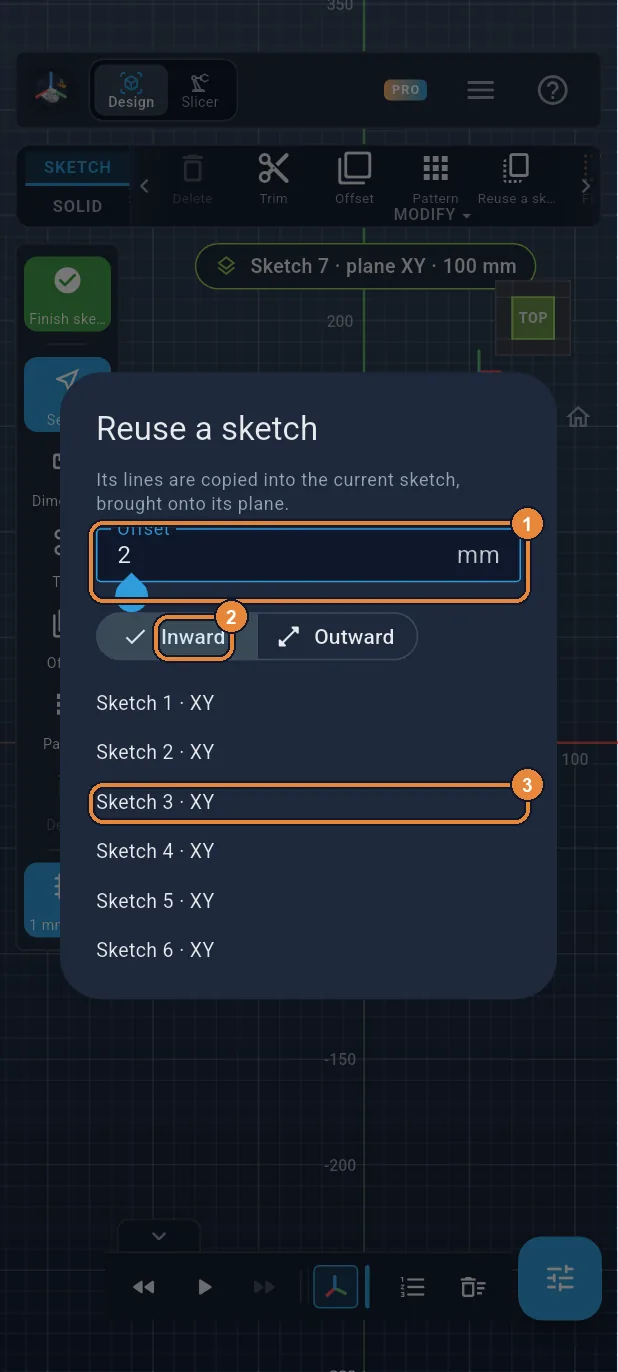
Reuse Sketch 3
Tap Reuse a sketch in the ribbon. Type 2 ①, leave Inward ② and tap Sketch 3 ③.
Step 34 / 51
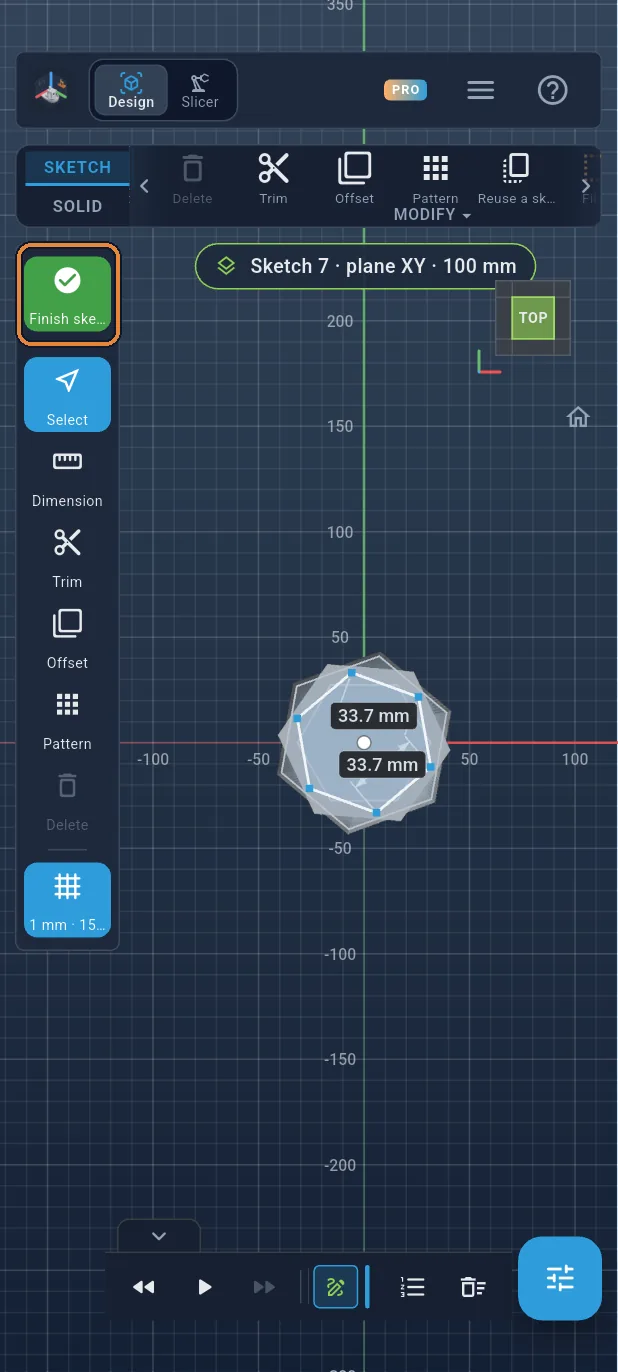
Finish the sketch
Tap the green ✓.
Step 35 / 51
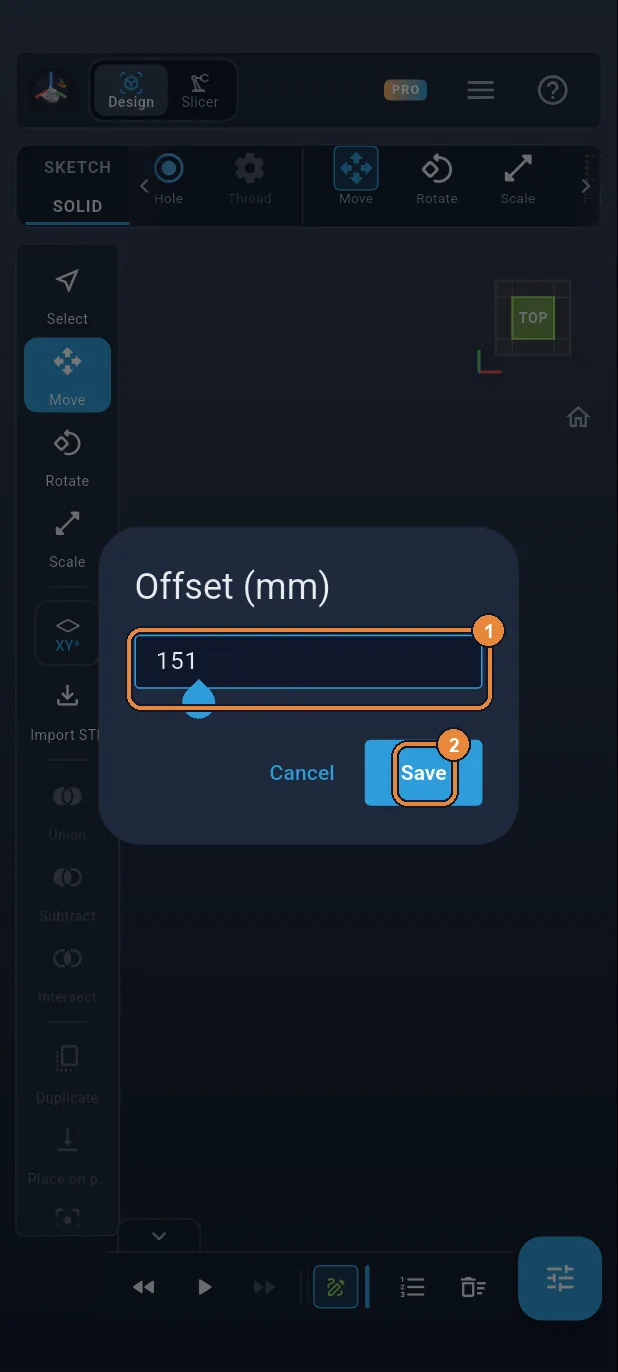
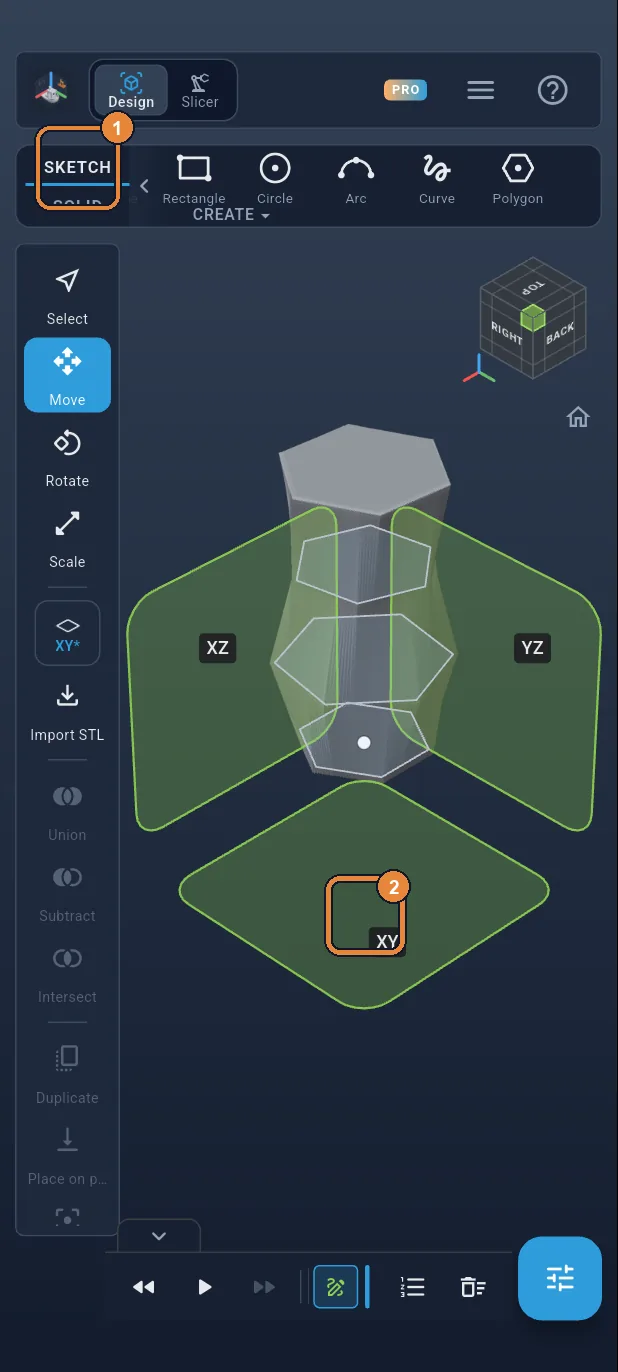
Plane at 151 mm
Plane button, Offset (mm): type 151 ① then Save ②. 1 mm above the rim: the cavity sticks out, so the top of the vase will be fully open.
Step 36 / 51
New sketch
SKETCH tab ①, then the XY square ②.
Step 37 / 51
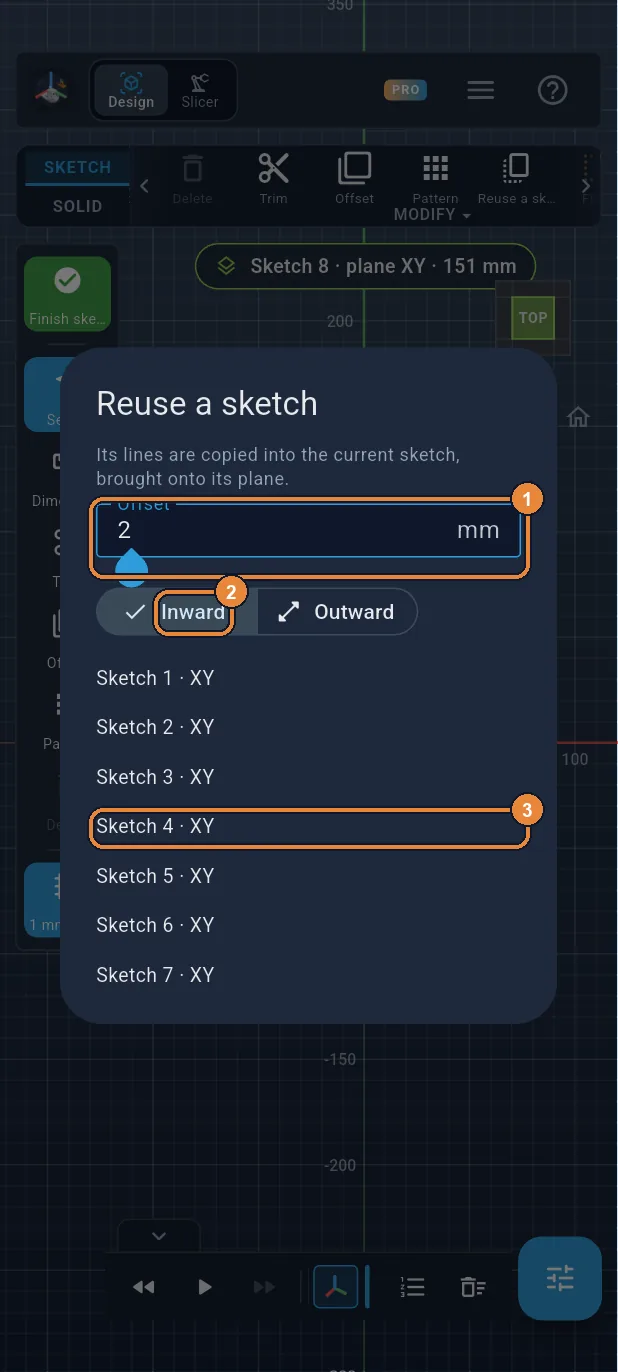
Reuse Sketch 4
Tap Reuse a sketch in the ribbon. Type 2 ①, leave Inward ② and tap Sketch 4 ③.
Step 38 / 51
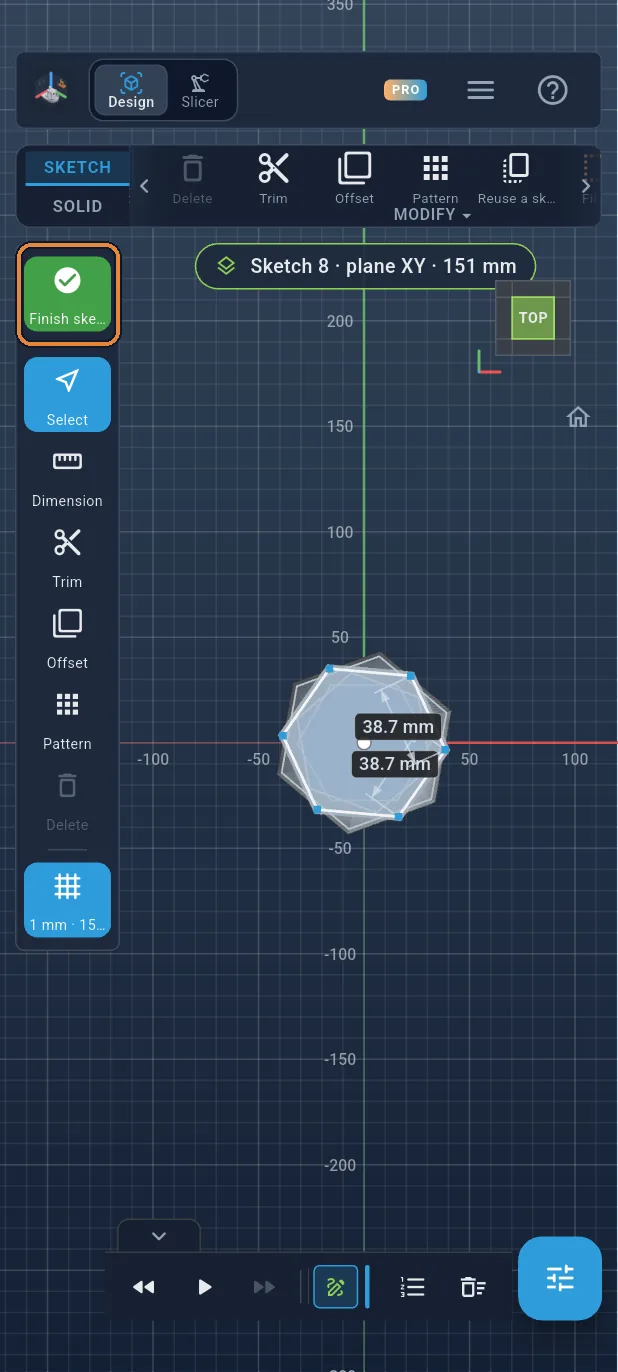
Finish the sketch
Tap the green ✓.
Step 39 / 51
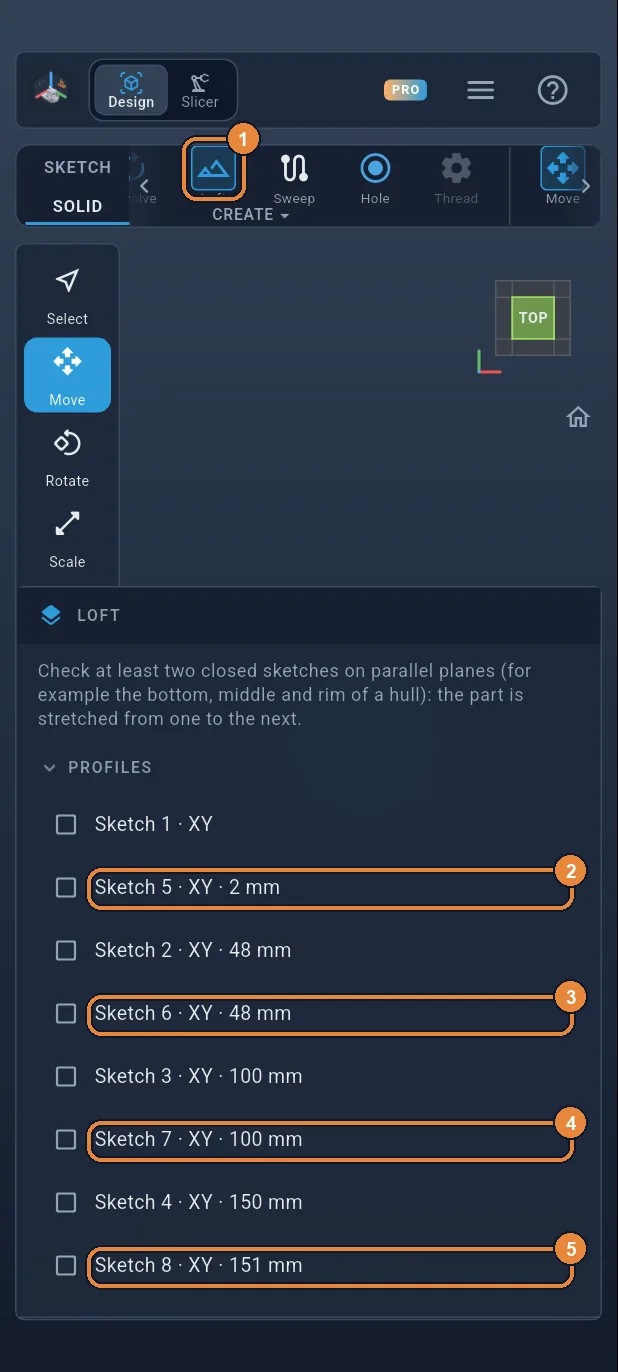
Loft the cavity
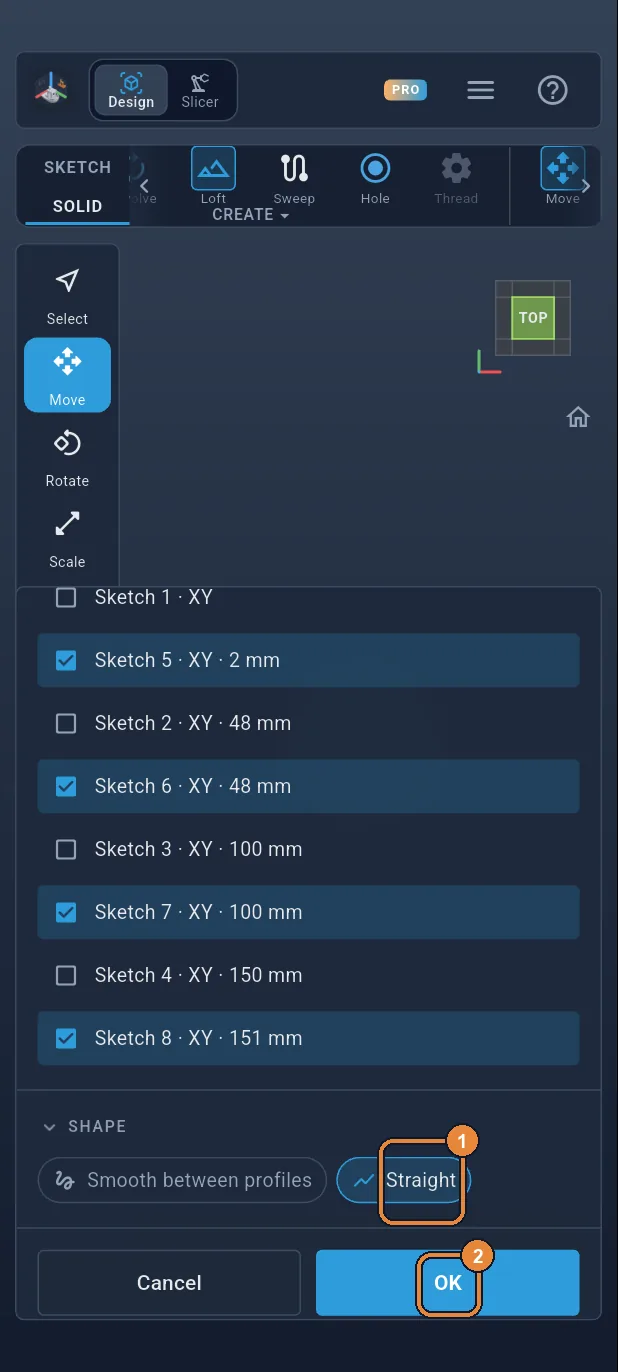
Tap Loft ①, then tick the four new sketches ②③④⑤. The vase's sketches are listed further down, already used.
Step 40 / 51
Straight, then OK
Straight ① as for the outside, then OK ②. The cavity is a second body, sitting inside the vase; it barely sticks out at the top.
Step 41 / 51
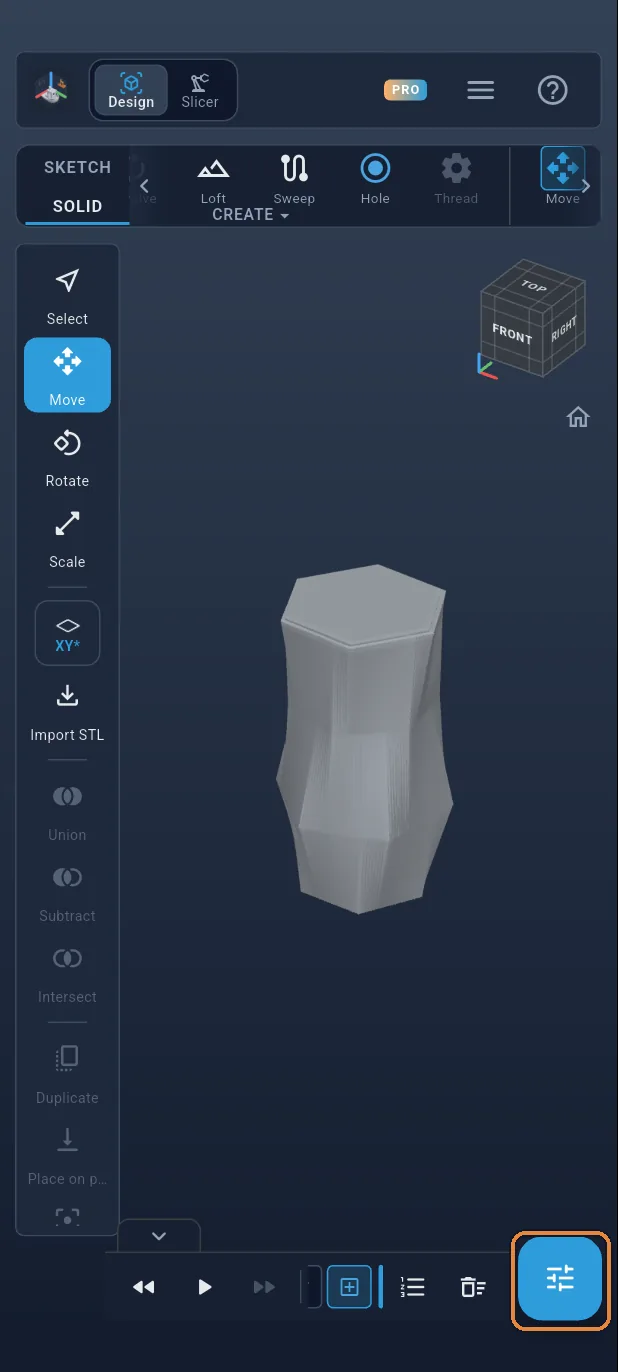
The list of bodies
Tap the panels button at the bottom right. The sheet shows the two bodies: Loft 1, the vase, and Loft 2, the cavity.
Step 42 / 51
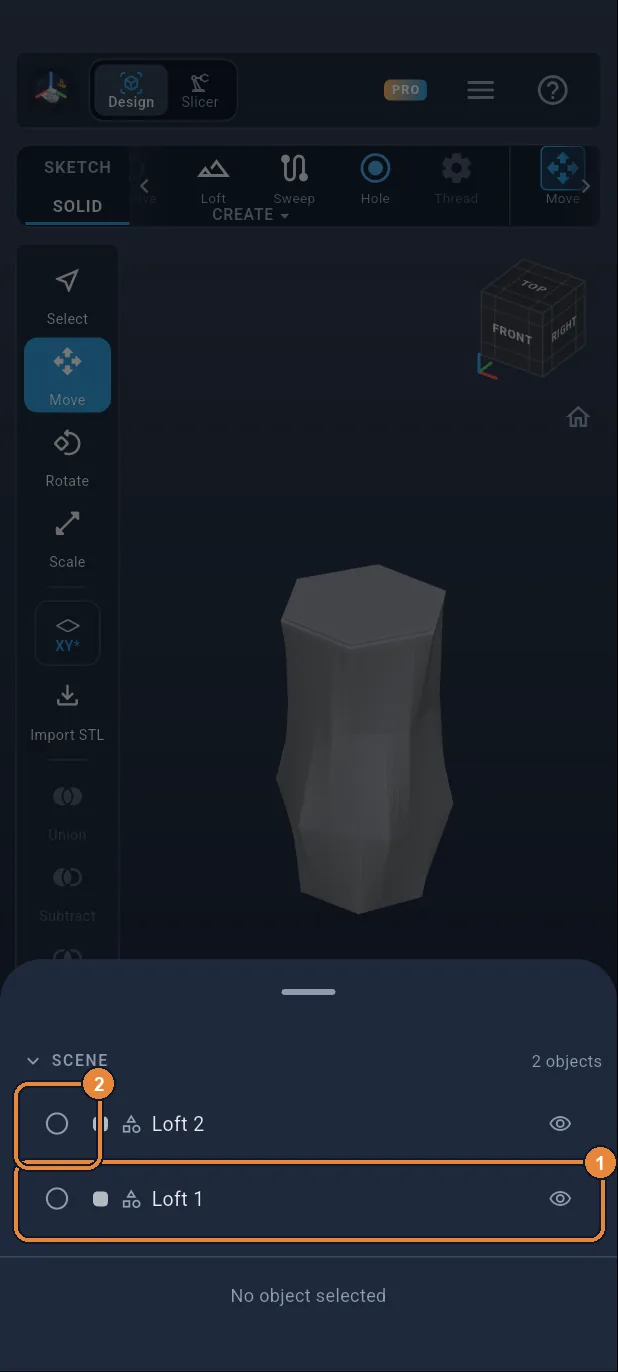
The vase, then the cavity
Tap Loft 1 ① to select it. Then tap the small circle in front of Loft 2 ②: it is added to the selection. The order matters: the first one is the one being cut.
Step 43 / 51
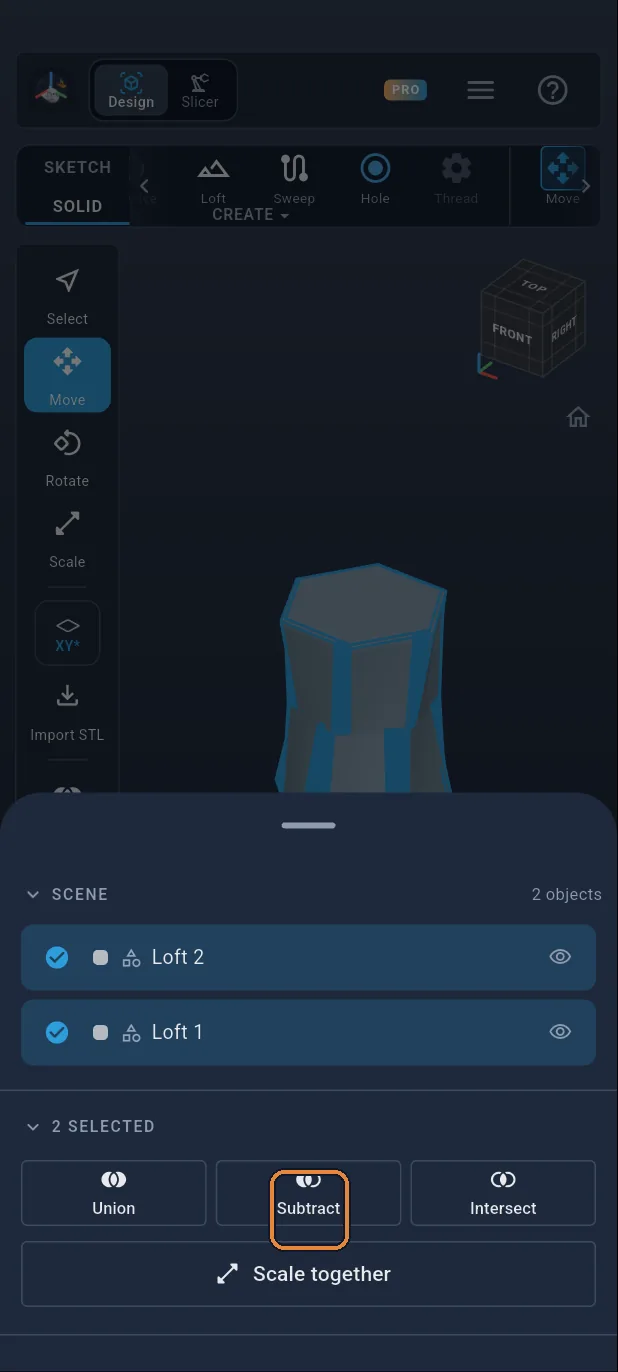
Subtract
Tap Subtract. The cavity is removed from the vase: what remains is a 2 mm wall, a 2 mm bottom, and an open top. Swipe the sheet down to close it.
Step 44 / 51
Switch to Slicer
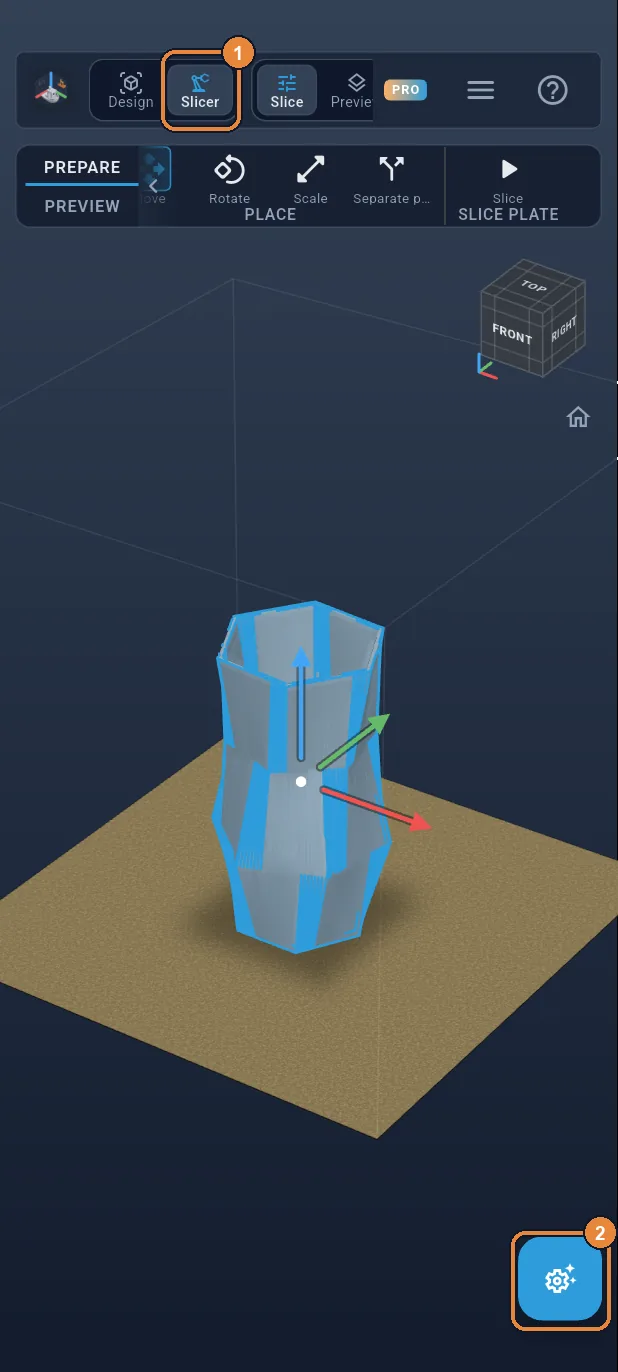
The vase is finished. Tap Slicer at the top ① to move on to slicing, then the panels button ②.
Step 45 / 51
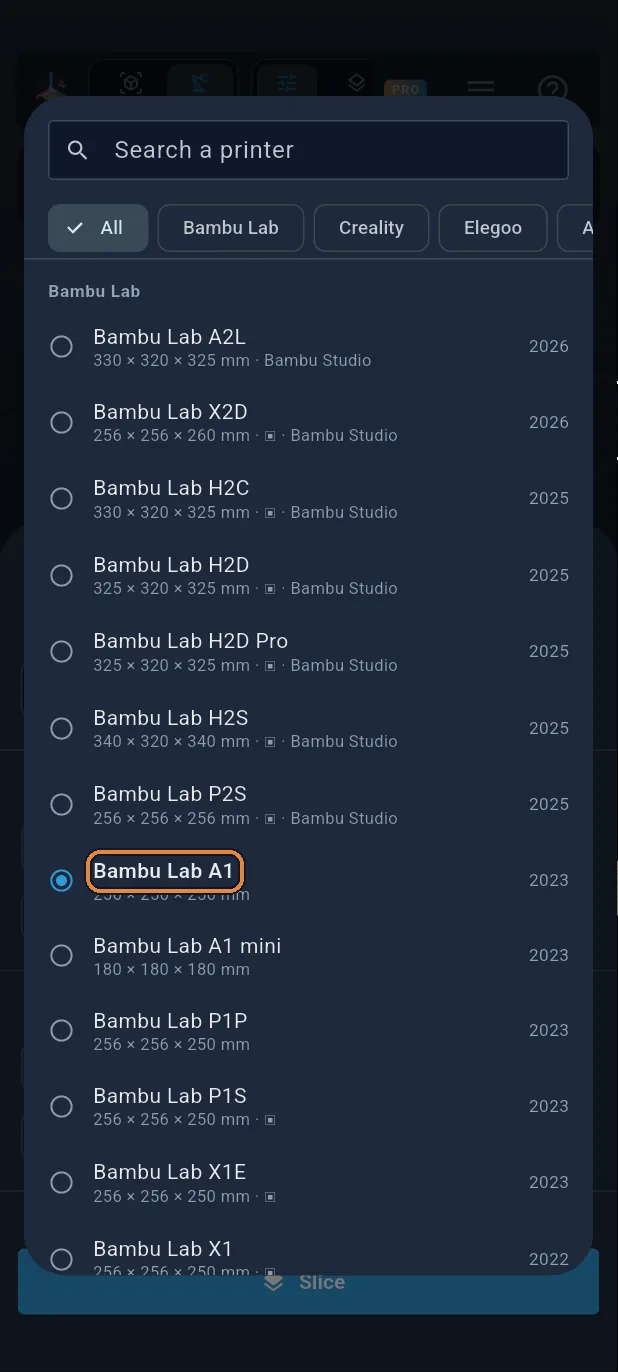
Choose your printer
Tap the printer at the top of the sheet: the app starts with a Bambu Lab A1, already ticked in the list. If yours is different, tap it. The vase is 15 cm tall, it fits on most build plates.
Step 46 / 51
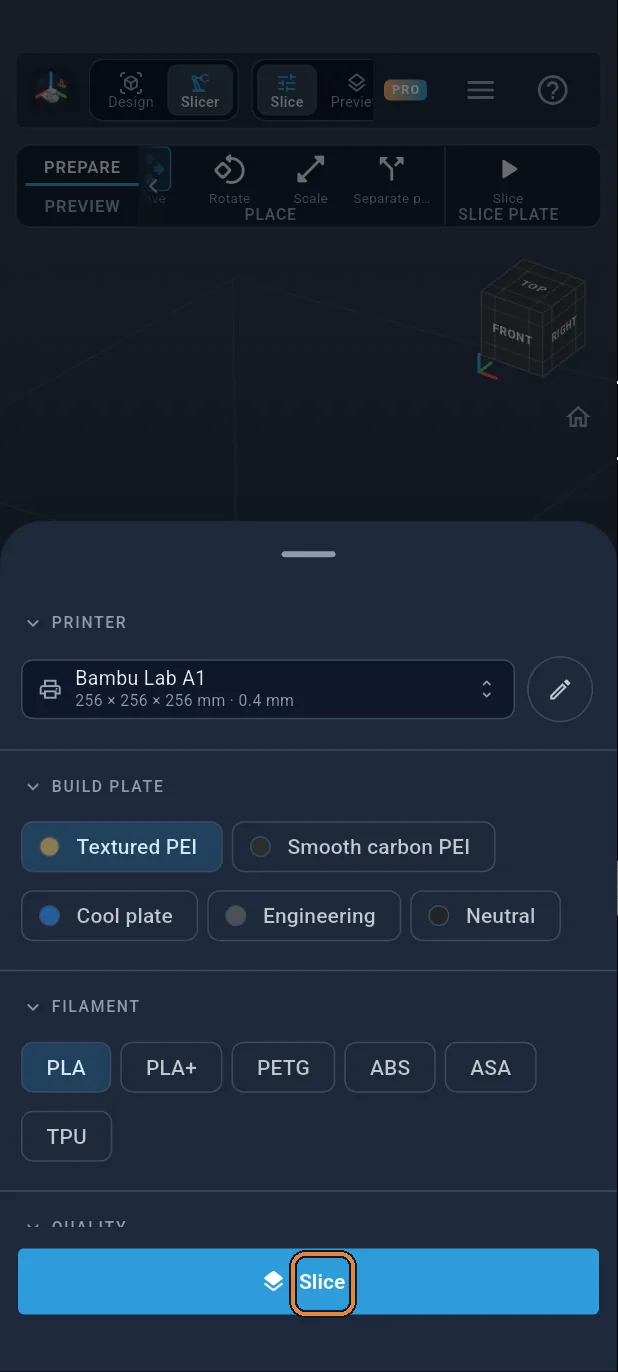
Slice
Tap the big Slice button at the bottom of the sheet: the vase is cut into 750 layers of 0.2 mm, then the preview appears. There is no overhang that is too steep: no supports needed.
Step 47 / 51
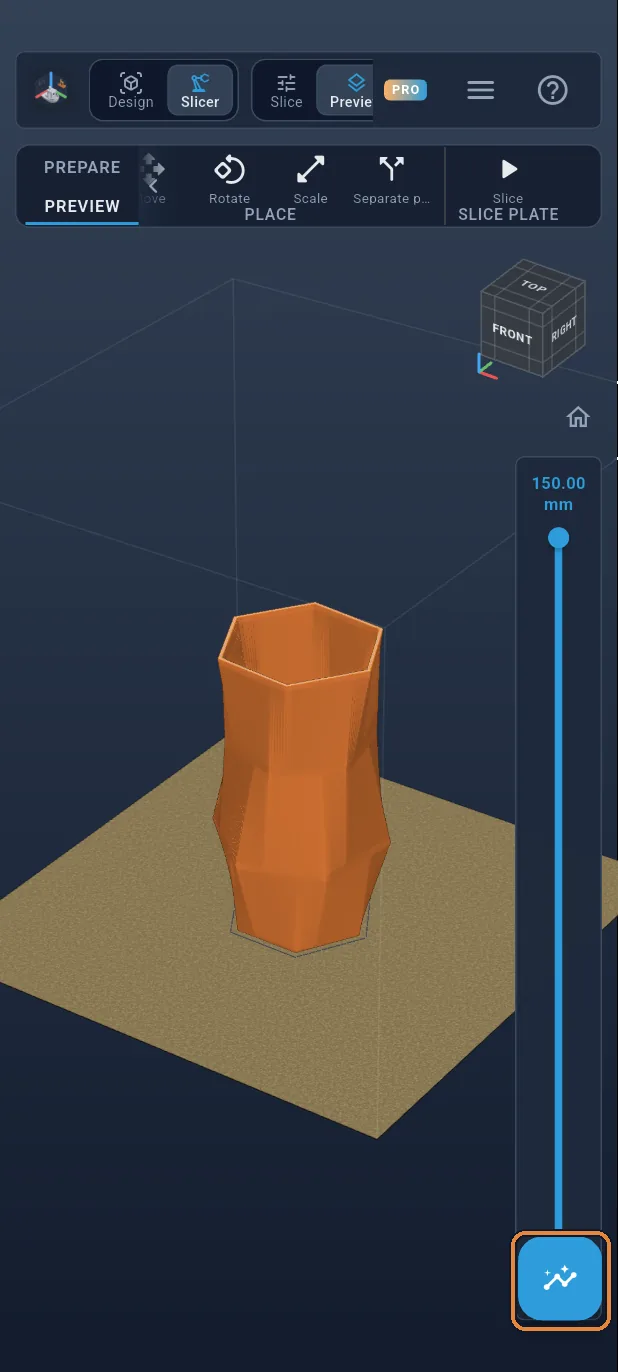
The layer preview
Drag the slider on the right to watch the wall rise as it turns. Then tap the panels button.
Step 48 / 51
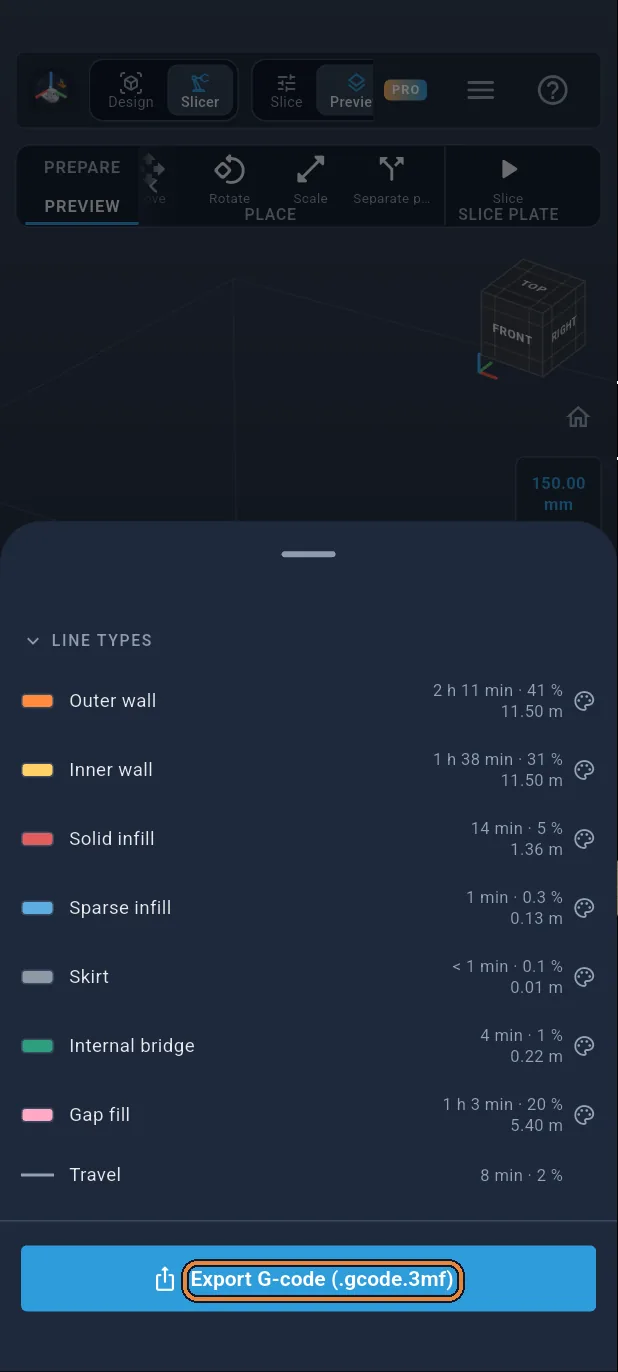
Export the G-code
The sheet gives the print time, the weight and the filament length. Tap Export G-code (.gcode.3mf for a Bambu Lab).
Step 49 / 51
Free export
Without a subscription, three exports are free: tap Use a free export.

Step 50 / 51
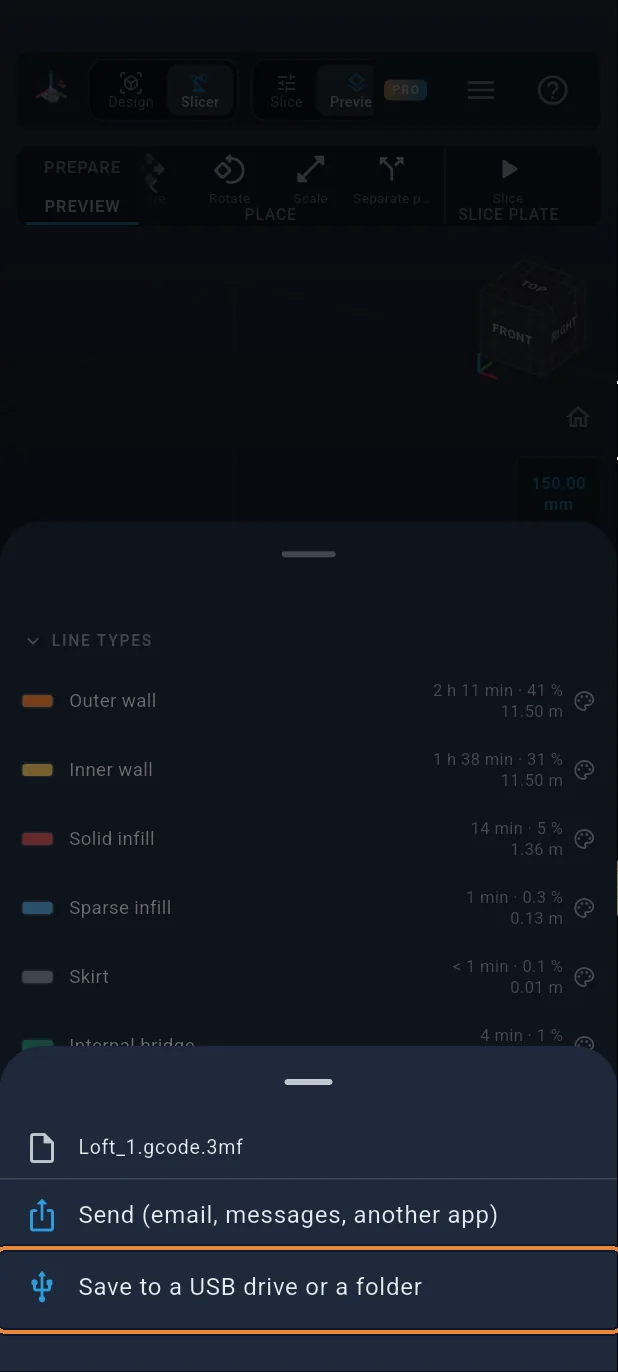
Save the file
Tap “Save to a USB drive or a folder” and choose where to keep it, or Send to pass it to another app. All that's left is to start the print.
Step 51 / 51
Well done!
Your vase is ready to print: about 5 h 20 min and 90 g of PLA on a Bambu Lab A1. It is sliced normally, with its real 2 mm wall and its solid bottom, without supports: the slicer's vase mode, in a spiral, would only make a single-line wall. For dried flowers, it is perfect as it is; for water, check first that it is watertight.